>
Showing posts with label Distress Stickles. Show all posts

Tuesday, March 19, 2019

Cracked people ....


Made a set of three ATC's in a theme of 'People' for a swap over on UK Stampers Forum ....

Idecided to do a distressed look & made the bases from re-cycled packaging and used Distress Inks, Distress Oxide Ink along with stamps and bronze metal embellishments.

The main images are old stickers and where the frames are applied with brads I have used Crackle Accents to produce a cracked glass effect.  They are finished with Distress Stickles.

If you would like to join in the swap click HERE to join the Forum.... it's free, friendly & fun !!

Sid xx

Pin It

Friday, July 14, 2017

Some ATC's ....


Here are a set of three 'Anything Goes' ATC's made for a monthly Swap over on the UK Stampers Forum Facebook Group.

I used various techniques including layering (on the Black Cat ATC)  and bleaching (on the Clowns ATC).

If you fancy joining in on the Swap click HERE to join the Forum and to join in !

Sid xx

Pin It

Thursday, August 06, 2015

Framed Postcard


This is a postcard that have made for the UK Stampers monthly swap for August.  The theme is to use a frame on your postcard. I started with a piece of white card 6 x 4 inches which I coloured with Distress Inks applied direct to the card. I used faded jeans and victorian velvet which I dried with a heat gun.  The base was stamped around the edges with a swirl stamp and Memento black ink.

I then stamped a face stamp from Crafty Individuals in Versamark ink and heat embossed this with a Moonglow embossing powder which is metallic (doesn't show very well on the photo).  I used Distress Stickles in victorian velvet to infill the un-embossed facial details and edged this with a silver Posca Marker.


The frame was cut from mountboard using a movers and shapers Die from Sizzix and this was painted with metallic acrylic paint in turquoise.  This was stuck over the embossed face image firmly with Glossy accents.  I applied some black Stazon on the same swirl stamp to embellish the corners of the frame.


Finishing touches were to add the printed words and edge with white Posca marker.  The whole thing was then sprayed with acrylic sealer as it will end up in the post naked !

Sid xx

Pin It

Sunday, March 01, 2015

Luck is good .......


Another Card Candi card.  This time for Good Luck.  I have used a Tim Holtz spots stamp with brown chalk ink and infilled with a pink Posca pen.


The card is a 5 x 5 inch white blank and I have matted onto pink card before applying to the blank. Edges were enhanced with brown Versamagic chalk ink,


Some distress Stickles have been added to the flowers and the label (Papertrey Ink) is stamped in sepia Archival Ink on a scrap of card, edged with more of the same ink and applied on foam pads.

Sid xx

Pin It

Thursday, October 30, 2014

Eeeky Spooky !


Another card made to celebrate Halloween !  I have collaged the elements which have been cut from 12 x 12 inch papers.


I have used a 6 x 6 inch white card blank as the base.  The 'Halloween' word is put together with self adhesive stickers.


Some orange faux gems and Distress Stickles in black soot with some corners added with a fine Micron Pen finish the card.

Hope everyone has an Eeeky Spooky night on 31st October !

Sid xx

Pin It

Sunday, August 03, 2014

Someone Special !


A very pink card today !!  Wind is blowing hard outside as I finish this.  The peppermint green card base is 6 x 6 inches and has been matted with some pretty pearlescent print paper.

The chipboard frame was cut using a frames mover and shaper die from TH Sizzix.  This was heat embossed using a Versamark inkpad and a couple of coats of Blond Moments spring tropic lustre embossing powder (this has a fab pearlescent gold overtone, not easy to photograph!).  I have then stamped into it whilst molten with a rubber stamp coated with more Versamark to act as a release.  This has added some texture too !


The frame was stuck in place as shown and the paper flowers in shades of pink towards maroon added at each of two opposite sides of the frame.  The centres have been highlighted with dark brown dimensional pearls.

The dotty embellishments were made on a craft sheet by squeezing dots of Glossy Accents which were then loaded with TuTu Beadazzles and allowed to dry.  Once dry they were peeled off the craft sheet and applied as shown.  I thought they looked very much like the coated jelly's in Liquorice Allsorts !


The pink paper ribbon on the left was embellished with dots of worn lipstick Distress Stickles and stuck in place.


The sentiment was stamped on pink card in Archival sepia ink and edged with the same ink before trimming out and mounting in place with foam pads.  The maroon ribbon bow was added on a foam pad to finish.

Sid xx

Pin It

Friday, September 13, 2013

No.17 Technology


This weeks entry into my Photo Book is entitled 'Technology'.  I am a bit of a fanatic for fresh coffee and this pic of a bit of kit is my little indulgence where traditional methodology is enhanced with lots of hi-tech gadgetry.  I love it and it makes superb coffee.


Whilst it grinds the beans and brews it can be programmed to any degree to give you exactly what type of coffee you desire.


I have used stamping, printed papers, Washi tape, punching, stickers and Distress Stickles on this page.

If you would like to join in click HERE and HERE for more info.

Sid xx

Pin It

Saturday, March 09, 2013

Friends for Life


Another card for you today and it is again on a Kraft card base.  The 6 inch papers used this time are from the Mellow collection by Basic Grey.  I started by cutting a base mat and applied this to the card with double sided adhesive. Next I diecut a tag through the Big Shot and cut a strip of matching paper the same width as the base mat.  This strip was then matted again on some maroon paper.  This mat was then decorated with faux stitches applied with a black marker and embellished with a Kraft tab and a paper flower, some crushed olive Distress Stickles and a self adhesive word sticker.  The decorated strip was then applied at the base of the card.

The tag  was edged with fired brick Distress Ink and again edged with faux stitches before adding a small double bow of plain jute string through a hole made in the tag with a pokey tool.  This was then applied as shown.


The main stamp used is by Lost Coast Designs and was stamped on white card with Memento tuxedo black ink.  The little guys were coloured with Copic Markers before trimming out.  The image was then mounted on foam pads and stuck in place.


Finishing touch was to colour a piece of twiggy chipboard with the maroon paper, trim off excess with a craft knife, add some dots of crushed olive Distress Stickles.


Sid xx


Pin It

Monday, March 04, 2013

Smile Please


With the enigmatic smile of the Mona Lisa in my mind and a wonderful weekend spent with my crafting friends in Yorkshire I created this card.


A plain Kraft card was used as a base. The flowers were white Prima which I sprayed with yellow and green Dylusions colour sprays.  They were centred with shabby shutters Distress Sticles and stuck in place with glue dots.


The stamped image (Lost Coast Designs) was stamped with Memento black ink and coloured with pale lemon Copic Marker before trimming out.  This was applied on foam pads to raise it.

All papers used were from a 6 x 6 pad by Prima (Alla-Prima).

The image was layered onto a background paper (sewn around the edges) and applied over two mats cut with the Big Shot using a Spellbinders Nestabilities Labels 2 Die.


The sentiment was a self adhesive sticker matted onto pale green card and again applied on foam pads.

Sid xx

Pin It

Friday, July 15, 2011

'Live' Box


Here is a box have I crafted using All Tim Holtz products and I think it fits the bill for this weeks Simon Says Stamp and Show Challenge which requires us to 'Show some Stitching - Faux or otherwise' & The Stamp Man Challenge 'Anything by T!m'. 

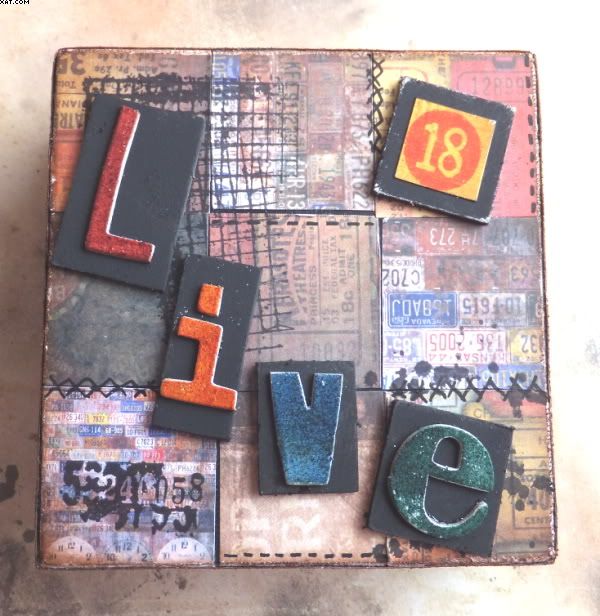
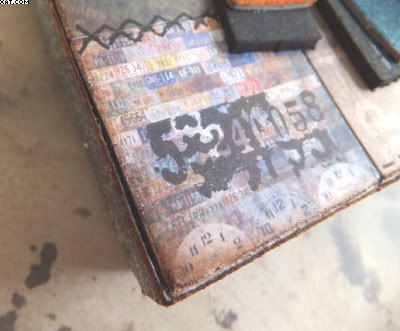
The stitching on my box is definately faux and I have made a sort of patchwork effect with 'Lost & Found' papers on the top.

I cut out roughly 9 squares of paper and after distressing the edges stuck them on the top of a 4 inch square box blank which was painted black with Adirondack acrylic paint dabber in pitch black. I used Matte Medium as an adhesive. When dry I distressed the edges with sandpaper.


The sides of the top of the box were covered with die-cuts using the TH 'on the edge' mini scallop and pinking die from more lost and found paper. These were stuck in place on all sides with matte medium and again distressed. All the distressed edges were coloured with aged mahogony Distress ink and foam. The sides were then treated with clear rock candy Distress Stickles and rubbed over with a finger.


I then used stamps from the TH 'Bitty Grunge' plate to add some images onto the top in archival black ink and some faux stitches were added on some edges of the patchwork squares with a black Posca pen.


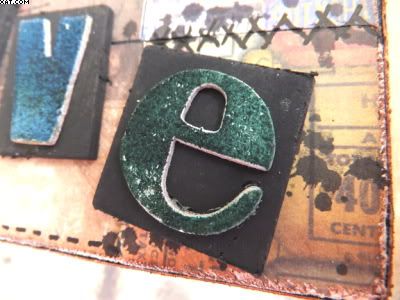
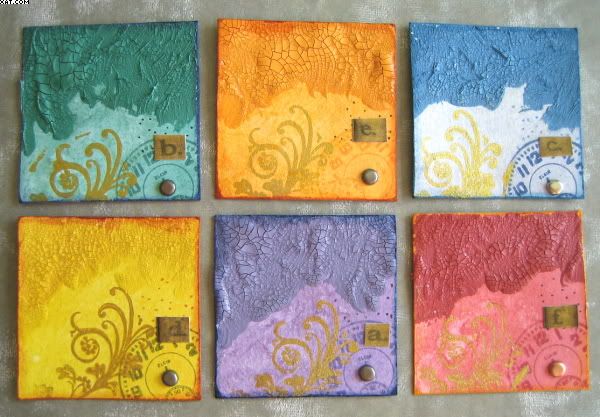
All the embellishmnets were made from Grungeboard shapes and letters coloured with aged mahogony, dried marigold, faded denim and pine needles Distress inks on bases coloured with more black dabber.  The number 18 is a lost and found salvage sticker.  All were adhered with Glossy accents.


I was tempted to add more but I think that was enough.  This box would make great storage for cufflinks !

Sid xx

Pin It

Sunday, April 10, 2011

Distressed Twinchies


One of the members on UK Stampers Forum has revived the Twinchie swap after a period of dormancy.  This swap has the theme of 'Distressed' and need us each to make 6 Twinchies.


I made 6 twinchies from thick card cut to 2 x 2 inches.  The theme is the same for each of them.  I first gave the surface a coat of Distress Ink applied with foam.  I used pine needles, spiced marmalade, weathered wood, mustard seed, dusty concord and fired brick.

Next a thick coat of the corresponding Distress Crackle paint wa added and allowed to dry completely.  A clock face and a swirl stamp from Crafty Individuals was then inked in the corresponding Distress ink and gold Stazon and stamped as shown. A splodge of Rock Candy Stickles was added and rubbed over with a finger to spread.


The edges of each inchie were then distressed with sandpaper and inked in a corresponding colour.  Finishing touch was to add a metallic brad in the middle of each watch face and a cut down TH letter sticker.

Sid xx

Pin It

Saturday, December 25, 2010

Timmy's Tag Day 11


Here we go again with Tag No. 11 ....... Yipeee!!! just one more to go.  Once more really heavily improvised, only the Distress inks were Rangers !!

The background was made from white card covered in Yellow Pages paper heat embossed with detail clear embossing powder, a snowflake stamp and Versamark ink.  It was coloured with faded denim, cracked glass and stormy sky Distress inks and edged  (after distressing) with blue iris chalk ink.  I had no tree die so stamped with a PaperArtsy swirly tree and Versamark,  heat embossing with dark green embossing powder with some of the branches topped with frosted lace Stickles..  The other tree was another PaperArtsy stamp inked in black Archival ink on green textured card.  I have treated the spots with more of the dark green EP, added a little silver pen at the top and applied frosted lace Stickles (ohhh that makes 3 Ranger products now!).  The trunk was wrapped round with some blue fine metallic thread and tied off before mounting on foam pads as shown. 


The top of the tree was finished with a gold star brad poked through with a pokey tool.


The brass nameplate was added with brads after cutting a little oval of white card to fit the aperture and colouring with antique linen DI.  The words were also coloured with the same ink and stuck in place with Glossy Accents (4 Ranger items !).


Finishing touches were to add a gold eyelet with the crop-a-dile and thread through with some gold ribbon adorned with a gold charm.

Sid xx

Pin It

Wednesday, December 22, 2010

Timmy's Tag Day 8


Once more a belated Tim's Tag....this time it's No.8.  Again I have improvised heavily.  The only real TH stuff is the Distress inks and the houses Sizzix ' On The Edge' Die along with rock candy Stickles and Tissue tape.

The sleigh and reindeer are made from stencils applied over a blank white tag with masking tape to obscure everything but the images.  Rubbed over with fired brick Distress Ink and then stamped with a snowflake stamp in black Archical ink.  The stencils were then removed and some masks made from these images.  With the masks in place I used  stormy sky DI and overstamped with a flourish stamp (?) in black Arcihval ink.  Once the masks were removed the effect was quite similar to that of Tims.


The houses were diecut from grungeboard, coloured with turquoise acrylic paint and grunged with coarse sandpaper before applying smoke made from florists wire and rock candy Stickles before sticking down with Glossy accents.


The clockface was made from an original clear watchglass stuck over a cutout of a clockface with glossy accents.  The finger was again a real finger stuck on with glossy accents.  A metal corner embellishment was added as shown.


Finishing touches were to add the words on a piece of tissue tape and to add an eyelet with the crop-a-dile, threaded through with ribbons and an old bit of a beaded necklace.

Sid xx

Pin It

Monday, December 20, 2010

Timmy's Tag Day 7


Next one in the series of Tim Holtz Tags............this one is Day 7 and I am determined to finish the series before Christmas Day.  The background tag was made from white card first coloured with wild honey Distress Ink and a blending tool.  I didn't have the woodgrain embossing folder so I used a cuttlebug folder that  I did have and coloured the folder with walnut stain DI before embossing.  The tag was then edged with vintage photo DI after roughing up with course sandpaper.


The poinsettia came next and I did use the two Sizzix dies to produce the petals and leaves but this time I used linen cardstock instead of grungepaper, once coloured and cut out I assembled all of the petals on 3 large sticky dots finishing off with a large pale green plastic gem.


The letters were actually white flock self adhesive ones that I first coloured with fired brick DI and heat dried before sticking onto the tag.  The flourish was cut from Grungeboard and coloured with white brilliant white emulsion paint before colouring the edges with vintage photo DI.  This was cut in two and applied with Glossy Accents as shown.


Finishing touches were to apply a gold eyelet with the crop-a-dile and add a short length of silk ribbon, threaded through and tied around with some green wire.  I cut the 25 from some of Tims printed paper, coloured the edge stuck in place and added a half pearl .  That's it !!

Sid xx

Pin It

Tuesday, November 23, 2010

Starry Hanger


Here's another one of my Xmas items.  The wood star was kindly provided by Tinkertaylor (Jan) after she asked her hubby to do 50 for her !!!  Now that's true dedication !

I started by selecting a ruler background paper from the Tim Holtz 'Lost and Found' 12 inch paper stash and I glued this to the smooth wooden face of the star with PVA glue.  I then closely trimmed around the star with a craft knife.  I then cut a hole with a crop-a-dile middle of the top point of the star.  The whole star was edged with red chalk ink.


The jingle bells were cut from the reverse of the same paper with a Martha Stewart punch and the three resulting bells were edged with red chalk ink and arranged onto a piece of florists wire threaded through the hole and twisted carefully round a pencil .


I then selected a number 25 from another page of the paper, trimmed it out and matted it onto a piece of slightly larger cream card.  This was edged with ochre chalk ink and after applying a little red Stickles glitter glue around the square was stuck in place as shown.  The noel was from PaperArtsy and was stamped in black archival ink onto another piece of white card, trimmed and again edged in the chalk ink.  This was mounted onto foam pads and applied as shown to add more dimension.

Final embellishment was a piece of folded and trimmed red grosgrain ribbon applied on double sided tape.

Sid xx

Pin It

Thursday, September 09, 2010

'The Journey' ATC


This ATC uses an acrylic paint resist as a background and the stamped seedheads are releasing their little seeds into the wind on a journey to their destination.  That sounds awfully philosophical I know but I thought it was a good representation in this case.

The background ATC was cut from grey backing board from a pack of stamps.  This was then painted with a metallic granite acrylic paint from Inscribe.  Once dry the painted surface was stamped with Versamark ink with a numbers background stamp from PaperArtsy.  The stamped image was heat embossed with detail clear embossing powder using a heat tool.

A coat of  peaches 'n cream DecoArt acrylic paint was then applied over this and allowed to dry until tacky.  The peach paint was then roughly removed with a paper towel moistened with water to remove some of the paint revealing the background colour showing through the embossed image. Once a pleasing effect had been obtained this was allowed to dry thoroughly. 


The distressing is textured and raised and looks really good as hopefully captured in the pic above.

Next step was to stamp a couple of seedhead images from 'My Minds Eye' with the acrylic stamp in Coffee bean & pearlescent ivy Brilliance ink as shown.  These were dried with the heat gun as this ink is a pigment ink that dries rapidly on absorbent surfaces.  A blob of rock candy Distress Stickles was added to the bottom left of the card and spread with my finger before drying with the heat gun.  You can just see the sparkle on the close-up.

Two brass snaps were added using the crop-a-dile and a Chinese motto was inked with Impress tangerine ink, trimmed and stuck in place.  The ATC was finally edged in orange chalk ink.

Sid xx

Pin It
Related Posts Plugin for WordPress, Blogger...