>

Sunday, December 25, 2016

Happy Christmas 2016 !!


Well the big day is here !  Christmas Day 2016 ! 

Here's wishing you and yours a very Wonderful, Happy and Peaceful Christmas.  Just like to thank all those who have followed my blog and also commented .......... I really do appreciate you taking time to do it.

Most of all .......... ENJOY !!!

Sid xx

Pin It

Thursday, December 15, 2016

Star of Hope Card


Another Christmas card using mats, stamps and Washi tape along with a diecut.  I started with a 5 x 7 inch white card blank and then cut a slightly smaller matt in white textured card and I rounded the corners with a corner chomper.

Onto this I stamped some distressed spots in red Memento dye ink and the sentiment in the same green ink.  This was matted on foam pads on the card front.


Another matt in more white card was then cut and again I rounded the corners.  I chose 5 different Washi tapes in Christmas colours and applied these in stripes over the matt.  I then diecut a snowflake in silver Mirri card and embellished the points with some green self adhesive cabochons.

I wrapped some bakers twine around the top of the matt and tied in a knot, securing at the back with some more tape.  The matt was attached to the card on more foam pads and the snowflake added on a couple more to finish.

Sid xx

Pin It

Sunday, December 11, 2016

Silver Wreath .......


This card is a variation on a theme using a different colourway.  I started with a 5.5 x 5.5 inch white card blank and matted this with some crimson cardstock and then matted again with some crimson diagonal stripe paper.

The wreath stamp was inked with Versamark ink and heat embossed with silver embossing tinsel before trimming out with a craft knife.  The berries were highlighted with dimensional pearls.  The wreath was then applied as shown on foam pads.


The noel was diecut from black cardstock and placed as shown to finish.  Very simple !

Sid xx

Pin It

Wednesday, December 07, 2016

Winter Firs .........


A Christmas card in different colours again.  I chose a 5 x 5 inch white card blank as the base and matted this with a piece of blue and pink spotty paper (edged with black ink).


The fir trees (Time Holtz) were diecut from white card and applied with one flat and one raised on foam pads.  These were embellished with Stickles glitter glue.

I then diecut the deer from Kraft cardstock and used another die cut down to embellish his neck with some silver glitter card before mounting on foam pads. He was then applied over the trees as shown supporting the head end with more foam pads.


The sentiment (Papertrey Ink) was stamped in Versafine black ink on white card, trimmed out and again mounted on foam pads to finish. I just love those trees !!

Sid xx

Pin It

Sunday, December 04, 2016

UK Stampers Forum - Re-invented !


Hi There.  I recently posted that the old Bulletin Board called 'UK Stampers Forum' has been discontinued.  I have, just today, started a Closed Facebook Group with the same name.

If you were a member previously please join the group so that we may continue and if you would like to join as a new member please also join.

Click HERE to go to the Group.  Looking forward to a good response so that we may continue the good work !

Sid xx

Pin It

Deck The Halls .......


I do like different colours on Christmas cards !

This card has a white square 5.5 x 5.5 inch card base and I have matted some greyish coloured paper onto this.  I then made another mat with some more printed paper with some words this time and applied this to a piece of silver mirri card.  This was then applied as shown on foam pads.


I then diecut a deer in sparkly glitter card (does not show up very well in the photo).


I gave him a necklace of red twine before applying him over the mat to finish.  Not much colour but I think it looks good !

Sid xx

Pin It

Friday, December 02, 2016

Let It Snow ......


Who said pink wasn't Christmassy?  This card uses slightly less traditional colours for a change.  I started with a 6.6 inch white card blank and matted over this with Pink textured card and a slightly smaller pink & black spotty paper.


I then applied a stripey paper in matching colours as shown.  The wreath was stamped on white card with Versamark ink and heat embossed with glossy black embossing powder.  This was then trimmed out with a craft knife and the berries on the wreath coloured with a pink Posca marker before mounting on foam pads.


Final touch was to diecut the words 'Let It Snow' in black card and stick in place.

Sid xx

Pin It

Wednesday, November 30, 2016

Deer, Deer !!


Another simple Christmas card as I ramp up the crafting process.  This year I am determined to make all my own cards ....... a feat never accomplished in other years.

I started with a 5.5 x 5.5 inch white card blank and applied a strip of Washi tape as shown (mainly to 'ground' the deer).

I next chose an old PaperArtsy greetings stamp and stamped this on a scrap of white card in Versafine black ink.  This was trimmed out and edged in more black ink and applied on foam pads.


The deer was then diecut from Kraft card and stuck in place as shown.


I then edged the card with a hand drawn squiggly frame with a black Micron pen and applied some self adhesive crystals to finish.

Sid xx

Pin It

Monday, November 28, 2016

We Three Trees !


Another recent and simple Christmas card I have made.  I started with a 5.5 x 5.5 inch white card blank and matted a smaller piece of Kraft card onto this.

I used a scrapbook frame with the word Noel and applied this as shown.


The Trees (Paper Artsy) were stamped out on Lawn Fawn plaid papers in black Memento ink and trimmed out before applying on foam pads as shown.


There you have it !

Sid xx

Pin It

Tuesday, November 15, 2016

Noel Card


Christmas is coming so time to start making Christmas cards I guess !  This one features traditional reds and greens.

The base card is a white 6 x 6 inch card blank and I have used printed papers which have been trimmed and matted onto the card base.


The 'Noel' is diecut from plain green card and has been treated with Glossy Accents to add a shine and accentuate the colour.


The wreath was stamped in Versamark ink and heat embossed with red glitter embossing tinsel from Ranger.  I have coloured the berries in the wreath with champagne liquid pearls and trimmed out the wreath with a craft knife before adhering on foam pads.

Sid xx

Pin It

Friday, October 28, 2016

UK STAMPERS FORUM - Site suspended


Today you may have noticed that the UK Stampers Forum site has been suspended !!!!!

I have no idea what has happened as Kym Boulton (Galaxy Girl) technically still owns the site.  I have been in negotiation since April 2016 with her to take over owning the Forum but for some reason she will not contact me to arrange for me to take over.

I also notice that she has deleted her Facebook account  (as of yesterday) and I have no way of contacting her until she contacts me so:

Kym,  PLEASE CONTACT ME VIA THE EMAIL LINK ON THIS BLOG with your mobile or landline number so we can sort out what is happening as I feel we are letting down our existing members. I am more than happy to take over.

Pin It

Thursday, August 04, 2016

Touchy Feely ...........


This card has been made as an entry into this fortnights recipe challenge for weeks 286 & 287 over on the Less is More Challenge blog whose theme is 'Use Something Tactile'

I decided to look at what I had in my stash and found a collection of pots of micro Deco Beads in various colours and I thought if I used these as an infill on a solid stamped image it would provide a touchy-feely texture to the finished image.


I took a 4 x 4 inch white card blank and stamped directly in Versafine black ink with a styalised flower stamp from Anitas that I have had for years.  It's a solid image of a flower with foliage which I thought was ideal.


I then used Glossy Accents as an adhesive and coloured the petals with magenta beads, the leaves with green beads and the flower centre with gold beads. I left a border showing in black to set off the infill with the beads.  Once dry these provided a raised textural finish to the flower.

The sentiment (PaperArtsy) was stamped in black Versafine ink to finish.

Sid xx

Pin It

Low Calorie Diet?


The challenge this week over on the City Crafter Challenge Blog for week 323 is 'I Gained A Stone' so I made this rather sweet card as my entry.

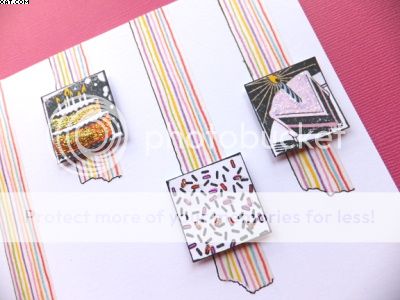
I started with a 6 x 6 inch white card base.  On another piece of white card I stamped four 'inchie' stamps from Inkadinkado in black Memento dye ink and then punched these out with a 1 inch square punch.  Thought that these stamps fitted the bill for the subject perfectly.


These were then coloured with Marvey alcohol brush pens, edged in black and decorated with diamond Stickles for a bit of bling.


I then cut lengths of rainbow striped Washi Tape, torn at one end and applied directly to the card base and edged the left and bottom sides with fine black Micron pen to add relief.


I then applied the decorated inchies on foam pads over the Washi Tape as shown.  The sentiment is from Stamping Bella and I stamped direct onto the card in Versafine black ink to finish.

Think if you have a sweet tooth these little tempting treats could soon add on the weight although the subject centres on baking really and who doesn't like to spoil themselves with a little treat from time to time ?

Enjoy !!!!

Sid xx

Pin It

Wednesday, August 03, 2016

Leafy Celebration


I made this card using mainly Uniko stamps and clear embossing powder.  Bold colours but subtle embossing to allow the original colours to show through and acting as a resist to more colour layers added after the embossing.

I started with a 4 x 4 inch white card blank and cut a matt slightly smaller out of more white card.  I then set about colouring this with Adirondack and Distress inks in greens and blues applied on cut'n'dry foam.  I then randomly stamped the rough spots (Finnabair) in emerald ink.


I then stamped in the leaf stamps in Versamark ink and heat embossed with detail clear embossing powder to act as a resist.


More of the same colours were added to produce a much darker layer and the excess wiped off with a dry paper towel to reveal the lighter lower layer.

The Celebrate Today sentiment was stamped in black Versafine ink on more white card, trimmed out, edged with blue distress ink and applied on foam pads as shown. Three green pearl cabochons were added to finish.

A bit moody but bold at the same time.

Sid xx

Pin It

Wednesday, July 20, 2016

Flowery Postcard


I made a postcard for a monthly swap over on UK Stampers Forum.  The theme for this month was 'Green and Peach'.

I started with a 6 x 4 inch white card base and covered this with two pieces of printed paper featuring daisies and lily's.  One was fussy cut and overlaid on the other some diamond Stickles glitter glue was added to the daisy centres.


I then set about stamping some swirls (PaperArtsy) in opposing colours of Memento dye ink.  I then made some mica powder paints with Perfect Pearls in green patina and mandarin and painted areas of the flowers as shown.


Some penwork in 0.1 Micron pen was added and the 'flowers' stamp (PaperArtsy) was stamped in black Versafine and finished with Glossy Accents.

The card edges were coloured with more orange Memento ink and a spray with matt acrylic varnish to finish.  The card will travel through the post to it's recipient naked (without any envelope or covers).

Sid xx

Pin It

Cherry Ripe


This card fits the requirements of the Less is More Challenge blog for week 285 whose theme is 'Repetition'

I started with a 5 x 7 inch kraft card blank.  I cut another strip of kraft card with a white scalloped design and applied this as shown.


I then stamped a cherry image in red Memento dye ink three times and trimmed these out - this the origin of my repetitive theme.  Two of the leaves were coloured with a green alcohol ink marker, the other left white.


The trimmed out cherries were then applied as shown.  The sentiment was stamped in black Versafine ink to finish.

I think it looks like a winning line on a fruit machine !

Sid xx

Pin It

Tuesday, July 05, 2016

Kitchen Colours


This card has been made for the Less is More challenge blog for week 283 whose theme is 'Colours of your Kitchen'.

I had a good look at my kitchen and the main colours are Lime Green, Dark and Light Grey & White as depicted in this photo of walls and tiles.


I started with a 5 x 5 inch white square card blank.  I then used the Sizzix Bigshot to cut a postage stamp edged die in pale grey textured card.  This was matted onto another slightly larger diecut square of dark grey card with a stitched edge die.


I then took a leaf, flower and butterfly die and cut this from white card, trimmed the base to fit the smaller matt and coloured this with a lime green alcohol brush marker sticking in place as shown. The butterflies (in three sizes) were left white and positioned as shown before sticking in place.


The sentiment is a stamp from Papertrey Ink which was inked in black Versafine ink and stamped directly on the card blank.

Think I got the colours right and I do like my kitchen colours, they are bright but with a nice contrast.

Sid xx

Pin It

Sunday, June 26, 2016

Whispering Trees


Have a fab Sunday and it sees a card from me featuring a fab tree stamp and sentiment from Crafty Individuals.

I started with a 6 x 6 inch square white card.  I then diecut a matt using a smaller stitched square die out of more white card and embossed this with a Martha Stewart embossing folder and the Sizzix Bigshot.  This was adhered to the card front.


I then cut a frame with the same but smaller die.  I then stamped the tree on a square of card in Versafine black ink and then hand coloured this with Distress inks, a tile and a waterbrush.

This was placed behind the frame and then matted onto the embossed card.


The sentiment was stamped on more white card in more Versafine black ink, trimmed out, edged with the same ink and adhered on foam pads to finish.

Sid xx

Pin It

Friday, June 24, 2016

Joyous day !


This card was made to fit the challenge over on the Less is More blog for week 281 whose theme is 'Faux Bleach'.

I started with a 5 x 7 inch white easel card blank.  Then a cut a smaller matt out of white card and coloured this with barn door Distress Ink applied with Cut'n'Dry Foam.  This was dried with a heat gun.


I then chose a Paper Artsy stamp and stamped onto the coloured mat with Versamark ink and heat embossed the design with clear detail embossing powder.  I then went over the image again with more of the same colour Distress Ink.  I then covered the matt with some brown paper and ironed over the paper to melt and remove the heat embossing to reveal the lighter one coated layer below.


The matt was edged in black Memento ink and further stamped using more Distress ink and a flourish stamp.  The matt was then stuck in place.

The sentiment (Papertrey Ink) was then stamped in black Versafine ink to finish.  This is one easy way to produce a faux bleach effect.

Sid xx

Pin It
Related Posts Plugin for WordPress, Blogger...