>

Sunday, January 15, 2012

Happy Alice !


I'm Alice mad at the moment I think !!

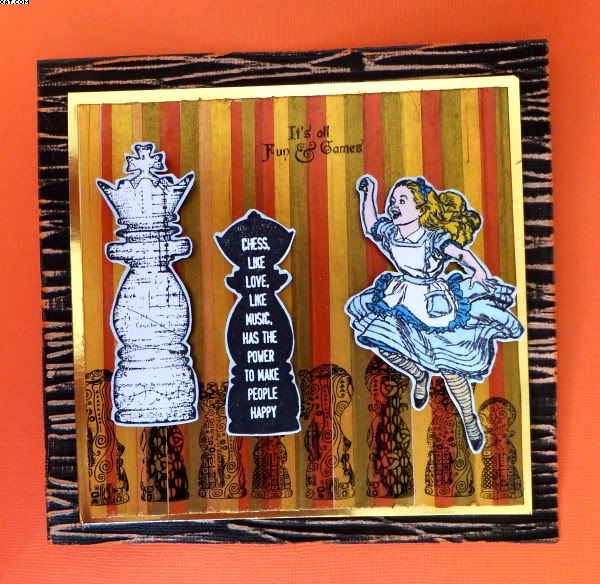
Here is a card I made as an entry for The Altered Alice challenge blog which has a theme of 'Stripes' this month.  The stripes in my piece are used as a background which I made using double sided adhesive applied onto a square piece of card and dusted over with metallic mica powders in bronze, copper and two types of gold.  Each stripe is individually applied and coated until the whole square is completed.


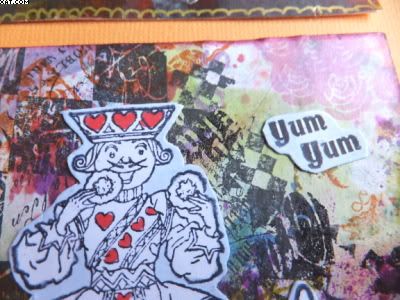
I then used chess piece rubber stamps from a plate by Chocolate Baroque to stamp a base onto the stripey card with black Archival ink.


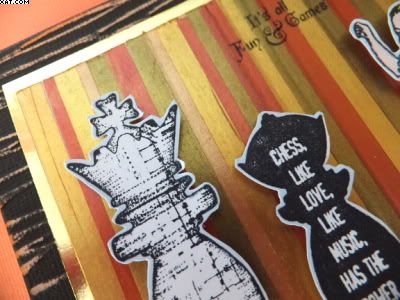
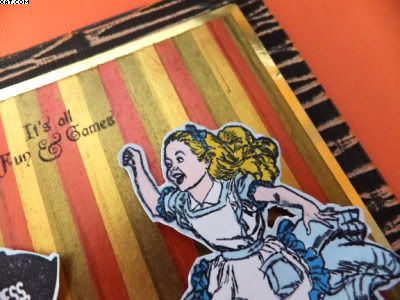
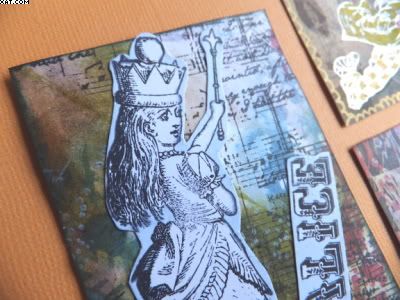
More chess pieces were stamped and trimmed and Alice herself stamped and coloured with alcohol ink pens.  These were trimmed out and  mounted on foam pads for depth. 


The text stamp was stamped directly onto the base card also.  The whole thing was mounted onto a mat of gold mirri board and then onto a background made by passing a square of Coredinations 'black magic' through the Sizzix machine using an embossing folder and this was sanded back to reveal the orange core.

Sid xx

Pin It

Sunday, January 08, 2012

Alice ATC's


Here are a set of three Alice in Wonderland themed ATC's done as a swap over on UK Stampers Forum.  I have used a variety of techniques all on serendipity type backgrounds.


Some images have been stamped in Archival black ink onto card and trimmed with minimal colour added with alcohol ink based pens before sticking in place.


Some heat embossing in silver followed by colouring with souffle pens was used on the Hatter image.


Alice herself was left entirely monochrome.

Sid xx

Pin It

Monday, January 02, 2012

Sixes & Sevens


First post of this New Year !!  This is a 6 x 4 inch postccard made as part of a challenge on UK Stampers Forum.  The subject this month is 'Numbers'.  The postcards have to be able to be posted naked to your swapee too so no big and bulky embellishments. I started with a large card bingo board trimmed to size.


I used stamped images from Lynne Perrella and Paper Artsy, scrapbook paper fragments and punched elements along with self adhesive numbers collaged with paper Mod Podge.


All the elements were edged in chalk inks and some penwork was added with  gold, white and black Posca pens.


Finally the whole postcard was painted with more paper Mod Podge to seal.

Sid xx

Pin It

Sunday, January 01, 2012

HAPPY NEW YEAR !!!


Just to wish all my family, friends, followers and commenters a very Happy, Prosperous & Crafty New Year for 2012


Cheers !!!


Pin It

Sunday, December 25, 2011

Happy Christmas 2011


Here is wishing you all a magical Christmas.  Have a fabulous time !!

Sid xx

Pin It

Monday, December 19, 2011

Tim's Tag No.6


Still battling on with the 12 tags of Christmas and I am determined to get them all done before Christmas.  This is my version of Tag No.6.  I have used a sizzix embossing folder on a piece of silver mirri board cut to the size of the tag as the base.


This has then been selectively inked with a variety of colours of Alcohol Inks over the embossing.


A Noel stamped plate and a Merry Christmas plate  were then 'hung' on pieces of golden fancy braid adhered with double sided tape.  The plates were raised on foam pads.


Another piece of braid was added at the base of the tag. The tag was then finished with a gold eyelet applied with the crop'a'dile, a green ribbon bow and some red/gold mesh ribbon tied through.

Sid xx

Pin It

Sunday, December 18, 2011

Happy Holidays


Here is a little matted plate I made using a base of Kraft card. I have stamped, used Distress Inks, stencils & Glossy Accents.  Loving the warm colours more so when it's so cold outside.


I have used a squares and a numbers stencil along with Distress Inks in spiced marmalade, mustard seed and vintage photo to produce the background by gradually building up layers through the stencils until happy.  All stamping was done with Archival black ink using stamps from Papermania Urban plates to produce the keyplate, key, music plate, background seedheads and sentiment.


The key and keyplate were covered with Versamark ink and heat embossed with stardust embossing powder which add a transparent iridescent finish and these were mounted on foam pads. Some of the coloured background squares were treated with Glossy Accents to add more dimension.


Finally the greetings plate was backed with a piece of orange grosgrain ribbon and mounted on foam pads.

Sid xx

Pin It

Tuesday, December 13, 2011

Tims Tag No.5


Next one done ! This is my version of Tag No.5.  I first cut a white card tag and then cut a matching piece of acetate.  I coloured the acetate on one side with red pepper Alcohol ink applied on a piece of felt, building up the layers to gain the desired colour intensity.  Then I inked up a small text stamp with Archival Black ink and stamped several times to cover the acetate.  I dabbed off the excess black ink with a wipe and then rubbed gently to remove the excess ink.  This dissolves the alcohol ink and leaves a see-through area where the ink previously was.  Once complete the acetate was adhered (inked side down) to the white tag blank with Glossy Accents around the edge of the acetate.


Next I coloured some grungepaper with picket fence Distress Stain followed with some weathered wood.  This was then dried with the heat gun and die cut with a TH die to make the leafy fronds.  Once cut these were cut in two and shaped with my fingers to add dimension.  These were adhered with Glossy Accents at the top but left free at the bottom.  Some half pearls were added to embellish and a white ribbon bow tied and applied with foam pads.


Because the words were not necessarily Christmassy I added a circular seal stamped in Archival black, coloured with red pepper Adirondack ink and heat embossed with clear embossing powder.  The seal was stuck in place on more foam pads.


A hole was cut with the crop'a'dile at the top of the tag and threaded through with a piece of open mesh silver ribbon to finish.


Sid xx

Pin It

Monday, December 12, 2011

Tims Tag No.4


Here is tag No.4 in the Christmas series.  The white card base was cut to size and some silver snowflake rub-ons were added.  The whole tag was then coloured with weathered wood, faded jeans and broken china Distress Inks.  The rub-ons resist the colour.  Some water splats added a bit of contrast.  A snowflake stamp was inked with more faded jeans ink and stamped randomly.  A couple of punched snowflaked were also added and a punched out acetate snowflake border was coloured with picket fence Distress Stain and added with glossy accents at the bottom.  The tag was then stamped with a dotty stamp and Brilliance moonlight white ink to add some snow effects.


The snowman was cut out of printed paper and edged with broken china Distress, treated with rock candy Stickles and applied on foam pads.  A blue grosgrain ribbon scarf was added round the snowmans neck.

The numbers are self adhesive and coloured with an alcohol marker before sticking onto a circle of blue card.  More snowflake stamping and Brilliance on this too before sticking in place on shallower pads.


A silver eyelet was added with the crop'a'dile and some silk ribbon, two silver stars and a sparkly drop were attached through and around the eyelet.

Finally the tag edges were distressed with sandpaper and given a rub over with more broken china Distress Ink.


Used some of the recommended items on this tag but not many again.

Sid xx


Pin It

Sunday, December 11, 2011

Tims Tag No.2


Yes I know my tags are out of sync. !  But this one is my effort for tag number 2.  The base is a white card cut to size and stamped with a music stamp in Archival Black.  This was toned down with picket fence Distress stain and dried.  I then stamped the word Peace down the right hand side of the tag with Versamark and heat embossed with clear embossing powder.  The words were swiped with vintage photo Distress ink and this was rubbed over with a cloth to remove the ink from the embossing.


Next I stamped a fir tree in pine needles Distress ink and used some barn door and a circle stamp to add some berries.  This was over coloured with more pine needled on cut'n'dry foam.


The reindeer is a digi image, printed on the printer, cut out and edged with gold Posca pen.  The garland round the reindeers neck is made from diecut foliage and a faux gem.  He was stuck in place as shown.  The base trim was cut using a Sizzix on the edge die and was attached with 4 pewter brads and edged with some frosted ice Stickles.


A pewter eyelet was added with the crop'a'dile and a small piece of woven braid tied through.  A little bow and two silver balls were then attached with a star brad as shown.  The whole tag was then edged in more vintage photo ink.

Sid xx

Pin It
Related Posts Plugin for WordPress, Blogger...