>
Showing posts with label Stickles Glitter Glue. Show all posts

Monday, August 17, 2020

Waves .....


I used a white card blank as the base and selected some papers from Websters Pages and used this as a background. I trimmed out some seaside word too. The paper was trimmed and stamped with some stamps from PinkPaislee in Distress Inks. I also stamped the anchor onto the base. Ithen stamped the shells in Versafine black ink on white card, these were trimmed out and coloured with Distress ink and Posca pen. The Sea-Side circle was stamped in red Versafine Clair, trimmed out and given a shine with Glossy Accents.  The shells were added along with the circle on foam pads. I then applied a metal dolphin charm with hot glue. The words were attached next, some of foam pads.

The 'Making Waves' was stamped in blue Versafine Clair onto blue card, trimmed out and treated with Stickles glitter glue before mounting on more foam pads. The paper was edged with Distress ink and then mounted on a dark blue card matt with dots of yellow Posca pen.

The matts were then applied to the card base to finish.....

Sid xx

Pin It

Saturday, July 18, 2020

Wings.....


This is a self-standing steampunk creation made as an entry into the That's Crafty Creatives Facebook Challenge for July ..... whose theme is 'Steampunk' ......

I started with a piece of printed background paper and applied a couple of strips of Washi tape at the base. I then stamped out a steam engine chimney and a pair of wings (Eco-Green) in Versafine black on white card. These were coloured with watercolours and silver metallic pen and trimmed out.

The gears (Tim Holtz) were die cut from white card, coloured with watercolours and gold metallic pen. I then matted the background onto brown craft card and black card. The chimney was applied on foam pads and the wings positioned as shown. The gears were were applied next on foam pads and centred with black adhesive gems. I then stamped a star (Tim Holtz) in Archival sepia and some numbers in turquoise Archival ink,  adding some blue Stickles glitter glue to the wings.

A few metal elements were added including the 'Family' sentiment.

I finished by dotting around the border with silver pen and added a die-cut stand (Tim Holtz) behind the piece.

Sid xx

Pin It

Friday, July 17, 2020

Oink .....


Love these new piggy stamps from AAll & Create .....

I started with a 6 x 6 inch white cardblank. I then chose a background paper and trimmed out edging with Amber Chalk ink. This was matted on a die-cut square of re-cycled Kraft packaging after adding some gold Washi tape as a ground for the piggy .....

The quirky piggy was stamped the in Versafine black onto watercolour card and coloured with watercolours, adding detail with a Posca pen and yellow Stickles glitter glue on her beads. She was trimmed out and mounted on foam pads over the Washi strips. The word 'Oink' was stamped on white card in more Verafine black ink, edged with amber Chalk ink and mounted on foam pads. Some black dots were added with a Posca pen. The Market sign was treated with Glossy Accents.

The matts were then added directly to the card front to finish..... reminded me of what a pig might say if it were going to the Market !!!!

Sid xx

Pin It

Tuesday, July 07, 2020

Dream ......


We had some Spanish tinned octopus the other day and I liked the tin it came in so I made a little 3D decoration ....love up-cycling and am always happy to re-use waste items..... I would like to enter this into the 'Country View Challenges Blog' Challenge 'Do What Makes You Happy' .....

I cleaned it thoroughly and treated with a couple of coats of white Gesso. I then painted the inside walls with primrose yellow satin acrylic paint and covered the outside walls with some Washi tape.

I found a label stamp and stamped this with Versafine black ink on white card.... using the base of the can to draw around and trim out the image to fit the inside bottom of the can.  I then coloured this with watercolours and stuck in place within the can.

I then added a couple of butterflies and the 'Dream Big' sentiment in Versafine ink on yellow card adding on a card support to lift off the bottom of the tin after treating it with Glossy Accents.


I then added some printed flowers around the rim of the can attached on red-line tape and used some yellow Stickles glitter glue in the centres. I finished with some strings of small yellow adhesive gems.

Was going to add more but decided I wanted it to be uncluttered ....

Really pleased with the finished tin .... very different from it's original use !

Sid xx

Pin It

Monday, June 22, 2020

Girly ......


Made this watercolour card .....

I started with a 5 x 5 inch white card blank. I cut a smaller square from white card and stamped this with a sketchy girl stamp (Tracey Coates - Aspects of Design) in Versafine black ink. I then used watercolours and a waterbrush to colour this image as shown. Once happy with the watercolours I matted this on black card.

I then added more colour with Ecoline Brushpens, Posca markers and gold pen and decorated with various colours of Stickles glitter glue. I added glossy accents on the girls lips.

The finished panel was then stuck onto the card blank. I then stamped the Happy Birthday (Tracey Coates - Aspects of Design) in Versafine black ink and matted this onto more black card, trimmed this out and added on foam pads.

Sid xx

Pin It

Saturday, May 30, 2020

Wonderland .......


Made a concertina tag book using Octopode Factory digis

The tag base was cut cut from pale green cardstock and scored to form a concertina. Holes were punched with the crop-a-dile. I then selected a range of printed papers as the bases. and stamped, coloured and punched decorations onto each of the six panels. some dew-drops were added along with metallic pens and Posca markers.

The main images were printed onto cardstock and coloured with Copic markers, trimmed out and further decorated with a range of embellishments including Stickles glitter glue & Glossy Accents. They were mounted on foam pads as show in the photos. I then stapled some black & white spotty ribbon through the holes in the tags.

I would like to enter this into the May Country View Challenge Blogs Challenge whose theme is 'Tea Party'

Sid xx

Pin It

Thursday, May 28, 2020

Dream ......


Made a collaged card today .....

I started with a 6 x 6 inch white card blank. I then cut a smaller piece of watercolour card and coloured this with watercolours to form the background. Once dry this was mounted onto black card to form a border and was stamped in black Versafine ink as shown. I also stamped the same image on white card in more Versafine black ink from which I trimmed out certain elements which were coloured with watercolour brushpens. These were mounted on foam pads to highlight certain elements. Some arrows were stamped in various Archival ink colours.

The Fornasetti face (Cherry Pie) was stamped in Memento black ink and coloured with Copic markers before trimming out, applying some Glossy Accents on her eyes, and applying on more foam pads

I stamped the words 'Dream, Create & Inspire' in Versafine black ink, trimmed these out and matted on more black card and stuck in place. I added a small piece of Washi tape reading 'Like A Boss' on the top right. The finishing touches were added with adhesive pearls, gloss dots, wire, Posca pen and Stickles glitter glue to finish.

Really had a great time developing the collage ....

Sid xx

Pin It

Saturday, May 09, 2020

Happiness.....


Made a little 2.5 x 3.5 inch box .....

This one is all about being happy as friends ..... we all need a little more Happiness at the moment ....dont we ?

The box was die-cut from white card and assembled as shown. I then decorated this with printed papers and die-cut elements using Stickles glitter glue and adhesive gems and sequins. The friends image (Crafty Individuals) was stamped in Archival black on watercolour card and was coloured with watercolour brushpens and a waterbrush before trimming out ans applying onto the front of the box.

The sentiment (Crafty Individuals) was stamped on white card in Versafine black ink, trimmed out and edged with pale blue Versamagic chalk ink. It was applied to the front of the box as shown.

The box was finished by tying through with fine blue and pink velvet ribbon.

Sid xx

Pin It

Thursday, April 30, 2020

Merry-Go-Round.....


Made a die-cut box with a Merry-go-Round theme in orange, yellow & turquoise......

I cut the box (3.5 x 4.5 inches) with dies from white card and then used a variety of printed paper to decorate it. I have trimmed out some elements and used sequins (yellow & turquoise) and Stickles glitter glue to embellish. The bunting was mounted in the background on foam pads.

The words have been stamped on white card in Versafine Ink, trimmed out and edged in more black ink.

I have used orange spotty grosgrain and turquoise satin ribbon and tied this through.

Sid xx

Pin It

Saturday, April 25, 2020

Daisies .....


A simple but effective tag ....

I cut a piece of white card to 2.5 x 6 inches and rounded the corners with a corner-rounder. Onto this base I applied  a number of torn pieces of blue tissue paper with white spots.

The rubber daisy stamps were then stamped onto the base in Versafine black ink and these were coloured with turquoise watercolour using a watercolour brushpen. I drew in black stems with a micron pen. Some yellow Stickles glitter glue was applied to the daisy centres. The sentiment was stamped in Versafine black ink'

I added three blue adhesive pearls and edged the tag in turquoise Versamagic chalk ink. I then chose some thin ribbon, punched a hole at the top of the tag and tied the ribbon through to finish.

Clean and simple ....

Sid xx

Pin It

Friday, April 17, 2020

Fruity......


Made this rather fruity card for a Challenge over on the Stamplorations blog for April .... I went with the photo prompt....


I started with a 6 x 6 inch white card blank. I then die-cut a slightly smaller matt in white card. I cut a strip of green card and applied a piece of Washi tape to this, applying as shown onto the white matt layer. I then stamped three lemons with a layering stamp using Memento yellow ink and Versafine black ink. These were trimmed out and edged with black Copic marker. I then took the Stamplorations 'Layered Leaves' stamps and stamped a leaf twice with a Memento green background and a Versafine black detail on more white card. These were trimmed and edged as before. I then used Stickles glitter glue on the lemons and leaves.

The lemons and leaves were then applied (some on foam pads) as shown.

I then stamped the sentiment in Versafine black ink on white card, trimmed out and layered on more green card embellishing the 'O's with yellow Stickles and raised on foam pads. I embellished with yellow and green sequins and attached the white matt onto the card blank to finish.

Because I have used a Stamplorations stamp I would also like to link to the 'Anything Goes' Never-ending Challenge too ....


Sid xx

Pin It

Wednesday, April 08, 2020

Ladybird.....


Made a very bright Birthday card .....

I started with a 6 x 4 inch white card base. I then made a busy background with dye inks and stencils. I then applied white Gesso with a dotty stamp and dried this.

The background was matted onto a slightly larger piece of turquoise card. I then stamped a stem with leaves and a flower (PaperArtsy) in Memento inks and edged some of these with black Posca pen. I also stamped a few word in black Versafine ink. I applied some Stickles glitter glue onto the flower.

The ladybird (Tim Holtz) was stamped in black Memento ink and die-cut before colouring with Copic markes and glazing with Glossy Accents. It was applied as shown.

The finished matt was added to the cardblank and the words 'HappyBirthday' stamped at the bottom in Versafine black to finish.

Sid xx

Pin It

Tuesday, March 31, 2020

Bunnies ....


Another Easter card made recently .....

I made a white card blank (5 x 5 in). I started with a piece of pink squared paper die-cut with a sewn edge die. This was matted onto some black card to form a border.

I applied a piece of magenta glitter Washi tape two thirds down on which to ground the sitting bunny.

The three bunnies (Rango Zoo) were stamped in Memento black, coloured with Copic markers and trimmed out. They were applied as shown on foam pads and some white Posca pen added to show movement.. I then stamped some flowers and leaves (Woodware) and again coloured with Copics and trimming. The leaves were applied directly and the flowers on foam pads. I have added some black Enamel Accents on the flowers. The clouds were stamped on blue paper, trimmed out and applied as shown. I have embellished with some turquoise Stickles Glitter Glue.

The sentiment (Papertrey Ink) was stamped on white card in black Versafine ink, trimmed & matted on black before being applied on foam pads. I added a number of white Posca white dots.

Once dry the decorated matt was applied to the front of the card to finish.....

Sid xx

Pin It

Friday, March 20, 2020

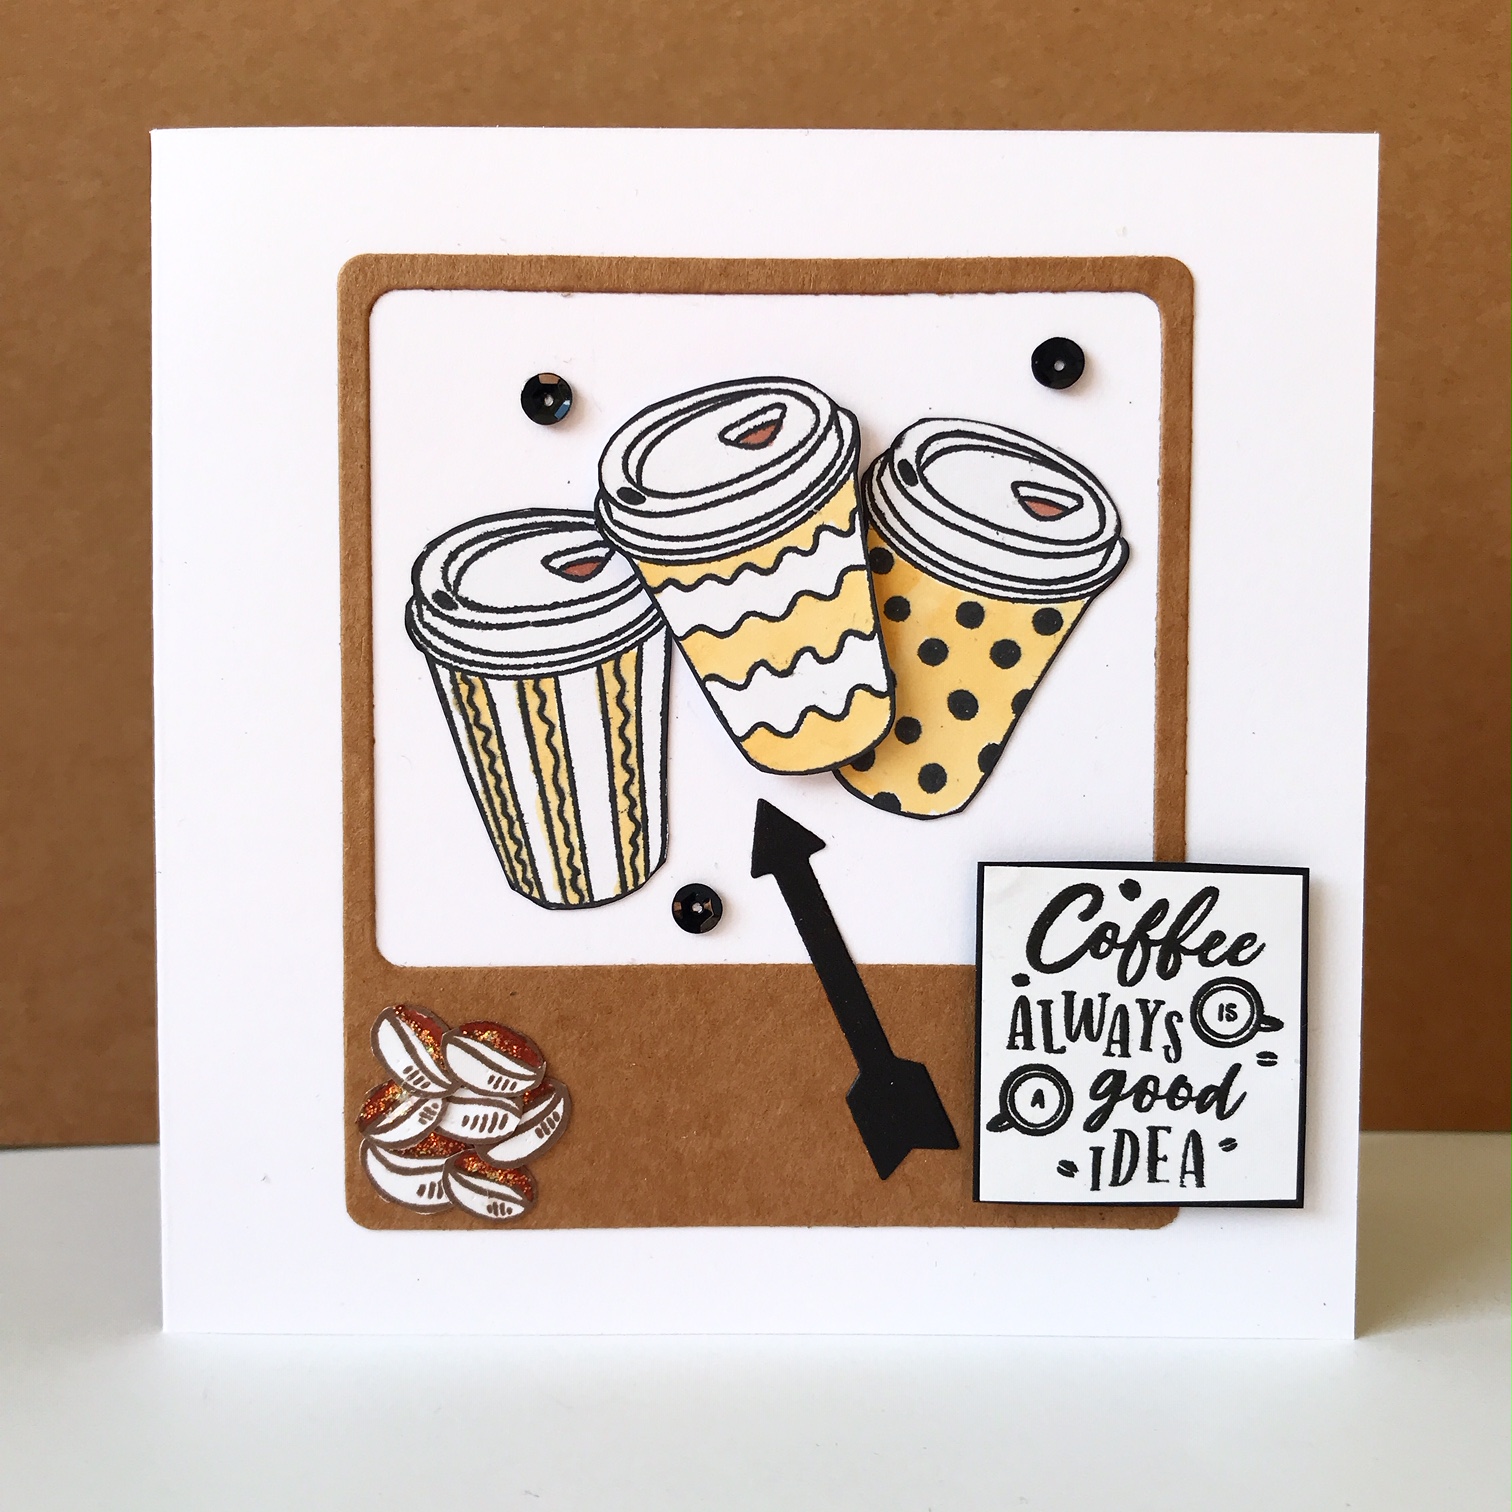
Coffee.....


Think we all need coffee at the moment with our challenging situation. I decided to make a card featuring coffee today.

I started with a 5 x 5 inch square white card blank. I then die-cut a frame from brown Kraft board and applied centrally on the front of the card.

I then stamped three coffee cups in Memento black ink and coloured with Copic markers. These were applied as shown, one on foam pads. I stamped a number of coffee beans, again coloured with Copics and with some added Glitter glue. These were arranged at the bottom left of the die-cut frame.

I die-cut and arrow in black card and applied pointing to the central coffee cup.

The sentimant was stamped onto white card in Versafine black ink. This was matted on black and trimmed and applied on foam pads. Three black sequins were added to finish the card.

Sid xx

Pin It

Wednesday, March 18, 2020

Red, Raspberry & Grey......


Wanted to enter the latest Challenge from Less Is More which is to make a Clean & Simple card with Red, Raspberry & Grey.

I used a 5 x 5 inch white card blank as the base. I then die-cut a 3.5 inch square with a stitched edge die which was cut diagonally on the guillotine. This triangle was decorated with a mini flower stamp in all three challenge colours to produce a mass of stamped flowers. I used dots of Stickles glitter glue to highlight the centres of the flowers.

The decorated panel was mounted as shown on foam pads onto the card base.

I then stamped 'You are pretty amazing' as shown in Versafine Black Ink to finish.

Sid xx

Pin It

Sunday, March 08, 2020

Celestial.....


Made a set of 'Celestial' ATC's for a swap in UK Stampers Forum ....

The base is re-cycled card cut to 2.5 x 3.5 inches. I have used some violet coloured card cut to the same size onto which I have heat embossed a stamped stars image in Versamark ink. I have infilled with dots of white and pale blue Posca pen.

I then stamped more moon and stars images in Memento ink, trimmed these out, coloured with pale blue alcohol ink and added metallic silver on the moon and star and embellished with turquoise Stickles glitter glue. the images were added on foam pads as shown. I have edged the ATC's in metallic silver pen and added a 'Dream Big' sentiment to finish.

Sid xx

Pin It

Saturday, February 01, 2020

Pink.....


Made a rather pink decorated tag for a swap on UK Stampers Forum ....

I started with tag blank and collaged a number of decorative papers as shown onto this base. I have used some gold/pink ribbon, adhesive gems, stickles glitter glue & a paper flower with a pearl centre to embellish the tag.

The sentiment is stamped with Versamark & heat embossed with white embossing powder, trimmed out and matted onto pink card before applying on foam pads. The whole tag is edged with pink Versamagic chalk ink and threaded through with some decorative trim to finish.

Sid xx

Pin It

Tuesday, October 15, 2019

Cones .....


A clean & simple Christmas card made recently ....

It is on a 5 x 5 ins white card blank and I have embossed the front of the card with a 'Falling Snow' folder from Stampin'Up

I then matted some more white card onto some holly red card. I stamped the sentiment 'Silent Night' in black Versafine ink as shown before applying directly on the card blank.

The pinecone decoration & leaves were die-cut from kraft and green cards. The pinecones are layered and infilled with Stickles glitter glue. They were arranged in a pleasing way as shown on foam pads and finished with three red dewdrops.

Simple but effective ....

Sid xx

Pin It

Thursday, August 15, 2019

Chirp Chirp .....


A card made for a Challenge over on UK Stampers Forum .... using a swapped stamp to make something ....

I started with a white 6 x 6 inch card blank. I then die-cut a piece of feather printed paper and framed this with another die-cut frame in white card.

The bird stamp was stamped 3 times in shades of Impress die ink on glossy photo paper which were trimmed out. The frame was applied to to the card on foam pads and the feather paper stuck in place.

The birds were applied centrally on foam pads and the design was embellished with sequins centred with purple gems. Some purple Stickles glitter glue was applied on the birds eyes.

The sentiment was stamped on white card with Versafine black ink, trimmed out and edged with black ink before applying as shown to finish the card.

Sid xx

Pin It

Tuesday, August 06, 2019

Foam ....


We have a Challenge this month over on UK Stampers Forum where we are to make a stamp from foam using a die to cut it. Then make something using the stamp .... this is mine ....

I used 3 mm thick fun-foam and die-cut this with the flower die which I then glued to a piece of thick black card as a base. It cut very easily.

I then dug out my Adirondack inks and inked the stamp with wild plum ink and stamped 3 times onto a piece of white card.  I then used a waterbrush and spread the ink.  I then used butterscotch and denim inks to make washes to produce a background.  Once happy I dried with a heat gun, trimmed out and matted onto black card, sticking onto a fuschia coloured card base on foam pads. A small amount of Stickles glitter glue was applied to the flowers.

The sentiment was stamped in Versamark ink and heat embossed with white embossing powder on black card.  This was trimmed out and applied as shown on more foam pads.

Great idea to make extra stamps from your dies.  If you fancy joining in do click HERE to join the Forum ... we are Fun, Friendly & Fun .... all are welcome !!!

Sid xx

Pin It
Related Posts Plugin for WordPress, Blogger...