>
Showing posts with label Acetate. Show all posts

Monday, November 05, 2018

Tagging .....


Made tag for a Decorated Tag swap over on UK Stampers Forum ....

Colours are a bit garish but thought it went ok during it's making ....

If you fancy joining in the swap click HERE to go to the forum - it's free & fun to join ....

Sid xx

Pin It

Tuesday, May 01, 2018

Cupcake Heaven ......


Welcome to the first day of May !!!

Here is a sweet Cupcake Birthday Boxcard ...... to celebrate the day .....


Popping out of the box, which can fold flat to go in an envelope, are a multitude of glittery topped cupcakes.....

This Boxcard is for sale in my Etsy Shop ...... click HERE to go have a look ......

Sid xx


Pin It

Thursday, April 26, 2018

Unicorns & Rainbows ......


Made a folding Boxcard with a theme of magical sparkly Unicorns ..... ideal for a little girl or Unicorn lover .... and it folds flat to go in an envelope !


Plenty of glitter, cakes, clouds & rainbows too !!

It's for sale in my Etsy Shop - click HERE to go have a look .....

Sid xx

Pin It

Friday, April 20, 2018

Floral Box ......


Made a Floral Garden Birthday folding Boxcard in blues, creams, pinks & green ..... it folds flat to go in an envelope - it's for sale in my Etsy Shop..... click HERE to go have a look ....

Have also entered this into The Crafters Castle Challenge #4 whose theme is 3D .......

Sid xx

Pin It

Wednesday, April 11, 2018

Beary Birthday ......


A brand new handmade Bear Hug Birthday Folding Boxcard .......

It's for sale in my Etsy Shop - click HERE to go have a look ......

Sid xx

Pin It

Rainbow Unicorns .....


A new Unicorns Birthday Folding Boxcard - it can be folded flat to go in an envelope for posting .....

It's for sale in my Etsy Shop - click HERE to go have a look .....

Sid xx

Pin It

Friday, March 16, 2018

Cloudy Bunnies ......


Made an Easter Bunnies folding Boxcard ....

The box was made out of blue card which was diecut and decorated with printed paper panels with stripes and bunting.

The bunnies were stamped, die-cut and coloured with Copic markers along with the clouds which were glittered with Stickles glitter glue.

The 3D box was filled with the bunnies and the clouds mounted on acetate so they seem to float. I used some pink self-adhesive pearls to decorate and the fun hand-stamped sentiment reads ' Hoppy Easter'

It's for sale in my Etsy Shop - Harpies Crafty Corner - click HERE to go and have a look ......

Sid xx

Pin It

Tuesday, November 14, 2017

Yellow Unicorns .....


Sharing a cute handmade Birthday folding boxcard .....

The box is decorated with cute glittered unicorns and a rainbow with a castle in the sky and can be folded completely flat for posting in an envelope !

This boxcard is for sale in my Etsy Shop ...... click HERE to go there  - why not have a look ?

Sid xx

Pin It

Tuesday, August 08, 2017

Hope is Honey ......


This is a 6 x 6 inch multimedia plaque that I have crafted recently.

I started by trimming a piece of corrugated packaging to 6 x 6 inches.  I then tore old book pages and applied with glue to the surface of the corrugated square.  Once dry I brushed on white Gesso to obscure most of the printed words allowing this to dry completely.

Next I applied modelling paste through a honeycomb stencil and allowed this to dry.  I then coloured the whole background with Distress Oxide ink in fossilized amber & spiced marmalade with cut'n'dry foam.  I lightly spritzed the plate with water and dried thoroughly with the heat gun to set the ink.

I then used a Versamark pen and selectively applied the ink to some of the octagonals which I then heat embossed with a pearly orange embossing powder.  The edge of the plate was then covered in orange 'numbers' Washi tape.

The bees were stamped in Memento black trimmed out and coloured with a Copic marker.  I then cut some acetate, trimmed and applied over the wings of each bee before applying on foam pads.  The flowers and leaves were diecut from blue card & green Brusho watercolour background with the centres embellished with green clear cabochons.  They were applied as shown.

The words were computer generated and printed, trimmed out and edged with a white pen and stuck in place as shown.

Final touches were to add a few yellow faceted stones and a few circles of cream acrylic paint applied on a small lid.  The plate was then matted onto a piece of black card to set off the finished plate.

I have entered this one into the That's Crafty Challenge blog Challenge whose theme is 'Anything but a Card' & this months Creative Challenge over on the Artistic Stamper Creative Team Blog whose theme is 'Anything Goes'.

Quite a Summery plate and I like the way it turned out.

Sid xx

Pin It

Sunday, April 01, 2012

Believe in Possibility


This is a little tea-light gift book I made at our Spring retreat but this could be decorated and filled with anything as a lovely gift idea.  It takes the form of a book cover containing a box to take 6 tea-lights and is secured by a piece of seam binding.

Once more it is covered with Pion 12 x 12 in scrapbook papers available fom 3D Jean.  The papers are beautiful and are very subtly coloured and all elements of the book use these papers.


The book cover is decorated with a number of embellishments cut out from the papers (fob watch, mini postcard and stamp) with some layered on foam pads. The only stamp used was the wording on the postcard !


The inside front cover is embellished with a label die cut from the candle box front with a Nestability die. This was edged with moss green chalk ink before adhering. A butterfly was trimmed out from the papers and also stuck in place.


The candle holder box, covered with more paper and the aperture lined with clear acetate before sticking in place on the inside back cover.


Final touch was to add two pale green eyelets with the crop-a-dile tied through with a double length of pale cream seam binding tied in a knot through each eyelet. These were tied in a bow to secure the book closed after filling the box with tea-lights. 


The box could be filled with sweetie treats or anything else for that matter dependant on the purpose and decorative theme of the box.

Sid xx

Pin It

Tuesday, December 13, 2011

Tims Tag No.5


Next one done ! This is my version of Tag No.5.  I first cut a white card tag and then cut a matching piece of acetate.  I coloured the acetate on one side with red pepper Alcohol ink applied on a piece of felt, building up the layers to gain the desired colour intensity.  Then I inked up a small text stamp with Archival Black ink and stamped several times to cover the acetate.  I dabbed off the excess black ink with a wipe and then rubbed gently to remove the excess ink.  This dissolves the alcohol ink and leaves a see-through area where the ink previously was.  Once complete the acetate was adhered (inked side down) to the white tag blank with Glossy Accents around the edge of the acetate.


Next I coloured some grungepaper with picket fence Distress Stain followed with some weathered wood.  This was then dried with the heat gun and die cut with a TH die to make the leafy fronds.  Once cut these were cut in two and shaped with my fingers to add dimension.  These were adhered with Glossy Accents at the top but left free at the bottom.  Some half pearls were added to embellish and a white ribbon bow tied and applied with foam pads.


Because the words were not necessarily Christmassy I added a circular seal stamped in Archival black, coloured with red pepper Adirondack ink and heat embossed with clear embossing powder.  The seal was stuck in place on more foam pads.


A hole was cut with the crop'a'dile at the top of the tag and threaded through with a piece of open mesh silver ribbon to finish.


Sid xx

Pin It

Monday, December 12, 2011

Tims Tag No.4


Here is tag No.4 in the Christmas series.  The white card base was cut to size and some silver snowflake rub-ons were added.  The whole tag was then coloured with weathered wood, faded jeans and broken china Distress Inks.  The rub-ons resist the colour.  Some water splats added a bit of contrast.  A snowflake stamp was inked with more faded jeans ink and stamped randomly.  A couple of punched snowflaked were also added and a punched out acetate snowflake border was coloured with picket fence Distress Stain and added with glossy accents at the bottom.  The tag was then stamped with a dotty stamp and Brilliance moonlight white ink to add some snow effects.


The snowman was cut out of printed paper and edged with broken china Distress, treated with rock candy Stickles and applied on foam pads.  A blue grosgrain ribbon scarf was added round the snowmans neck.

The numbers are self adhesive and coloured with an alcohol marker before sticking onto a circle of blue card.  More snowflake stamping and Brilliance on this too before sticking in place on shallower pads.


A silver eyelet was added with the crop'a'dile and some silk ribbon, two silver stars and a sparkly drop were attached through and around the eyelet.

Finally the tag edges were distressed with sandpaper and given a rub over with more broken china Distress Ink.


Used some of the recommended items on this tag but not many again.

Sid xx


Pin It

Saturday, December 18, 2010

Timmy's Tag Day 1


Here is my Day 1 tag of the Tim Holtz '12 Days of Christmas' series.  Yet again I have improvised heavily on this one.  The house is made from chipboard that has been coloured with wild honey Distress Ink and stamped with a distressed lines stamp with walnut stain Distress ink.  The edges of the roof and windows were decorated with clear glass glitter applied with glossy accents.


The background tag was made from white card with Distress inks in faded jeans, stormy sky and tumbled glass Distress inks rubbed on a craft sheet and wetted with home made gold mica spray.  The tag was repeatedly rubbed over the craft sheet to build up layers and dried each time between layers.


The wreath was a ready made embellishmentt and the trees (PaperArtsy) were stamped in pine needles and coloured with the same, before adding with glossy accents and foam pads.


The fence (Sizzix) was stamped onto acetate with versamarks and heat embossed with seafoam white embossing powder, trimmed out and stuck at both sides over the house and trees.

Final touches were to stamp Noel (PaperArtsy) twice and colour with stormy sky before trimming out and sticking in place.  Whilst adding an eyelet with the crop-a-dile and tying through with some blue ribbon finished the tag.

Sid xx

Pin It

Saturday, July 10, 2010

Greens & Oranges


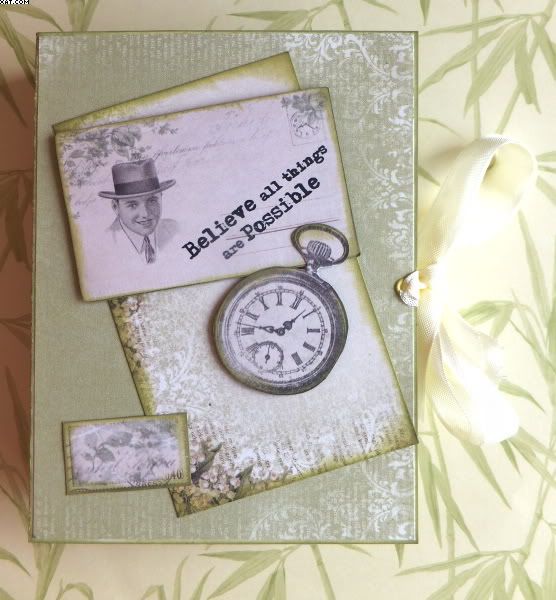
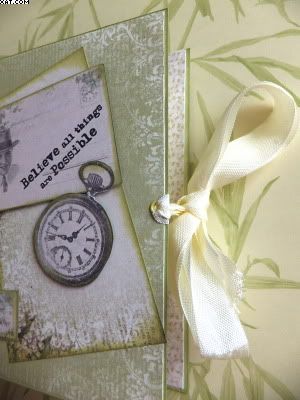
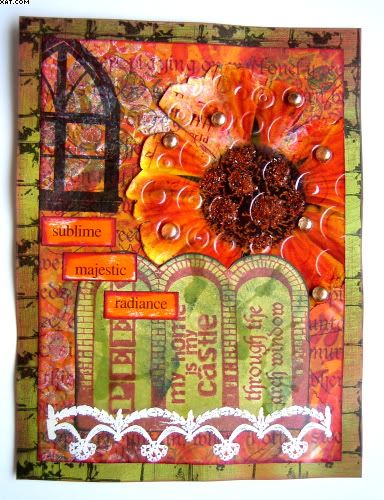
This piece was done as an experiment using two base colours along with collage, stamping and embossing.  I didn't plan what I did, just used elements that fitted the colourway and completed the whole thing in one session.

I started with a piece of printed paper from Graphicus and then used Brilliance inks in pearlescent icy and moonlight white applied to a piece of bubblewrap and used as a stamp.  I then made up a strong spray with shabby shutters distress reinker in a mini mister and sprayed this so it ran down the page before drying with a heat gun. I stamped the arch (top left) using a Paperartsy stamp in onyx black versafine ink over some of the bubblewrap stamping.


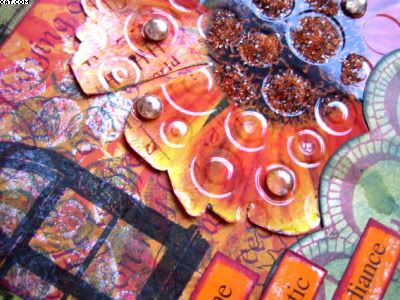
Next I pinched a glossy orange flower image from a Crafty Individuals postcard and trimmed it out edging the cut areas with orange chalk ink.  This was put through the Big Shot using a Cuttlebug circles embossing folder to provide some texture.  The flower was then loosely stuck in place with some of the petals lifted.

Next I stamped another Paperartsy arch in rhubarb stalk Memento ink and coloured this with shabby shutters Distress ink applied with cut'n'dry foam and then sprayed with the same colour.  This was dried with a heat gun, trimmed out and stuck in place over the flower as shown.


The white bottom border was made by stamping onto heat resistant acetate with a border stamp and Versamark ink and heat embossing with white embossing powder.  This was trimmed and applied with Glossy Accents at the base.

The centre of the flower was then decorated with orange glass glitter held in place with Glossy Accents and some gold Dew Drops (
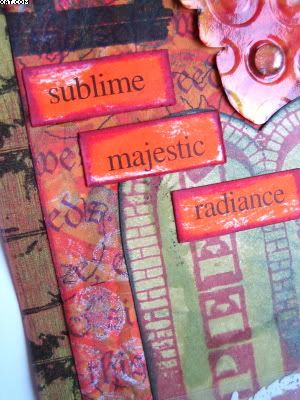
3d Jean) also applied with Glossy Accents.  The words were printed, trimmed out and coloured with tangerine Impress dye ink and edged with maroon chalk ink before sticking in place.


The whole plate was then edged in maroon chalk ink and matted onto a piece of Basic Grey backing paper which had been stamped with onyx black Versafine ink with a square lattice stamp from My Minds Eye.  The mat was also edged with maroon chalk ink to finish.

I wondered whether it was a bit too fussy when I finished it but when I came back to it next day it looked ok.  I think you get visual overload when working on a project from start to finish in one go !

Sid xx

Pin It

Thursday, June 17, 2010

Odd Art !


Here is a little wall hanging I have entitled 'Odd Art' because I think it is.  Actually the idea came from the stamp.  This was done for the Ready Steady Stamp challenge blog as a guest designer sample.

The 5 required elements this time were:


Not an easy bunch of requisites, especially the handwritten script background !  I can't write for toffee actually and I ended up writing the word Charming several times with a green script pen on the lime green stripe in the middle.


I started with a piece of chipboard 8 x 4 inches and trimmed three strips of coloured textured card using the challenge colours.  These were stuck in place centrally with a glue stick.  The remaining edges of the chipboard were covered with some metalised foil strips from the LLB collection (Trimcraft)  which just happened to be in the same colours.  These were stuck in place to complete the background..  I then handwrote the word 'Charming' several times with a Sakura green script pen on the lime greem stripe and applied a little Adirondack dye ink with sponge in stream & wild plum to the other two coloured stripes.


I then took some heat resistant acetate and stamped the house stamp (Zettiology) with Versamark ink and heat embossed this with detail black embossing powder.  The cooled image was then trimmed out.

Next I chose some little rectangular die cut frames from the same LLB collection and coloured these with more wild plum ink, stamping with a swirl stamp and violet pigment ink and heat embossing this with clear embossing powder. The centres of the frames were rubbed over with Memento grape jelly dye ink  These were placed and attached on the background with foam pads.


The embossed acetate house was stuck in place with Glossy Accents.  I took some ribbon and some brass ribbon embellishments and applied some purple and turquoise grosgrain ribbon over the frames sticking in place at the back with glue dots.  A couple of metal fold-over clips were added at the sides and two glitter flowers with gem centres added as shown.

The hanger consists of two brass spring clips threaded with a length of black glossy wire twisted to close.  Another of the rectangular frames was stamped in black Stazon with the words 'Odd Art' and this was attached to a piece of card over the wire with double sided tape to finish.

How ODD is that?

Sid xx

Pin It

Monday, May 17, 2010

House and Home Tag


Here is my next tag in the Rolling Recipe series on UK Stampers forums weekly challenge.  This one had to have the following elements:

1. Acetate
2. Stripes
3. Stamped house/houses

I started with a white card blank and adhered some printed stripey paper to it.  I then took some old bookpaper, tore it, added some ochre chalk ink and adhered this at the top of the tag.

I then took a house stamp (Zettiology) and stamped this in onyx black Versafine onto more white card.  I then used a brayer and a shades of purple Dee Gruenig blending blox (Marvey) to colour the image, adding a little ochre chalk ink also.  Some glossy accents were added to one or two of the buttons on the roof !  This was allowed to dry and was then cut out.


Next I took some acetate and stamped a buttons border stamp (Lost Coast Designs) in Royal Purple Stazon along one edge.  This was trimmed and adhered on the left side of the tag behind some of the buttons with Glossy Accents.


In the meantime, some dots (Tanda Stamps) were stamped bottom right with the blending block ink and another image of the house was stamped on the tag top right with scattered straw Distress ink.


The stamped house was added as shown on foam pads and the word 'home' stamped in vintage sepia Versafine ink with clear polymer stamps.  Finishing touches were to add a piece of aubergine velvet ribbon at the top, held in place with a material covered brad which had been coloured with the same blending block ink.

Love the Purple Stazon on the acetate.......it really makes it pop !

Sid xx

Pin It

Monday, May 10, 2010

Butterfly Philosophy Tag


Here is Tag No.16 in the series of Rolling Recipe Tags hosted on UK Stampers forum by the lovely Efemera.  This week we had to include the following:

1. Stripes
2. Stamped Butterfly
3. Acetate

I started with white card, cut to shape.  The top section of the background was coloured with Distress ink in scattered straw and pumice stone applied with cut'n'dry foam.  I used a clear stamp from Li'l Davis Designs and inked this with more scattered straw Distress and stamped onto the background 2 or 3 times. I then chose some stripy paper and cut it at an angle with scallop decorative scissors and applied in lower half of the tag with glue stick.


I used pumice stone Distress ink to ink a solid butterfly background stamp (Elusive Images) and stamped this in the centre to act as a background for the acetate overlay which was stamped with another Elusive Images detail butterfly stamp in black Stazon and trimmed to size. This was adhered over the solid background in 4 places with Glossy Accents.


I then embossed the word 'philosophy' onto a strip of card and coloured again with scattered straw Distress ink, applying as shown.  I added a metal corner embellishment on the left.


Finishing touches were made by applying a piece of silver braid, tied in a bow. A grey eyelet applied with the crop-a-dile and a length of grey decorative fibre tied through the eyelet.

I wanted to keep this one very simple and the colours of grey, straw and black seemed to do the trick.

Sid xx

Pin It

Tuesday, December 29, 2009

Kind Thoughts Card


Christmas has now passed and the New Year is just around the corner so I decided a change was as good as a rest. One of my friends has not been too good over the break and I wanted to do a card to cheer her up.

I used a stamp called 'Natures Little Helper' from The Artistic Stamper which I won from the very kind Jennie. I used acetate, glitter and souffle pens to colour in the image (attributed to Mabel Lucie Attwell).

I took a mottled pale blue cardstock and trimmed/scored to make a 4 x 4 inch square card as the base.


I took a piece of acetate and stamped the image with black Stazon. I then used dries clear art glue and applied a number of colours of ultrafine glitters on the reverse of the acetate, allowing them to dry between colours. The body, ear and paint tin were coloured with Sakura Souffle pens and allowed to dry. I then trimmed out the image to leave around a 1/4 inch border.

Next I took a piece of K&Co printed cardstock trimmed as shown and cut an aperture top right with a large square punch. This was rubbed over with broken china Distress ink applied with cut'n'dry foam. This was then matted over some dark plum coloured card and the same aperture cut again with the punch.

The matt was applied centrally with DS tape, the acetate applied over the aperture with glue applied behind the glitter and the card finished off with a 'Thinking of you' sentiment mounted on foam tape and matted onto the same dark plum card.

Hope she likes it !

Sid xx

Pin It

Wednesday, October 28, 2009

Swirls ATC's


Here are three ATC's with the theme 'swirls' All three are made with printed acetate overlays with stamping and embossing on the card beneath.


I used a Graphicus CD to print onto inkjet acetate for the blue and red versions. Glossy accents were used to attach the acetate whilst brads were used to attach the yellow version.


Sid xx

Pin It
Related Posts Plugin for WordPress, Blogger...