>
Showing posts with label Moonglow Glitz Spritz. Show all posts

Monday, December 10, 2018

Snowflakes .....


A set of 3 ATC's made for a swap in UK Stampers Forum Facebook Group ....

The background is on blue iridescent textured card which has been sprayed with silver mica spray and stamped and heat embossed with metallic powders.

The main snowflake has been die-cut from heat embossed white sparkle white card.  The centres have been highlighted with gems. The sentiment has been stamped and heat embossed with silver embossing powder and this has been matted and applied on foam pads.

If you like making ATC's whu not join UK Stampers Forum to join in .... it's free & fun !  Click HERE to go there ....

Sid xx

Pin It

Saturday, September 24, 2011

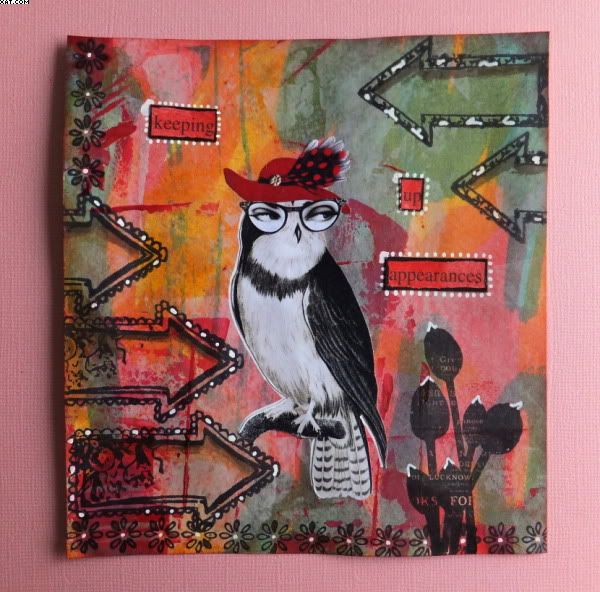
Keeping Up Appearances


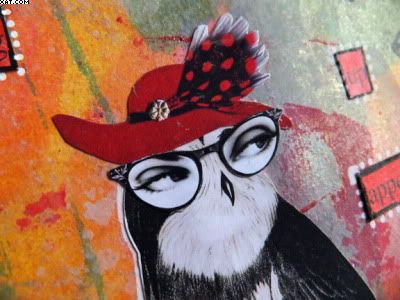
I have an owl fixation at the moment, especially these collage elements from ARTchix studio.  Whilst on my owl 'roll' I made an A4 background from stout white card.

The base was made with Distress Stains in scattered straw, spiced marmalade, barn door & pine needles applied directly from the bottles onto a water spritzed card.  These were then dried completely.

I then used a plastic scraper and applied a lightly spread coat of grey Dylusions paint - this knocked back the colours slightly and provided a nice matt surface.  Some more Dylusions paint in magenta was added and scraped selectively over parts of the background with some added using the edge of the scraper to form lines. 


I then used a filigree glimmer screen mask and sprayed with Moonglow Glitz Spritz in royal emerald fire and desert moon purple sage.  The mica effect is subtle and can't be seen easily in the pics.  This was completely dried again before stamping.  I used more Distress stains and a brush to add shadows in the arrows and colour some of the flower petals in walnut stain.


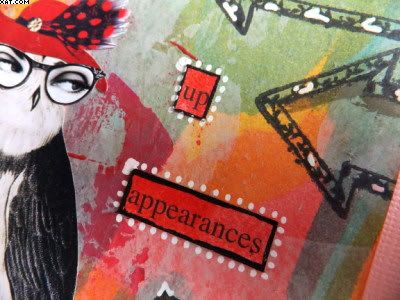
The arrows (Prima), flower border (Elusive Images) and the seedheads (PaperArtsy) were stamped as shown in Archival black ink. The owl, eyes and hat were stuck in place and the printed words coloured in barn door and edged with black Posca pen before adding and edging with white Posca pen.


More of the white Posca was added to highlight elements of the stamped images.  The whole piece was then edged with barn door distress ink added with cut'n'dry to finish. Hope Hyacinth Bucket is not offended !!

Sid xx

Pin It

Sunday, January 23, 2011

Best & Worst Journal Page


Here is a belated week 2 of the weekly journal challenge over on UK Stampers Forum.  Efemera wanted us to use the following three things in this challenge:

1. Your best Gift
2. Your worst Gift
3. Use some recycled packaging/card on your page


I used lots of purples on this page.  I started by die-cutting a snowflake die on the Sizzix with some printed paper with a purple cloud design. The page was then cut from plain white card and stencilled through some of the die-cut off cuts with purple wisteria Glitz Spritz mica dabber. I applied dusty concord Distress ink with cut'n'dry foam over the stencilled background. Some flowery 'Dove of the East' rub-ons were also applied to the background.

The Glitz Spritz was then applied to some of the diecuts in layers and allowed to dry.  Some of the diecuts were stamped with a swirl and dusty concord Distress ink.  Once dry the diecuts were stuck in place on the background. 


Two card corner embellishments (Dove of the East) were cut from some used packaging and applied with glossy accents to the left hand corners as shown.  The main words were made up from black self adhesive letters applied as shown.  The words were outlined with fine black pen.

Next I used Nesties dies to cut the smallest (aubergine card) and next to smallest labels (purple cloud card) which were matted.  I then used a mauve Souffle pen to hand-write (ughhh !) the other words.  The larger mats have drawn in circles at each corner filled with gold pen to simulate rivets.


The panels were then stuck in place and the card edged with purple chalk ink to finish.


Sid xx

Pin It

Sunday, January 09, 2011

Mini Journal Page


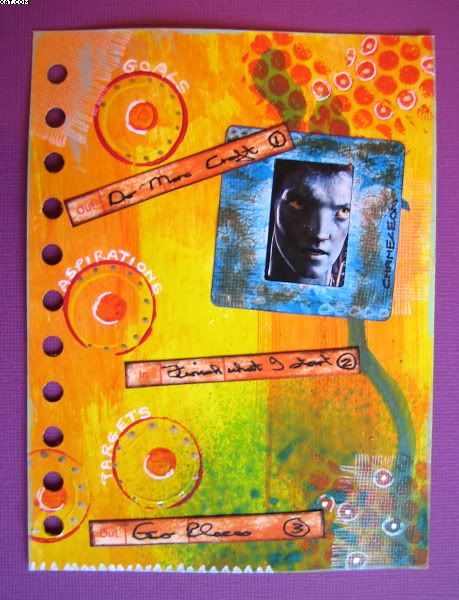
This is my first piece of crafting for this year !  Simply have had no time with other things getting in the way.  I am taking part in a weekly mini journal challenge being run over on UK Stampers Forum by Efemera.  We are to do one postcard sized page at 6 x 4 ins each week on a theme.  This weeks theme required:

1. A Photo
2. A handmade background
3. 3 things you want to achieve this year

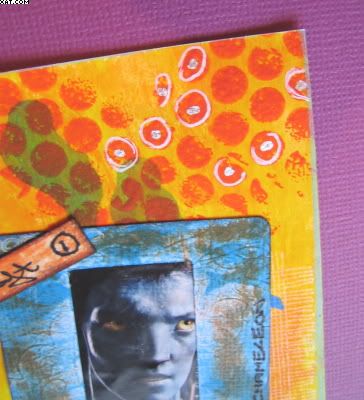
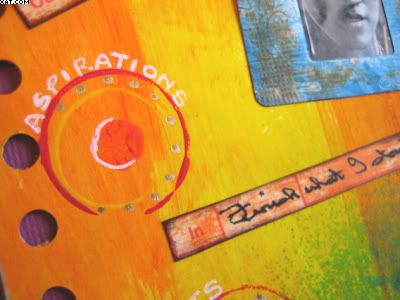
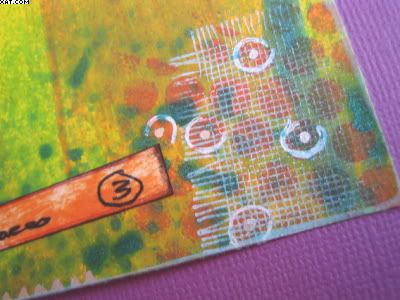
I cut my card and allowed an extra 1/2 inch on the left so that I could punch holes with the Cinch.  I then used a selection of Dylusion paints in Yellow, Orange & Pink from Dyan Reaveley to colour the background. For the circles I used lids of various sizes dipped in the paint and applied direct.  Some paint was applied with a sponge through some sequin waste too.


I stamped with a frayed linen stamp with Brilliance moonlight white and sprayed with some Teal Glitz Spritz mica spray. White opaque pen and silver and gold pens were used to decorate as shown.


I then diecut a slide mount with the sizzix and used a pic of Avatar behind the mount aperture.  The mount was coloured with blue and orange Memento inks applied direct with the word 'Chameleon' written on.


The journalling was done on a cut up clocking-in card, coloured with orange Memento and written on with fine black rollerball pen.  I chose to 1 - Do More Craft, 2 - Finish what I start & 3 - Go places !  I have also written around the circles Goals, Aspirations & Targets.

Let's hope I can keep up with this challenge in line with my second goal.

Sid xx

Pin It

Thursday, December 23, 2010

Timmy's Tag Day 9


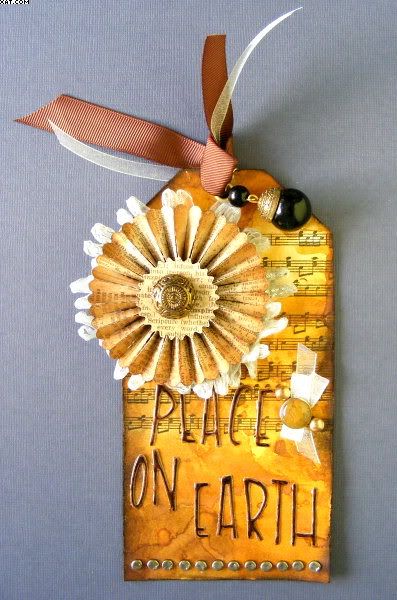
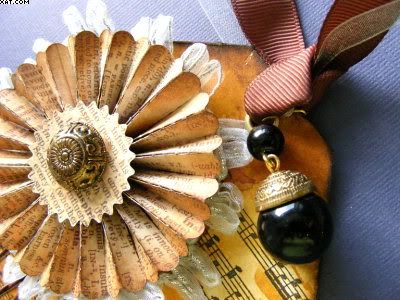
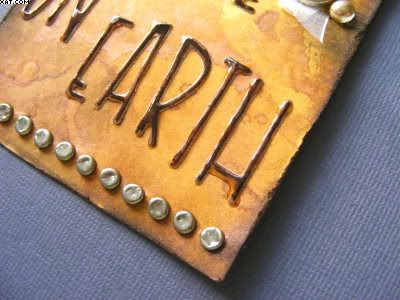
Another one of Tim's Tags, this one is No.9 and now only 3 to go before Christmas Day ! I started with a white tag, cut to size.  The background was made using a music stamp (?) inked with Archival black ink and stamped twice at the top of the tag.  The colouring was done using wild honey and brushed corduroy Distress inks rubbed onto a non-stick craft mat and sprayed with some pumpkin blush Glitz Spritz mica spray with the tag being smooshed through the inks and dried with the heat gun a couple of times.  The edges of the tag were roughed up with coarse sandpaper and inked with walnut stain DI.


The bottom of the tag was measured out and a row of pewter brads applied and these were battered with the edge of a small hammer to distress them.  The rosette was made using the TH (Sizzix) die out of TH printed paper and was edged with walnut stain DI and sprayed with the pumpkin blush spray.  The centre was decorated with an old button applied on a glue dot.  I had no tinsel so I used some fancy ribbon applied behind the rosette as shown.


The letters were die- cut from dark brown linen effect card using the Sizzix 'The Ginchiest' typeface and the Big Shot, stuck in place with glue-pen and glossed with Glossy Accents.  The rosette was then stuck in place with a large glue-dot.


Finishing touches were to add an eyelet with the crop-a-dile and thread through some brown and silver ribbons and apply a dangly piece of old jewellery.  The other embellishments were a brad holding some more of the silver ribbon in place and two gold dew-drops.

Sid xx

Pin It

Monday, July 26, 2010

BirdSong CJ Entry


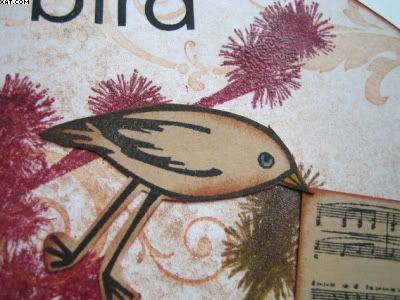
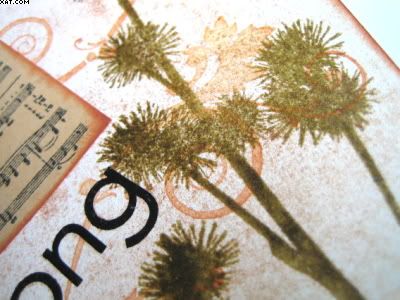
Here is a CJ entry I have completed for a Circle Journal group over on UK Stamper Forum.  The pages on this particular journal are small  and I had to use a supplied stamp in the design.  The little birdie stamp is just that !

I associated birds with song and found a music stamp which was just the right size to make a plate, linking the song with the bird.

I started with the blank white card and worked directly onto it.  I first stamped with tan Colorbox pigment ink with a swirl stamp and heat embossed with detail clear embossing powder.  Once cool I sprayed with some Moonshadow Glitz Spritz mica sprays in desert moon horny toad and royal crimson fire, drying between sprays and building up a decent mica layer.  The finish is subtle but very iridescent (unfortunately it's very difficult tp photograph because of this). 


I then took a thistlehead stamp (PaperArtsy) and inked this with Adirondack cranberry dye ink, followed by oregano ink and whilst still wet again heat embossed with detail clear EP.


Next I stamped the bird (supplied) and the music (Crafty Individuals) onto straw coloured card with Versafine onyx black ink and trimmed both images out.  I then edged both with burnt sienna chalk ink and coloured the eye blue and the beak yellow.  The images were then applied as shown with Glossy Accents with the bird holding the music in its beak.  I then edged the page with burnt sienna chalk ink and applied rub-on letters as shown.

Hope Efemera like it !!

Sid xx

Pin It
Tuesday, August 18, 2009

Lizard ATC

This is an ATC I did for this weeks TMTA challenge. Reptiles was the theme so I made a black Fimo polymer clay lizard using a mould from Krafty Lady and applied mica powders before baking. The base is black card which has been stamped with galaxy gold Brilliance ink using a stone texture stamp from Judikins 'Artifacts' cube and sprayed with Moonglow gold glitz spritz. The letters are pre-printed by K & Co and attached with Glossy Accents. The ATC has been edged with gold Krylon pen.

One problem I found is as usual the shiny finishes on this card are very difficult to photograph so it looks much better in real life.

Sid:-)

Pin It

Monday, July 27, 2009

'Nature' Box

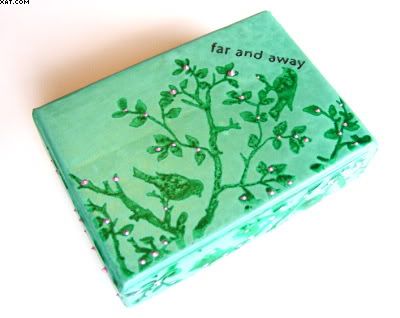
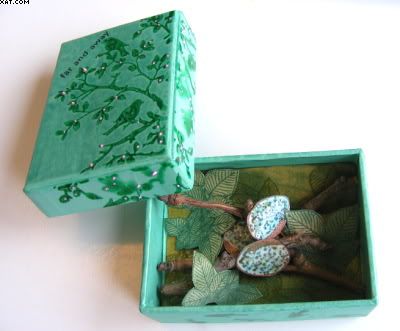
Here is a little box I have decorated for an altered swap over on UK Stampers Forum. The brief was to use something which had grown from the earth or in the sea and to turn it into a piece of art for swapping.

I had collected a piece of very lichen covered deadwood from under some trees ages ago and this has sat in my hall waiting to be used ! I had a plain box which is 8cm long x 6cm wide x 3cm deep. I painted it in a pale green semi-gloss acrylic all over and allowed to dry. I then used a couple of rubber stamps from Crafty Individuals (one a single bird and the other a branch with birds) in eden green Stazon on the top, 3 sides and all sides of the base of the box. Once dry I sprayed desert moon gecko green Glitz Spritz generously on all surfaces and allowed this to dry naturally. Once dry I added tiny blobs of pink Pearly Doodles dimensional paint to represent blossom on the leaves and branches on the top only. The words 'far and away' were stamped on the top of the lid in black Stazon. The mica shine does not show very well on the shots unfortunately, but they are quite shiny !


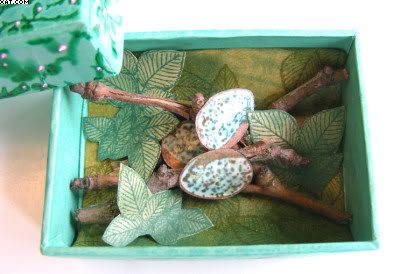
I then stamped 3 birds eggs (PaperArtsy) in vintage sepia and used a waterbrush and Marvey le Plume II pens to colour the eggs in green, blue and brown. Once dry I applied Versamark from the pen and heat embossed them with clear detail EP. I then trimmed them out carefully.


I wanted to make a leafy background and on a piece of beige paper stamped a leaf stamp (Crafty Individuals) onto a background made with Distress inks in pine needles, shabby shutters and peeled paint. Three of the leaves were trimmed out for decoration. The background was stuck in place with double sided tape.


I broke my twig into useable sized pieces and stuck these in place with clear silicone glue, arranging them to suit. The eggs and leaves were then shaped and also applied the same way to provide a 3D effect..........loosely resembling a birds nest ! I am quite pleased with the effect overall and its great to use natural pieces in your artwork too.

Hope you like it :-)

Pin It
Friday, June 26, 2009

'Froggy' ATC


I have not entered TMTA (Think Monday Think ATC) for a long time and I noticed that this weeks theme is for Frogs. I remembered I had a frog stamp from Kodomo and decided to use it to make my entry.

The background was sprayed with Moonglow Glitz Spitz in various shades of pink and red and allowed to dry before trimming to size. The stamp was inked in Versamark and heat embossed with opalescent green embossing powder. The foliage was stamped with a leaf stamp from Crafty Individuals in eden green Stazon. The edges were stamped with a diamond stamp in Brilliance galaxy gold. The word 'frog' was stamped with PaperArtsy alphas and Versamark and heat embossed with peach EP. A paper flower was painted with Viva metallic paint in gold (simply fantastic coverage and shine) and applied with glossy accents, the centre of which was embellished with Ranger gold Stickles. Final touch was to edge the card with Krylon gold pen.

Pin It

Sunday, June 07, 2009

Another Blue CJ


Right & Left Pages

Here are my two pages as my entry into one of our CJ'ers works of art. This one has a rubber stamp of an angel which has to be used in your entry and, apart from the colour 'Blue', you could do anything.

I wanted to keep a celestial theme so took two pieces of pale blue card and sprayed these with Moonglow mica sprays in various pale blues and silvers over a glimmer screen of a scroll until the desired effect was achieved. These were allowed to dry. I then rubber stamped clouds and the moon ( A stamp in the Hand) in Brilliance moonlight white across the skyscape I had previously sprayed. Very subtle effect, but if you look closely you will see these ! The main stamp of the angel was stamped in Brilliance mediterranean blue on the same blue card and cut out and given a light coat of Lumiere hi-lite blue paint. Before applying the cut out I selectively stamped just the wings in the same ink down the left hand side of the page as a border. The angel was adhered, leaving the wings free to curl and the finishing touches applied with gold calligraphy ink and a nib pen.

I liked the words I used, I had written them down in my little sayings book ages ago and they have never been used before. They were computer generated and printed onto a piece of ordinary copier paper. This was trimmed, edged with pale blue chalk ink and again given a coat of the Lumiere hi-lite blue paint. The edges were curled and the whole lot sprayed with hair lacquer to stiffen. This was applied as shown along with a couple of flourishes in the blue Brilliance ink. The page again has a border of wings.


The Sign-in Tag

To finish I decorated the supplied sign-in tag and applied a small piece of velvet ribbon in light blue.
Hope the recipient likes it :-)

Pin It

Thursday, May 28, 2009

'Vintage' ATC's


Here are a set of three ATC's I did for a swap. The theme was Vintage.

The first (from left) was made from a piece of serendipity paper that I had stamped on numerous times and I then heat embossed the stamp (from the 'pensive' plate by Cherry Pie) with blue glass EP finishing with an edging with iris chalk ink and the word EVIDENCE.

The second is on a background made from Moonglow mica sprays and templates. A few layers were applied over magenta cardstock and allowed to dry. The swirls stamp was from Crafty Individuals and was inked with Adirondack Eggplant ink. The collage element is another stamp from Cherry Pie (Klimt plate) and was finished with Alcohol Inks in various orangey colours and finished with black stazon on glossy cardstock. The card was edged with midnight blue obsidian EP from Moonglow.

The third uses another homemade background using blue Moonglow Glitz Spritz sprays. The flourish stamp was another from Crafty Individuals and was inked and stamped with denim Adirondack Ink. The image is another from Cherry Pie and was stamped in black Stazon on white glossy card, cut out and split three times before adhering to the background. The headress was made by applying glossy accents as a glue and then sticking on random black sequins and infilling with stickles glitter glue.

Hope the recipients like them :-)

Pin It

Thursday, May 21, 2009

'Blue' Inchies

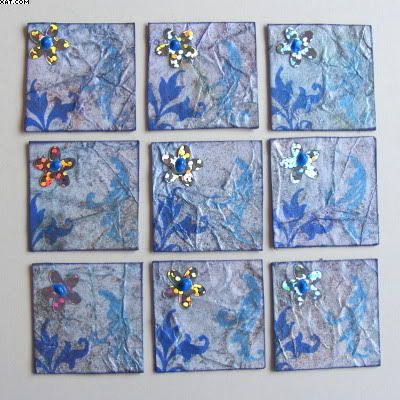
Someone asked 'Are you going through a blue phase?', and I think I am. I am running an inchie swap with the theme of blue this month and these are my inchies for that swap.

Background is Moonglow Glitz Spritz and the 'scrunch' technique on ordinary copier papier. Stamps are from a swirls set applied in Stazon and Brilliance. The embellishment is a holographic flower sequin with a blue dimensional blob of liquid applique. Each is edged with Iris chalk ink.

Et voila.......there you have it !

Pin It

Saturday, February 14, 2009

Happy Valentines Day !

Wishing all you lovers out there a Happy Valentines Day ! Here is a card I made for mine. I wanted to make a slightly different overall effect and used a couple of the Elusive Images stamps that I thought fitted the day.

What I used:

  • Pearlescent Card (Pastel Pink cut to 8.25 x 3.25 inches)
  • Card (Petrol Blue for mat & sentiment)
  • Pearl paper (blue/pink for second mat)
  • Moonglow Glitz Spritz ( Desert Moon Endless Sky, Royal Crimson Fire)
  • Moonglow Embossing Powders ( Cosmic Pink Blue, Midnight Ruby Obsidian)
  • Mylar stencil (flower shape)
  • Stamps (Filigree Heart and 'With Love' - Elusive Images)
  • Versamark Inkpad
  • Brilliance Inkpad (Pearlescent Sky Blue)
  • Double sided tape
  • Foam pads

The card was cut and folded using a bone folder. The heart stamp was inked up with Brilliance Pearlescent Sky Blue ink and randomly stamped over the front of the card, this was heat set with the heat gun.

The first mat was cut out of petrol blue card and sprayed liberally with the Desert Moon Endless Sky Glitz Spritz and allowed to dry naturally. The stencil was placed over the card in two places and this was heavily sprayed with the Royal Crimson Fire Glitz Spritz. The stencil was carefully removed and the spray was allowed to dry.

The heart stamp was inked with Versamark Ink and stamped as shown on the mat then heat embossed with the Cosmic Pink Shimmer Moonglow EP. The sentiment was stamped using Versamark onto a scrap of the petrol blue card and this time heat embossed with Midnight Ruby Obsidian Moonglow EP. This was trimmed with scissors and foam pads were applied to the reverse.

A second mat was cut to allow 1/8th inch border and the first mat applied over this. The card was then assembled and finally finished with the sentiment applied as shown.


Hope you like it :-)

Pin It

Sunday, February 01, 2009

Postcard from Australia !


Here is my entry for this weeks Sunday Challenge over on the UK Stampers forum. This weeks theme was 'Australia'
For the postcard I used:
  • Ink-jet image of Australia
  • Cheap hairspray
  • Moonglow Glitz Spritz (Shimmering Silver)
  • White card
  • Adirondack Dye Ink pad (Eggplant)
  • Brayer
  • Stazon Ink Pad (Royal Purple)
  • Rubber Stamps (Foliage Cube Fern, Invoke Arts Alphas, See D's Alphas)
  • Versamark Ink Pad
  • Embossing powder (Peach, White)
  • Skeleton leaves
  • Satin ribbon (Maroon)
  • Glossy Accents
  • Micro Glue Dots
  • Glue Stick
I must say I didn't have one directly related stamp so I used an ink jet printed image of Australia which I cut out and set with cheap hairspray then sprayed with the Glitz Spritz.
The card was cut to 15 x 10 cm and brayered with Adirondack eggplant then overstamped with the royal purple Stazon and the foliage cube stamp.
The Invoke words were stamped with Versamark ink and heat embossed with white EP. The word OZ was stamped similarly with the See D's Alphas and heat embossed with peach EP.
The ribbon was applied with glue dots as shown and three skeleton leaves tucked under the ribbon and stuck with small amounts of glossy accents as shown. Finally the map of Australia was applied with a glue stick.
Hope you like it :-)

Pin It

Wednesday, October 15, 2008

'DARK'

This months theme for the UK Art Raffle is 'Dark', to be interpreted any way we liked. This art has also been entered into the 'Goth Style' Wednesday Stamper challenge for this week.

I wanted to do a dark atmospheric number so I started with a yellow card as the base and applied Adirondack dye inks with cut'n'dry foam to obtain a murky overall background. I used bottle, denim, egglant and slate to get the effect I wanted, using small pieces of foam and picking up the ink after first applying ink to a non-stick craft sheet.

I had acquired, many moons ago (pun), a laser cut sheet of tree silhouettes and I cut one of these out and sprayed with Moon Glow Glitz Spritz in desert moon wild iris, allowing to dry naturally before edging with silver Krylon to reflect the moons silvery glow. This was set aside. I then stamped the base with a foliage stamp (anon) in Brilliance pearlescent lime.

The devils face was a stamp I have never used before and came from a grab bag from Third Coast rubber stamps in the USA. I stamped this several times in Versafine onyx black to go behind the tree. The stars in the sky were stamped with a dotty stamp (anon) with Brilliance mediterranean blue and the moon was applied top right with silver Krylon and a circle stencil. The bird was stamped onto black/silver card with black ink and cut out before edging wings, beak and tail with silver Krylon. The word 'DARK' was stamped with magnetic stamps from Making Memories and onyx black Versafine.

The tree was applied over the devils faces with glue stick and the bird applied with silicone glue as shown. The scene was matted onto black and green carstock to finish.

Don't think 'I' would like to walk past that tree on a night like that !!! Hope whoever is the lucky winner this month is not put off by my rather macabre art.

Hope you like it :-)

Pin It

Monday, October 13, 2008

Wednesday Stamper

This weeks Wednesday Stamper challenge is 'Brown Combo'. I made my own background card by spraying textured green cardstock with Moon glow Glitz spritz royal emerald fire, Glimmer Mist spring mint and Sticky fingers grass green spray inks. I allowed these to dry naturally to produce a rich opalescent sheen.

I then took a corner stamp with a lady on it and stamped this on pale green card in Versafine vintage sepia, tearing around the edges and edging with dark brown Colorbox chalk ink. I used a dotty stamp to stamp the top right corner of the base card and the torn out image with the same brown chalk ink. I then stamped two more single ladies face images on light green cardstock in Versafine olympia green, wiped over them with sage green chalk ink and edged them with dark brown chalk ink.

I then layered one of the images over the original sepia corner and attached with foam pads for relief. The sepia corner was also added as shown with foam pads. A strip of printed paper was adhered along the width of the card at the bottom and the second ladies face attached over this on foam pads.

Two epoxy stickers were added and some flourishes stamped on with gold Marvy Metallics to finish. I seem to be going a bit green at the moment but, along with blue, it is my favourite colour after all.

Hope you like it :-)

Pin It

Monday, September 15, 2008

My heart.............ATC

This ATC was done as my first entry to the Think Monday, Think ATC challenge. The subject this week is Handwriting.

I cut the ATC from white board and adhered a piece of printed background paper to it with handwriting printed on a cream background from K & Co Lifes Journey. I then chose a rubber stamp with the words 'My Heart Is Like A Singing Bird' and stamped with Versamark ink and heat embossed with Stampendous twighlight embossing powder and a heat gun.

I cut out a medallion from the same paper and dabbed this with moonglow delphinium turquoise Starburst Stain, again drying with the heat gun. The ATC was sprayed with moonglow desert moon endless sky Glitz Spritz and allowed to dry and edged roughly with some more starburst stain. I used a calligraphy swirl stamp (anon) and stamped twice with Brilliance meditteranean blue ink.

The medallion had a small fabric flower applied centrally and this was secured with a pewter coloured square brad before attaching as shown with foam pads to give depth.

I would have used some of my own handwriting..........but it is really bad, so I opted for a stamp instead.

Hope you like it :)

Pin It

Thursday, September 11, 2008

Sunday Challenge No 6


These three tags were done as my entry for the UK STampers Sunday Challenge. Basically the challenge was to produce three tags in leaf shapes and Autumn colours.

My three tags were cut with the Sure-Cuts-a-Lot program and my Cricut using SVG files. One cut in green, one cut in yellow and one cut in orange textured card. I then used various Moonglow Glitz Spritz sprays in copper, antique gold and green, dried in between coats with the heat gun until very sparkly.

I then used one of the images from the Stampendous foliate quad cube stamp (TC51) with Versamark ink to apply various Moon Glow EP's in Tannenbaum Green Gold, Holly Berry Red Gold, Orbit Olive Gold and Midnight Teal Obsidian along with Adirondack Butterscotch and Bottle EP's all heat embossed with the heat gun and applied in layers.

Colobox Chalk Ink in peach and tangerine was added to edges of leaves and patches on the leaf surfaces.

Finally some red and green organza and orange grosgrain ribbons were added along with a gold swirly clip.

Hope you like them :)

Pin It
Related Posts Plugin for WordPress, Blogger...