>
Showing posts with label Glimmer Mist. Show all posts

Tuesday, April 05, 2011

A cup fit for a Red Queen?


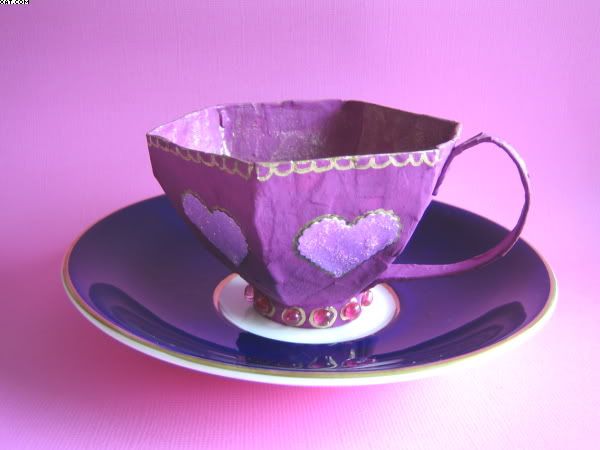
Once more and in line with my Alice in Wonderland theme this cup was made at our retreat in Skipton as one of our projects. The template for making these teacups came from Ann Woods Blog which has loads of other inspiring creations.

The template was cut out from recycled cereal boxes which were reinforced with strips of paper and PVA glue to make papier mache (of a type).  The teacup was allowed to dry completely.

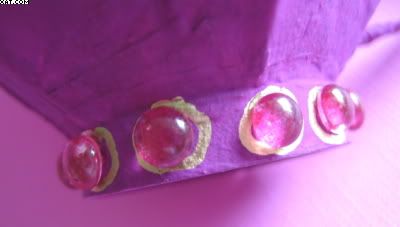
I painted mine with a few coats of matt Dylusions paint and then decorated with a gold pen and some Dew Drops.  The inside was sprayed with antique gold shimmer mist to give it a sheen.  The hearts are cut from pink card using a heart Nestabilities die and stuck in place, followed by a coat of Stickles diamond glitter glue.


This one is displayed on an old porcelain saucer which I didn't make !!

Messy to make but really satisfying once complete.

Sid xx

Pin It

Sunday, November 16, 2008

'Poppy'


Here is my entry for the UK Stampers Sunday Challenge. The theme was linked to Remembrance Sunday and the image had to be of a poppy. Here is mine.

The poppy was stamped after selectively colouring the flower and the leaves with watercolour brush markers. This was stamped on plain white card and then waterbrushed to produce a watercoloured finish. The image was then carefully cut out. The stamp used was from the Aspects of Design Floral plate. This was then applied with foam pads onto a pre-prepared cuttlebug textured mat. The mat was made by embossing a plain card with a Cuttlebug embossing folder then spraying with passion red and pink ink Glimmer Mists. This was rubbed over with the Versamark pad and this was heat embossed with blue pearl embossing powder. The mat was then matted on dark blue and pink card.

The C6 card was made from light blue cardstock and a printed acetate sleeve applied which had been inkjet printed with a design from the Artilicious filigree fusion CD Rom from Glenda Waterworth. The sleeve was applied with purple metallic eyelets and the poppy and mats adhered centrally. The acetate was very difficult to photograph to avoid reflections but you will get the general overall effect from the picture.


Hope you like it :-)

Pin It

Monday, October 13, 2008

Wednesday Stamper

This weeks Wednesday Stamper challenge is 'Brown Combo'. I made my own background card by spraying textured green cardstock with Moon glow Glitz spritz royal emerald fire, Glimmer Mist spring mint and Sticky fingers grass green spray inks. I allowed these to dry naturally to produce a rich opalescent sheen.

I then took a corner stamp with a lady on it and stamped this on pale green card in Versafine vintage sepia, tearing around the edges and edging with dark brown Colorbox chalk ink. I used a dotty stamp to stamp the top right corner of the base card and the torn out image with the same brown chalk ink. I then stamped two more single ladies face images on light green cardstock in Versafine olympia green, wiped over them with sage green chalk ink and edged them with dark brown chalk ink.

I then layered one of the images over the original sepia corner and attached with foam pads for relief. The sepia corner was also added as shown with foam pads. A strip of printed paper was adhered along the width of the card at the bottom and the second ladies face attached over this on foam pads.

Two epoxy stickers were added and some flourishes stamped on with gold Marvy Metallics to finish. I seem to be going a bit green at the moment but, along with blue, it is my favourite colour after all.

Hope you like it :-)

Pin It
Related Posts Plugin for WordPress, Blogger...