>

Wednesday, April 28, 2010

Another D-Fly ATC


Another dragonfly ATC with a much darker background this time.  This ATC was cut from black mountboard and the background made by spraying with homemade mica sprays.  I used lilac, sapphire and silver micas in a mini sprayer with water and a few drops of Distress re-inkers to add a colour element.

I sprayed liberally and allowed the coats to dry between (they don't photograph well unfortunately but look fab in the light).

The swirl stamp is from Cherry Pie and was stamped with Versamark and heat embossed with imperial crown violet gold Moonglow embossing powder.  The other stamp of the dragonfly tag was then stamped with Versamark and heat embossed this time with antique gold embossing powder.  A few dots were added to the wings with an opaque white pigment pen to finish.

Simple, but effective, I think the black mountboard is a super surface for moonglow or mica sprays because it really enhances the mica shimmer and colours.

Sid xx

Pin It

Tuesday, April 27, 2010

'Fly, fly dragonfly' ATC


Here is a little Dragonfly ATC I made for a swap.  I used torn bookpaper on the background which was coloured with cut 'n' dry foam and Memento inks in bahama blue and bamboo leaves helped along with a little crushed olive Distress ink too. 

The dragonfly stamp (Artistic Stamper) was stamped in onyx black Versafine and coloured with Marvey le Plume II pens, cut out and applied onto the background. The eye stamp (Stamp in the Hand) was stamped three times also in onyx black and the little bird (?) was stamped several times with the Memento bahama blue. Highlights were added with a white opaque pen and the letters (K&Co). I added a Sizzix die cut corner cut from green paper to finish.

Sid xx

Pin It

Sunday, April 25, 2010

Rolling Recipe Tag 14


Here is the next tag in the series of Rolling Recipe Tags over on UK Stampers Forum.  This one is no. 14 and had to have:

*   Stripes
*   Gems
*   Leaves

I started by cutting a blank white card tag and covered the front with some printed stripey paper.  The die cut strip down the right hand side is cut using the Big Shot and one of the Tim Holtz 'Alterations' dies, this one is ornate.  This was stamped with a TH letters stamp and sprayed with a home made mica spray in a duck egg blue tint.  This was then stuck in place and trimmed.


The plate was stamped on white card with a fern stamp (Paperartsy) several times with onyx black Versafine and with Memento cottage ivy ink. The background was coloured direct to paper with ColorBox chalk inks in tangerine, orchid pastel and amber clay  A swirl stamp (Wendie Rhodes) was also stamped with lilac posies Memento ink. A punched bird (Martha Stewart) was made using the stripey paper and applied before matting onto more of the stripey paper.  A small self adhesive sentiment was added.


The base tag was decorated with some vinyl swirls and the swirl stamp was stamped again in Memento ink as shown.


The plate was adhered on foam pads and some green gems added.  A piece of florists wire was then attached at the top of the tag to finish.

Sid xx

Pin It

Saturday, April 24, 2010

Ma Cherie !


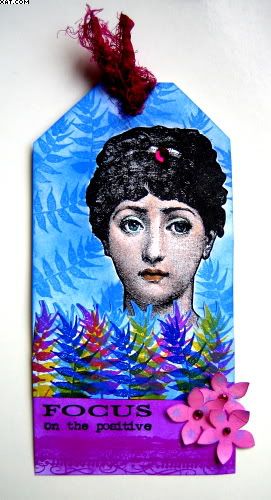
I have been watching the RSS (Ready Steady Stamp) challenge website for a while and have never taken part.  I decided to join in this time and this is my entry.

This entry had to have at least three of the following ingredients:

*   The letter M
*   Purple, pink, green & black
*   Stamped flowers
*   Gesso on background
*   Rubber


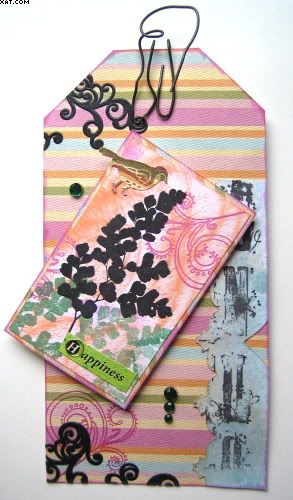
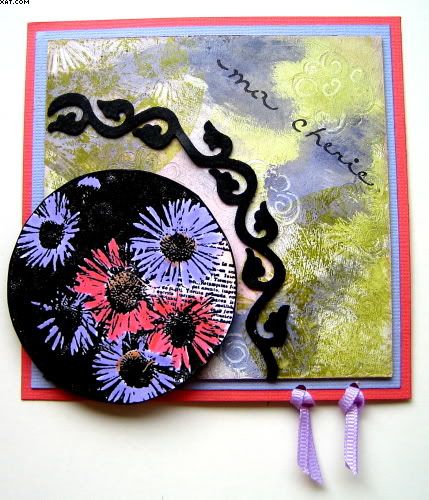
I managed to use all five of the ingredients.  I first made the background out of a piece of brown backing card and cut it to a 4 x 4 inch square.  I then applied Gesso roughly and stamped into this with a Klimt swirl stamp  (?).  Once dry I coloured the background with brushes and Adirondack dye ink in lettuce and eggplant.  I used Memento angel pink dye ink for the pink in the background.  Once happy with the overall effect I selected a flower stamp from Tuscan Rose and inked this with lettuce Adirondack ink and stamped on two corners of the background, providing a subtle image over the background.


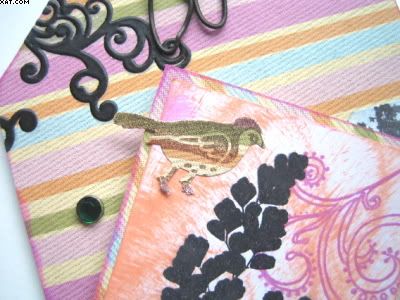
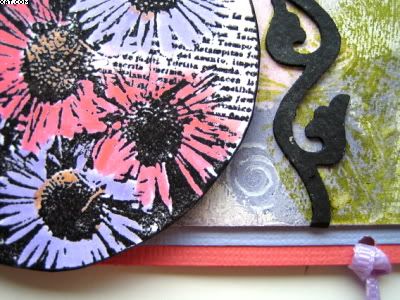
For the embellishment I again stamped the floral image onto white card but this time in Versafine onyz black and heat embossed with detail clear embossing powder before cutting out.  I hand coloured the daisies with Marvey Le Plume II pens in appropriate colours as shown.  This was later adhered on foam pads to raise the image a bit. I then mounted the background plate on two card mats, one in lavender and one in french pink.


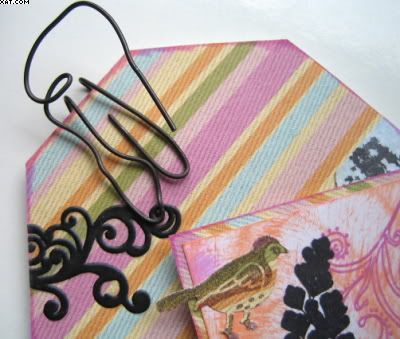
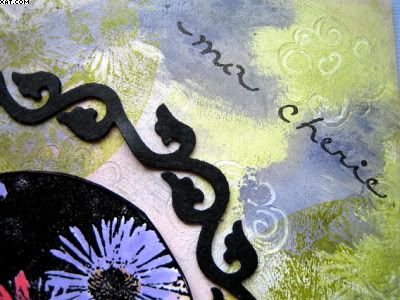
The black vine embellishment was made out of die-cut bike tyre rubber by a crafting friend of mine Lorraine and was given to me as a RAK some while ago.  I knew I would get the opportunity to use it sometime and this was just that opportunity !  It was adhered carefully as shown with Glossy Accents.  The beauty of using rubber in this way is that it's flexible and can be easily curved as desired.

The 'ma cherie' was stamped directly using more Versafine ink and a polymer stamp from Sizzix.

Finishing touches were added by punching 2 holes at the bottom and knotting through two pieces of thin lilac grosgrain ribbon.

Sid xx

Pin It

Sunday, April 18, 2010

Rolling Recipe Tag 13


This weeks challenge was to make a tag with the following elements:

  1. A Face
  2. Leaves
  3. Gems
I decided to go a bit funky and use leaves but with not a tinge of green in them at all (no green ink was used but some green was made accidentally by overlaying different colours). This turned out to be a very bright little number indeed !


The base tag was cut from white card and the stamp of a ladies face (Cherry Pie) was stamped first with onyx black Versafine ink. I love this stamp ! The image was coloured lightly with Marvey Le Plume II pens.
A mask was made by stamping again on a post-it note and placed over the original image whilst lavender Impress dye ink was applied with cut'n'dry foam for the background. A leaf stamp (Crafty Individuals) was then inked with the same ink and stamped randomly over the image to decorate as shown.


The same stamp was then stamped repeatedly in lemon yellow, ultramarine, peony purple and lavender Impress ink to form the leafy layer and this was trimmed out.
The bottom half of the tag was then sponged with more Peony purple ink and a border stamp (Green Pepper Press) stamped in the same colour. The leafy section was then stuck into place with glue stick.


Next I cut out some flowers with a Martha Stewart punch out of an old M&S cake box and coloured this with more peony purple Impress before embellishing with purple self adhesive gems and sticking in place with glue dots. Another gem was applied in the ladies hair.

The word stamp (Cherry Pie) was stamped as shown with onyz black Versafine ink and an eyelet with some pink silk added with the crop-a-dile to finish.

Must say that I love the vibrancy of the Impress inks in this. Hope you like it.

Sid xx

Pin It

Sunday, April 11, 2010

Rolling Recipe Tag 12

Trying to play catch up with these tags, I left off at Tag 6 and so have another 5 to do to complete the set. This is Tag 12.

This weeks challenge was to make a tag with the following:

  1. Gems
  2. A stamped image of a face
  3. Eggs

I cut the basic tag from white cardstock and adhered a torn page from an old book at the bottom. I then applied pumice stone Distress Ink to the top of the tag and around the lower edges with cut'n'dry foam. I then stamped onto the background with a music stamp (?) in crushed olive Distress Ink.


I then used a leaf stamp from Paper Artsy and stamped this repeatedly in pumice stone & crushed olive Distress ink as shown. The main image of a face is also from Paper Artsy and this was stamped on white card in Versamark and heat embossed with detail black embossing powder before colouring in with distress inks and a waterbrush. This was trimmed out and applied with glue stick.

The eggs (Paper Artsy) were stamped on white card in onyx black Versafine and coloured in similar colours of distress ink as before. These were trimmed out and applied on a single large glue dot.

The scalloped edge was made using a Martha Stewart punch, white card and more crushed olive Distress Ink and was applied with glue stick at the bottom of the tag. I adhered 3 peridot flat backed gems to this strip. The word stamp (Paper Artsy) was stamped directly in onyx black Versafine as shown.

Finally a cream eyelet was applied with the crop-a-dile and some fibres tied through the hole. Now to start to catch up on the rest.

Love those new colours of Distress Inks by Tim Holtz & Ranger!

Sid xx

Pin It

Saturday, April 10, 2010

Spring has Sprung

It's been simply ages since I posted, somehow life got in the way ! This little number is my homage to Spring in that it makes me feel brighter and the sun is actually shining outside today.

I have had the mini canvas (2.75 x 2.75 ins) in my hands so many times and have never done anything with it to date. I used tissue paper, stamped images and napkins for the background, all adhered and held in place with Matt Mod Podge.

I had been sent a very lovely paper napkin as a RAK and tore the edges (which contained images of cherries) and adhered these with the Mod Podge and a soft brush. I then stamped some text onto pale pink tissue paper with Versafine vintage sepia ink, again tore this and adhered several pieces across the canvas using the same method. I finished off by stamping an image (free coverstamp from Craft Stamper Mag) with Cherry Red Stazon onto pink tissue and applied this as before. I left one or two bits of the canvas showing through too.


Next I cut the lady image from a mini postcard and edged with black ink. This was applied over the collaged canvas (once dry) with Glossy Accents as shown. A piece of pink velvet rik-rak ribbon was applied with glossy accents and this was embellished with a button tied through with a thin piece of dark green braid and adhered on a glue dot.

To finish I added a coat of victorian velvet Distress ink applied with cut'n'dry to the sides of the canvas. I love the way that tissue paper allows the other stamped layers to show through.

Hope you like it !

Sid xx

Pin It
Related Posts Plugin for WordPress, Blogger...