>
Showing posts with label Shrink Plastic. Show all posts

Sunday, May 23, 2010

Charming !


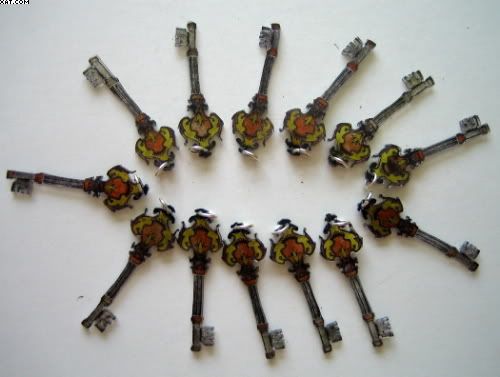
These little key charms were made as part of a swap run over on UK Stampers Forum by the lovely Minxy.  She kindly hosted the swap and each participant (14 in total), made 14 charms which were sent to her.  She had the massive task of fixing all the different charms to a bracelet that she had made before sending back our fab finished works of art.

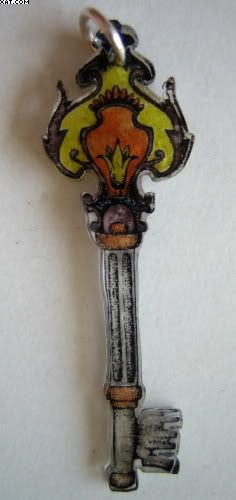
I used a key stamp from Elusive Images and stamped this on opaque shrink plastic with black Stazon.  I then used Sakura Moonlight pens to colour them before punching a hole with the crop-a-dile, cutting out and shrinking them.  I applied a small jump ring to each to finish.


I thought that they would be ideal because they were only 1 inch long and very lightweight too ! Click HERE to see the finished bracelets and all the charms.

Sid xx

Pin It

Monday, September 14, 2009

'S' is for Spooky Tag


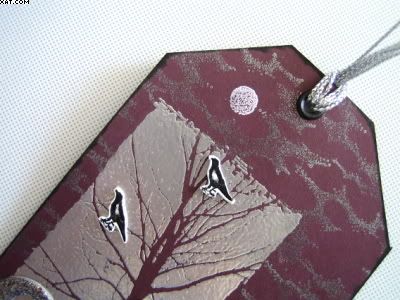
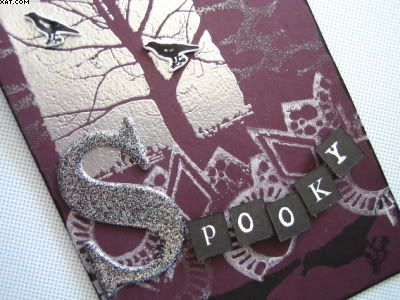
Here is my tag for this weeks challenge over on UK Stampers Forum. This weeks theme was 'S' is for Spooky. Wanted to create a dark and bleak effect on this one.

I began with a dark brown card trimmed to size. I first used a stamp of a bare tree (PaperArtsy) and inked the stamp with Versamark ink and heat embossed with detail silver embossing powder. I then used a cloud stamp (A Stamp in the Hand) and inked this with Brilliance moonlight black ink and stamped the cloud background. The moon (A Stamp in the Hand) was stamped in Brilliance moonlight white in a gap in the clouds.


The bird stamp (PaperArtsy) was next inked with black Stazon and stamped onto white shrink plastic 3 times, and trimmed and shrunk with the heat gun. The stamp was then inked with Versafine onyx black and stamped along the bottom of the tag. I used a Stewart Gill Artaglio stamp inked with Brilliance starlight silver to fill in the gap under the words.


The chipboard letter S was coated in Versamark and heat embossed twice with Marcasite embossing powder. The tag was then assembled by sticking the shrunk birds on the tree as shown with Glossy Accents. The chipboard letter S was stuck in place followed by some K&Co black letters (mounted on foam pads) to spell out 'Spooky'. The whole tag was edged with Brilliance graphite black. A black eyelet was applied with the crop'a'dile and 4 short lengths of silver metallic cord were tied through the hole.


Sid xx

Pin It

Sunday, June 28, 2009

Altered Cutlery ?


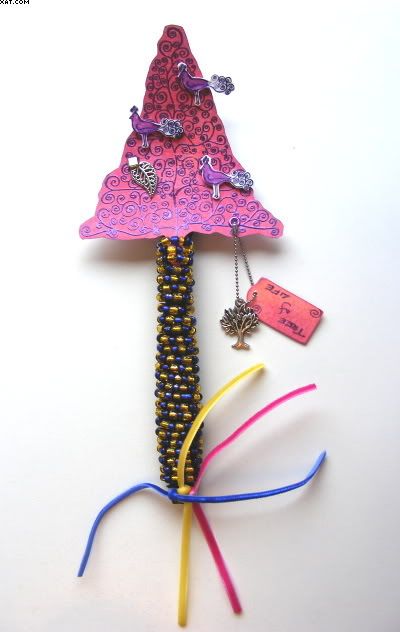
Well this is it ! My weirdest creation yet. I have called it 'The Tree of Life'. It's made from a black plastic fork obtained with a salad from Subway last week. It is part of a swap run by Hazel on UK Stampers Forum in the altered art section.

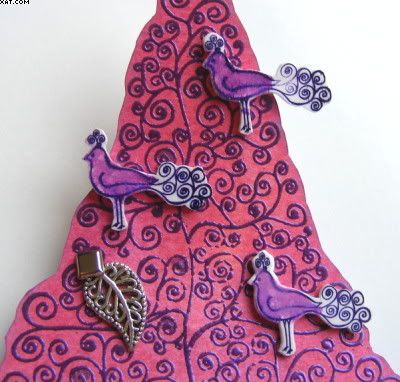
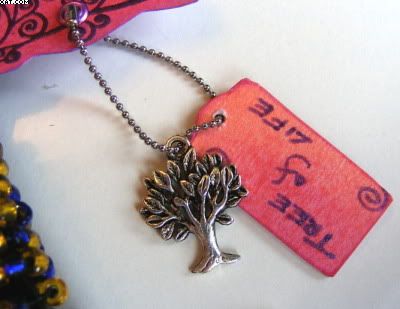
I made the tree itself using a stamp from PaperArtsy which was heat embossed with violet pearl EP on a background made with Adirondack wild plum and red pepper inks applied with a piece of cut'n'dry foam. Once embossed the tree was cut out and left to one side. In the meantime I made three shrink plastic embellishements which were stamped in purple Stazon ink on white shrink plastic sheet. The bird stamp was also PaperArtsy. The bodies were coloured with pink chalk ink before cutting out and shrinking. A metal leaf was attached with a square silver brad and a hole punched with the cropodile on the bottom right of the tree. An eyelet was applied. The mini tag was coloured and written upon and threaded with a metal tree embellishment with the ball chain as shown. The three birds were applied with mini glue dots as shown


Detail of tree


Detail of Tag


Next was to cover the handle of the fork. I took a long strip of mediumweight black craftwire and threaded it with alternating gold and blue glass beades with silvered centres until I had a length of threaded wire long enough to spiral around the handle to hide it completely. One end of the wire was wrapped around the middle two prongs of the fork and the beads pushed down to the top of the handle. I then commenced wrapping the beaded wire round and round the handle to the base where the last coil was made to trap 3 pieces of coloured velvet ribbon before securing the wire into the last coil.


Handle base and ribbon detail

I used big sticky dots to attach the tree to the front of the fork prongs, hence the reason that the tree is curved slightly (following the contour of the prongs). The whole thing was wrapped in white tissue secured with three pieces of the same ribbon.

This was certainly a challenge for me ! Hope whoever gets it in the swap is happy with it :-)

Pin It

Tuesday, March 17, 2009

Jeans Black CJ entry 'Black Magic'


As you probably know I am doing a CJ (Circle Journal) with a number of fellow crafters on UK Stampers Forum. This entry was in the 'Black' CJ originated by Jean who asked us to complete just one page in her CJ. The stamp which accompanied the CJ was a Zetti stamp of a catlike face with a weird hat. We had to use this stamp and any others we liked in the colour theme. I decided to do 'Black Magic' as my theme. My finished page is shown above, detached from the CJ itself.

To make it, I used:

  • Card (silver grey)
  • Versamark Inkpad
  • Embossing Powder (Clear)
  • Glass mosaic tiles (Black, sandblasted in two sizes)
  • Shrink Plastic (Black)
  • Stazon Inkpad (Cotton White)
  • Glass faceted cabochons (Black)
  • Die cut Alphas (made on cricut)
  • Stamp (Calligraphy)
  • Superglue
  • Glossy Accents
  • Gelly Roll Pen (Silver Tiara, Opaque white)
The grey card was trimmed and stamped with the calligraphy stamp inked with Versamark ink. This was then coated in clear EP and this was heat embossed with a heat gun. This was applied direct to the page with double sided adhesive.


Next the Zetti stamp was stamped onto the shrink plastic in Stazon cotton white ink four times and allowed to dry before cutting out and heating to shrink. These were set aside.


The black glass mosaics were selected and laid out as shown before adhering with the superglue. The shrink plastic pieces were adhered as shown with the glue, as were the faceted cabochons.


Finally the letters were die cut out of white card and these were adhered with Glossy accents after coating with the Silver Tiara Gelly Roll pen. Finally I added my nickname in the opaque white pen.


I do hope that Gail likes the entry and I was a bit worried about the weight of the mosaics, but they were not too heavy in the end.

Pin It

Friday, October 03, 2008

Art Doll Charm

This is my little (3 inches tall) Art Charm Doll done for a swap on UK Stampers Forum. Pinky is running the swap and I have just finished mine.

I printed a doll parts template from the internet onto plain copier paper and then stuck this to a large sheet of black shrink plastic with glue pen. I then cut around the parts and soaked off the template paper with warm water, leaving me with all the bits. I then punched holes in the appropriate places with the crop-o-dile so I could assemble the doll when finished.

I decided to use Opalite inkpads in crystal blush for the arms and glacier blue for the legs. The stamps are two of my unknowns......but I thought they would give a decorative pattern when shrunk down. The torso was sprayed with starburst stains to achieve a mottled, shiny appearance. All parts were shrunk carefully with a heat gun and flattened whilst still hot with an acrylic block until cool. I only decorated one side of the doll with these. I painted the rear of the doll with blue matt acrylic paint and sprayed with fixative. All body parts were edged with gold Krylon pen.

For the skirt I used silver header pins and threaded numerous blue beads and just bent over the ends roughly with pliers to hold the beads onto the header pins. I then cut a length of fine black wire and threaded this through the two leg holes on the torso and threaded the beaded header pins onto this before securing at the front by twisting neatly at the rear of the doll. I then applied dabs of gold krylon on the torso as shown. All parts were attached with silver jump rings so the legs, arms and head were articulated.

The picture of the vintage ladies face was stuck to the head with glossy accents and a malachite star stuck on with glossy accents.

The silver lobster claw clasp was attached to the head with another header pin for hanging purposes.

This is the first of its type that I have made and I don't think it is very serviceable really. I found it a bit tricky but was quite pleased with the results though and it has given me more ideas for future pieces.

Pin It

Friday, September 05, 2008

A Charming Collaboration


This is a little gift made for a friend of mine who has been very sick for quite a long time. The collected charms from contributors will be suspended from a charm bracelet to hopefully make her feel better and help her recover more quickly.

I used a 4 x 4 inch piece of card (to go into a little book with a photo of the charm) from fairly light, white card. I used acrylic paints in pale gold, light green and mid-blue which I drizzled from the bottle onto the surface and roughly spread horizontally across the card with a dry brush to cover the surface. This was allowed to dry naturally in a fairly thick coat. I then stamped with a swirl stamp and Brilliance mediterranean blue ink. I finished off with my own (horrendous) handwriting and a blue brush pen with a sentiment that I had collected for just this type of gift.

The charm was made using sanded clear shrink plastic and a stamp by Zettiology (37-197-F)which was stamped first in Stazon ultramarine ink. Once dry this was cut to size and marvy le plume II pens in ochre and purple were applied direct and allowed to dry. A hole was punched with the Crop-a-Dile in the top left corner before shrinking and flattening with a heat gun.

Once cool the charm had a silver jump ring applied to enable it to hang from the bracelet.

Hope it does her a world of good :)

Pin It
Related Posts Plugin for WordPress, Blogger...