

Happy Chinese New year !
This is the Chinese year 4706 and is
The Year of the Ox


These three ATC's have been made for a monthly swap over on UK Stampers Forum. This months theme is METAL. lovely materials to work with, there is something very satisfying when working with foils and metal embellishments and of course I love anything shiny, or rusty for that matter !
Here's how I made them. I used:
The top card was made from a piece of foiled card cut to size and embossed with a cuttlebug embossing folder through my Sizzix machine. I then rubbed over with Versamark ink and applied verdigris EP. Before heat embossing I removed some EP with a fine dry brush to reveal the metal behind. I embellished the card with a 'back to nature' metal plate from DCWV and 4 hematite stars applied with glossy accents.
The bottom left card was cut from plain white card and the edges rubbed over with the pewter rub'n'buff using my finger. When dry this was buffed with a soft cloth. The self adhesive foil was embossed with a folder and adhered centrally across the card. I rubbed the versamark pad lightly over the embossed foil to ink only the raised relief areas and then heat embossed with detail black EP. Six silver round brads were applied at the top and bottom as shown and the metal diecut word 'family' applied with glossy accents.
The remaining card was cut from plain card and the left side rubbed over with Versamark ink for about 1/2 inch. Marcasite EP was applied and heat embossed along this edge. More embossed self adhesive foil was applied as shown and the swirl relief was traced with a Versamark pen before heat embossing with detail gold EP. Five round pewter brads were applied at the top and another DCWV metal plate with the words 'Home is where your story begins' applied as shown.
Hope you like them :-)
Pin It
I needed:
I coloured the card using the Adirondack Dye Inks applied in a circular motion in layers with the make-up sponges to achieve the background colour effect. I wanted warm and rich colours to give the impression of a warm beach. Once happy with the effect I heat set with a heat gun.
I then inked the Grand Hotel stamp with versafine and heat embossed with the lemon yellow Ranger EP. Next I inked the gone to beach stamp with Versamark and this time heat embossed with the Ranger magenta EP.
I then drew a line down the centre of the card with the Marvey pen and wrote postcard at the top left. I inked the postal stamp with Stazon and painted three wavy lines in gold artist ink to represent a postal frank. Finally edging the whole card with the chalk ink.
Hope you like it ! :-)
Pin It
My partners boss is about to go off on maternity leave to have her second child. She already knows that she will be having a boy so I decided to do a little Tag-in-a-Sleeve in advance of the big day ! I don't usually 'do' cute but hey-ho what the heck. Most of the materials are ready made also.
In my effort to be a bit greener, the sleeve was made from a cut down kitchen foil tube as described in an article in the February edition of Craft Stamper Magazine by Jo Capper-Sandon. She describes how to use what would be waste items in your craft projects.
I needed:
The roll middle was first cut to the desired length and then flattened to form an open ended sleeve. PVA glue was applied to the inside 1/4 inch of one end of the tube and this was clipped together with a strong crocodile clip until perfectly dry.
Meanwhile I prepared the tag. I chose one of the blue papers and adhered this with PVA glue to one side of the tag and repeated this for the other side. I trimmed the edges around the base tag and re-punched the hole in the top of the tag with the crop-a-dile (easy work!).
Once completely dry I used the small flourish rubber stamp and stamped in Stazon on both sides of the tag as shown. I then applied a few selected clear quote stickers (trimmed to fit) to both sides of the tag in a pleasing arrangement. Burnishing the stickers with the handle of a pair of scissors to ensure no air bubbles were present under them. A blue self adhesive gem was applied to each side of the tag for a little dimension.
I then edged the tag with the blue iris chalk ink pad directly. The fibre and 3mm ribbons were chosen and applied in a simple slip knot through the hole in the tag as seen.
Once the glue on the sleeve had dried I covered the sleeve with decorative paper and ensured that all edges were folded in and well stuck down. I applied more chosen clear quote stickers and again edged the whole sleeve with the chalk ink. The tag was finally slipped into the sleeve to finish.
I think she will like it and I enjoyed making it too. Hope this is of interest :-)
Pin It
Here is my entry into Efemera's 'Grey' CJ as part of the UK Stampers Forum second CJ. Her CJ consists of tags held together by a single metal ring fastener. Her specific rubber stamp, to be used on each persons entry, is a pair of rather pointy boots (I assume from a Knight's suit of armour).
God, did I mull over what I was going to do on this one but finally had an image of a 'Buy One Get One Free' sale offer. Well they are not exactly elegant , are they? Maybe a Knight may think so though! Possibly the height of fashion for him !
Anyway here's how I made it:
Materials:
The plain card tag was first covered with the architecture printed background paper using PVA glue applied with a brush. This was randomly stamped towards the edges with the flourish stamp using moonlight white Brilliance ink and this was heat set with a heat gun.
Next, the pointy boots stamp was stamped twice on the matt silver card in Versamark Ink and this was heat embossed with detail silver Embossing Powder. When cool the stamped and embossed images were carefully cut out and these were matted on the fine spots backing paper and again cut out with a 1/8th inch border.
Next the words were stamped with the magnetic alphas in black Stazon ink on the grey card and this was trimmed. The trimmed stamped words were matted on more of the matt silver card and again trimmed allowing a small border. They were edged with black stazon before applying with Glossy Accents as shown. Finally the adhesive foam pads were applied to the back of the cut-out boots and they were applied as shown.
It is now on its way to Hazel who is the next in posting line. Hope you don't have as much trouble deciding what to do as I did. That's it folks.
Hope you like it :-)
Pin It
Well, here is another Sunday Challenge entry for Challenge 22 over at UK Stampers Forum . The theme for this week was 'Elements' so I chose snow & frost as my elements. We had to use different stamps with the same colour theme.
I made the cards with:
The cards were sprayed with Glimmer Mist then Glitz Spritz drying in between with heat gun. The stencil was applied and the Adirondack colorwash was sprayed over. The stencil was carefully removed and again dried with the heat gun.
The cards were then stamped with two Create-It snowflake stamps using Versamark Ink and heat embossed with detail silver embossing powder. Finishing with the Rub-ons and edging with chalk ink as shown.
Hope you like them :-)
Pin It My 'Old' Tag
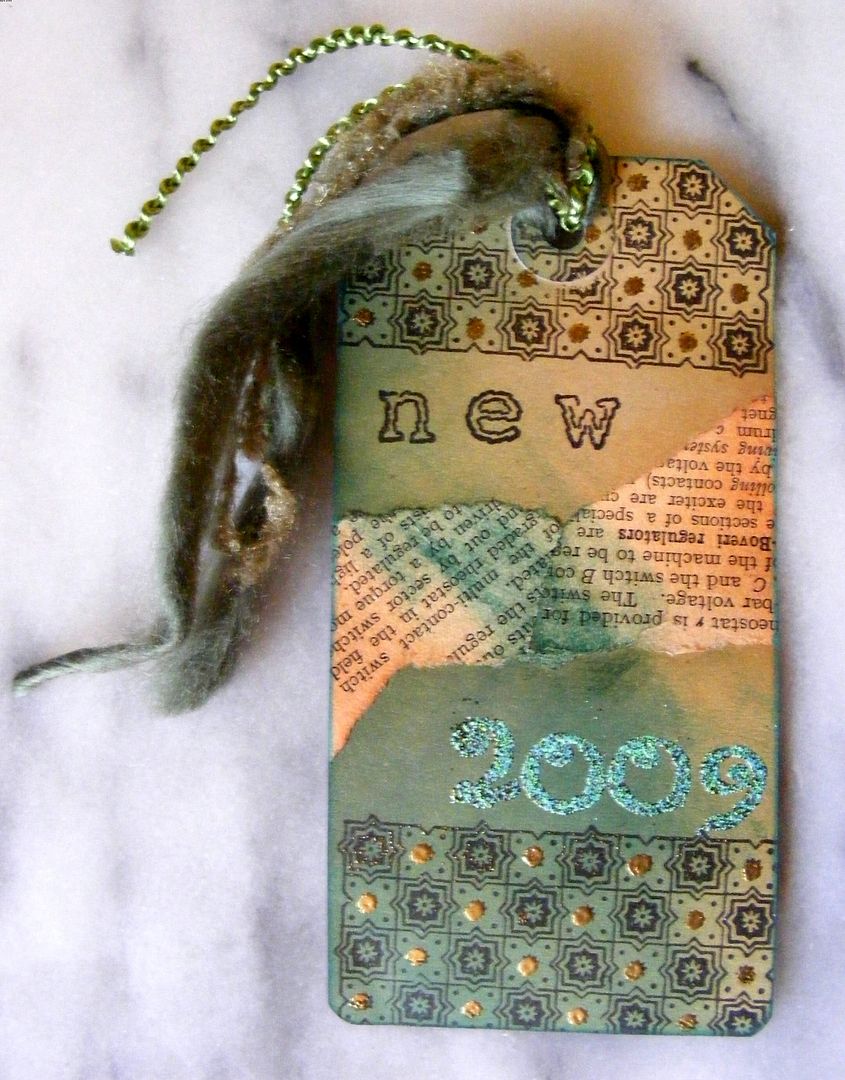
The tag was covered at the bottom with two pieces of torn book paper then the distress ink was applied and blended with cut 'n' dry foam. The main stamp was stamped twice with the versafine. Some versamark ink was smeared over the bottom left corner and Distress EP added before heat embossing with a heat gun. The 2008 was stamped with versamark and heat embossed with Claret EP. The 'old' was applied with versafine ink also. The versamark pen was used to dot the stamped image and go around the word and gold EP was then applied and heat embossed. Finally some fibres were added to complete.
I used for the 'new' tag:
The tag was coloured with Distress inks using cut'n'dry foam. two pieces of torn old book paper were added centrally and inked. The background was stamped top and bottom this time. The tag was then finished as the other but using verdigris EP for the year.
Hope you like them :-)
Pin It THE MAG
As usual I am a little late with uploading this but it is my entry into Diane R's 'Purple' theme CJ as part of a Colours UK Stampers Forum Swap.
I really enjoyed doing it though and took a bit of artistic license and added some mustard to the colourway. I must admit I was a bit stumped as to how to incorporate the image from her rubber stamp choice. I decided after a lot of pondering that I would do almost a daisy-chain of the same image stamped six times and calling my entry 'Purple People'.
Materials:
 Left Page
 Right Page
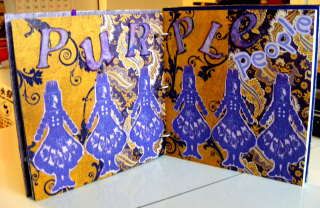
 Sign-in Tag Front
 Sign-in Tag Back


