>
Showing posts with label Seed beads. Show all posts

Monday, June 18, 2012

Bead Weaving


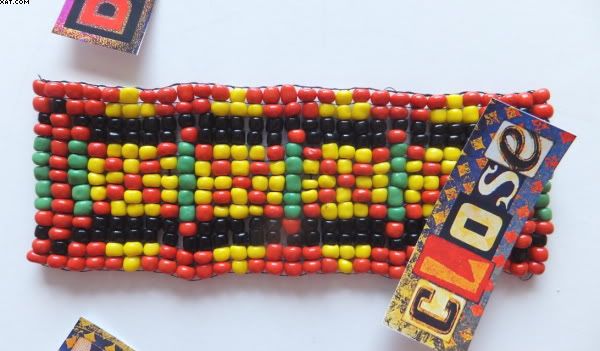
A short while ago I bought a bead loom as I had been meaning to have a go at bead weaving.  This one uses four colours and is 13 beads across in a traditional American indian design. The beads used in this piece are a bit large but for a first attempt I liked the design and the colours.  I think I will incorporate this into a card design as an embellishment going forward.

I intend using some smaller more even seed beads to do a more complex design next.

Sid xx

Pin It

Saturday, December 04, 2010

Tattered Wreath


'Tis the Season' so here is a little offering that could be used as a seasonal piece or not. 

This wreath was made entirely from old bookpaper and Tim Holtz tattered florals and tattered leaves Sizzix diecuts.  The whole lot is mounted on an expanded polystyrene flat backed ring of 10 inch diameter.


The bookpaper (from an old electronic circuit book), was torn out in blocks of about 10 pages and passed through the Big Shot to cut out lots of both the leaves and the florals.

These were then separated and laid in cardboard boxes and sprayed with a variety of mica sprays, some from Glimmer Mists, Moonglow Mists and some home made sprays using mini-misters and Distress re-inkers with a little heirloom gold Perfect Pearls added.  The pictures don't do the shimmer justice as usual and the overall effect is muted but shimmery and a little antiqued.


Once spayed I allowed the mica mists to dry naturally and then assembled the various layers in a random way with drops of Glossy accents.  I made flowers of various sizes using 4, 3 & 2 layers.  There are even single flowers in places which were used as fillers.


The assembly was a labour of love and took a while and I attached using dressmakers pins threaded with a clear gold lined seed bead, a black cup sequin and a violet sequin.  I placed the flowers (some with a leaf added behind) randomly on the ring ensuring that the ring was completely covered and could not be seen at all.  The beauty of the poly ring is that you can easily reposition the florals if you need to until you are satisfied with the effect achieved.

I was going to add a Christmas sentiment but thought that it would be too much.  I added a length of wide red glitter ribbon cut in a chevron at one end added a red eyelet with the Crop-a-dile to allow it to be hung.  The ribbon was simply pinned into place with three pins from behind.

This wreath looks festive but also could be used anytime of the year with a different style of embellishment or ribbon hanger.  This creation has been entered into the Tim Holtz 'Tattered Florals Challenge'.

Sid xx

Pin It

Monday, March 02, 2009

Postcard from the Seaside

Here is another postcard from our 'Send me a postcard from........' theme over on the weekly challenge at UK Stampers forum. This weeks was '....... the Seaside'.

I used:

  • White card (trimmed to 6 x 4 inches)
  • Blue card (for matt)
  • Acrylic paints (Desert Sand, Blue Mist & Soldier Blue)
  • Dye Ink pad ( Whispers - Butterscotch)
  • Pigment Ink pads (Colorbox - Lime, Fresh Green, Apple Green, Celadon & Green)
  • Versafine Ink pad (onyx black)
  • Stamps (Dots background?, Tanda - Advert Plate 3, The Artistic Stamper - Shells plate)
  • Embossing Powder (Clear)
  • Marvey LePlume II Pen (Green)
  • Gelly Roll Pen (Sakura opaque white)
  • Decorative Chalks
  • Chalk Ink pad (Colorbox blue iris)
  • Hairspray
  • Seed beads (clear amber)
  • Glossy Accents
  • Foam Pads

I painted the top half of the card blank with the Blue Mist paint and the lower half with the Desert Sand acrylic paints and allowed them to dry. I then dry brushed in a stippling action the Soldier Blue paint to form clouds in the sky and allowed this to dry thoroughly. The Gelly Roll opaque white pen was used to edge and shape the clouds in the sky.

The dots background stamp was inked with Whispers butterscotch dye ink and stamped randomly over the lower (sand) area of the card. The shells stamps were then inked with the Colorbox pigment inks in a random manner and these were stamped over the sand. The clear Embossing powder was applied and heated to melt with a heat gun.

The 'Cornish Riviera' stamp was inked with Versafine onyx black ink and stamped onto white card. Decorative chalks (blue, orange and yellow) were applied with a small brush to colour all but the girls dress, which was coloured with a Green Marvey brush pen. The coloured image was sprayed lightly with a cheap hairspray to seal on the chalks and then cut out with scissors. The image was matted onto the blue card and trimmed to allow a 1/8th inch border.

Glossy accents were applied on the base and the left hand side of the lower half of the postcard and amber glass seed beads were applied onto this. The matt was then applied as shown with foam pads. The whole card was edged with Colorbox chalk ink in Blue Iris to finish.

Pin It
Related Posts Plugin for WordPress, Blogger...