>

Wednesday, June 29, 2011

One Mans Journey


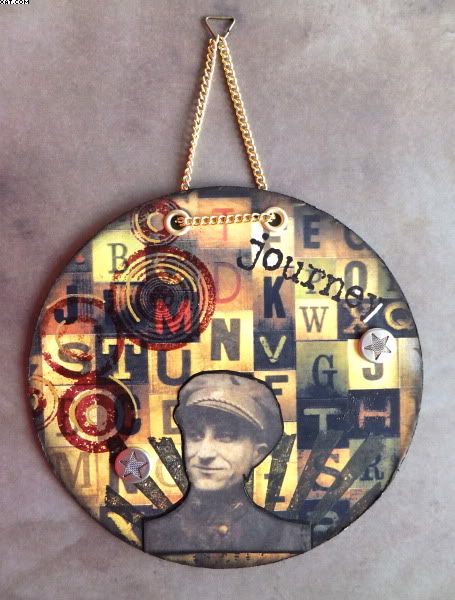
I have just taken part in an altered CD swap over on UK Stampers Forum.  I decided to do a vintage theme mainly with Tim Holtz materials and stamps.

The CD was covered in letters backing paper (Lost & Found) adhered with matt medium and trimmed once dry.


I then stamped with the tatty sunburst TH stamp with onyx black Versafine ink at the bottom and the retro circles TH stamp with Versamark and heat embossed this with claret embossing powder on the top left.  The journey word (Invoke Arts) was stamped in archival black ink on the top right.


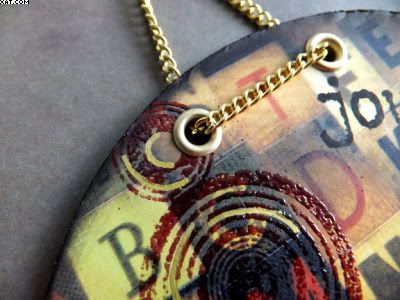
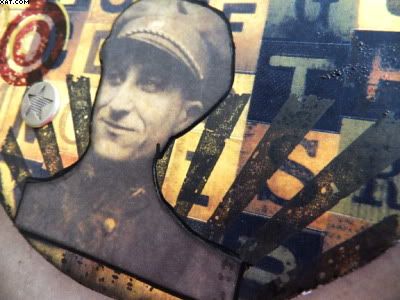
The circles and word were highlighted with gold and white Posca pens.  The military man was cut out from another piece of Lost & Found TH paper, stuck in place and highlighted with black Posca Pen. Holes were punched with the crop-o-dile for two star snaps and two gold eyelets as shown.  The edges of the covered CD were rubbed over with black soot Distress ink on cut'n'dry foam.


Finishing touch was to thread some brass chain through the top eyelets and join with a triangle split ring to hang.

Sid xx

Pin It

Sunday, June 19, 2011

The Golden Flight


Here is a tag I made recently.  The background technique is a simple Distress ink on craft sheet - water spritz - rub tag onto the ink & water face down - dry process.  I used faded jeans Distress ink.  When dry I made a mica and water mix with gold Perfect Pearls in a mini mister and sprayed over the surface to add a blotchy gold shimmer. This was allowed to dry naturally.


The butterfly is a Marianne design diecut made from plain white heavy paper which was painted with turquoise Viva Precious Metal Colour.  Some gold Stickles was added to the butterfly to embellish.

I then stamped the seedhead (Paper Bag Studios) at the bottom of the tag in Versafine onyx black ink and added some rub-on black flourishes on to the top half of the right side of the tag.


The engraved brass plate was added with glossy accents as shown and the tag edged with blue iris chalk ink.  The butterfly was then added with a glue dot.


Final touch was to add some metallic gold ribbon held in place with a staple.  Love the blingy effect on this tag.

Sid xx

Pin It

Sunday, June 05, 2011

Laughing with Mort Tag


I still had the ring pull top off the Sardine tin I used for my altered sardine tin in the last post so I thought I would put it to good use as a tag. After all it was tag-shaped to start with.  I folded back the ring pull and used a pair of pliers to flatten the folded over portion. Suprisingly the edges are not sharp at all either but I thought they might be !

I then applied a piece of printed paper in a diamond pattern with multi media and once dry trimmed around the tin lid.


Next I stamped a distressed polka dot pattern in archival black ink over the paper and allowed to dry. Then I used a Versamark pen and selectively inked some of the diamonds which I then heat embossed with glossy claret embossing powder. Didn't want this embossing to be perfect looking in line with the distressed effect.  I then went around the edge of the tag with black soot Distress ink and a cut'n'dry foam applicator.


I found a piece of pink and white check paper in my bit box which I then stamped with 'Mort had a Pin Curl' from Stampotique and more archival black ink before colouring in with Copic markers.  The image of Mort was then trimmed out leaving a narrow border which again was inked with black soot Distress ink.

I then took a crown bottle cap and after lining with a circle of purple paper I put in a label in silver with the word 'Laugh'. I tipped in clear UTEE crystals and heated until molten and bubble free with the heat gun allowing this to cool completely. 

A fabric flower was coloured with matching Copic marker and distressed with more black soot Distress ink.  This was stuck to the back of the bottle top .


The tag was then embellished by sticking Mort in place as shown and applying the bottle top flower with a large sticky dot.  Some silver metallic marker was applied on some of the background dots and a length of coloured yarn tied through the ring pull to finish.

Sid xx

Pin It

Wednesday, June 01, 2011

Altered Sardine Tin

Front

I started with a plain old Sardine tin which had been thoroughly washed and dried.  The outside base and sides of the tin were given a good coat of Viva Precious Metal Colour paint in turquoise.  Once dry I applied TH tissue tape over the colour to cover portions of the outside of the tin.


Back
I added a few fleur de lys rub-ons before giving the back of the tin a coat of acrylic gloss finish to seal on the tissue tape and protect the paint. Next the inside of the tin was given a coat of Viva precious metal color in gold.  I applied a number of gold metallic Candi circles with glossy accents to the inside top of the tin to reflect the light.


Two leaves stamped with a PaperArtsy Xmas pointsettia stamp and Versafine onyx black ink were then added.  They were first coloured with green Marvey le Plume II pen and sprayed with green mica spray before applying on foam pads to raise them.


Next a Tim Holtz ticket was applied on a piece of green card, trimmed and stamped with the words Curioser & Curioser from the IndigoBlu - Alice 1 plate in Archival black ink.  This was attached over some gold glass glitter.  A metal enamelled bird was attached over the base of this with silicone glue.


Alice herself (from the same IB plate) was stamped in Archival black ink onto white card and coloured with Marvey le Plume II pens before being trimmed out leaving a mounting lug at the base.  Some crystal Stickles glitter glue was added to the blue dress for sparkle.  Alice was then mounted forward in the can on layered foam pads and Glossy Accents.


Final finishing touch was to add pale blue dew drops attached with more Glossy Accents around the inner rim of the tin.

I decided not to add a hanging device because the can stands on its end quite comfortably for display purposes.

Sid xx

Pin It
Related Posts Plugin for WordPress, Blogger...