>

Wednesday, November 30, 2022

Red ......


Made this dimensional fold Christmas card ....

The red base card was cut to 6 x 4 inches and folded on the short side to form a card. Three panels were cut from red & green spotty paper to cover the front and insides of the card. I added a white panel to the back of the card for the greeting.

The inside fold was made from a 1 x 12 inch strip of red card folded in the centre  and at 3 inches from either side of the centre fold.

I die-cut 4 x 2inch squares from more red card and also die-cut some smaller matts from red mirri card. The mirri was added to the squares which were positioned along the red strip and attached to the centre of the card allowing the centre to fold flat inside the card.

I then die-cut some snowflakes from silver glitter card and added to the centre of the squares, adding a red adhesive pearl to each as shown.

For the front I die-cut red mirri card with a matt of white card using a stitched edge die. Stamping the white panel with the sentiment in red ink and attaching over the mirri on foam pads before adding to the centre as shown .....

Sid xx

Pin It

Tuesday, November 29, 2022

Birthday ......


Made a clean and simple Birthday card for a swap over on UK Stampers Forum ....

I took a white card blank as the base. I then cut a smaller matt from white card and cut a square stitched aperture in it. I then added a number of scored lines on the left.

The die-cut square was applied directly to the card base in line with aperture and the matt was applied on foam pads to the card front.

This was decorated with 5 Prima maroon paper flowers which were centred with adhesive pearls.

The sentiment  (Papertrey Ink) was stamped in black Versafine ink on white card, trimmed and matted on more white card before applying to the card front as shown ....... this card is also entered into the Challenge over on CAS ON FRIDAY whose theme is 'Greetings Card' .....

Sid xx

Pin It

Monday, November 28, 2022

Shiny .....


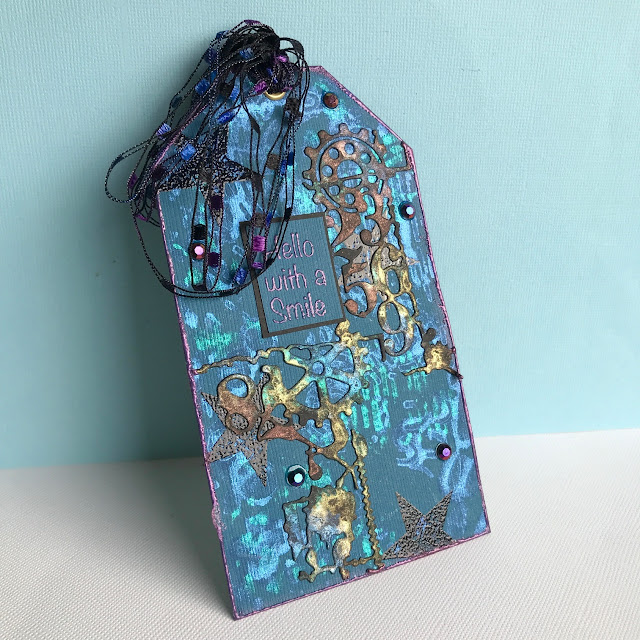
Made a decorated tag for a swap over on UK Stampers Forum ..... it has been photographed at an angle to hopefully show the iridescence of the tag ......

The base was cut from re-cycled food packaging. I then cut a top layer from dark blue textured card. I then prepared the background with stencils and various colours of Mica inks dabbed through the stencil allowing it to dry. Some black stars were stamped and heat embossed in black embossing powder onto this.

I then took a die (Aall & Create) and die-cut this from black card which was sprayed with mica sprays in various colours. It was cut in two and applied to the background as shown.

I then stamped the sentiment (Woodware) in Versamark ink and heat embossed with mauve mica embossing powder (Moonglow). This was trimmed and matted on black card to frame. It was added as shown.

The edges of the tag were then treated with more Versamark ink and dipped into more of the embossing powder and heated to set. I then added a gold eyelet with the Crop-a-dile which was threaded through with some shiny crochet thread.

The tag was finished with a number of dark metallic adhesive gems......

Sid xx

Pin It

Sunday, November 27, 2022

Trees .....


Made this Christmas card .....

The card base is a white 5 x 5 inches card blank. I have embossed the front with a falling snow embossing folder (Sizzix/Stampin' Up).

The deer and trees were die-cut from green card, green glitter card and brown Kraft card (Poppystamps). The reindeer was given champagne glitter card antlers and a red nose with Nuvo Jewel drops.

The deer and trees were added to the card front, some on foam pads and were grounded with a grey pen.

The sentiment was stamped in Versafine black ink on white card, trimmed and also applied on foam pads to finish ......

Sid xx

Pin It

Saturday, November 26, 2022

Leaves .....


A set of three Artist Trading Cards made for a swap over on UK Stampers Forum .....

The bases were cut to 2.5 x 3.5 inches from re-cycled food packaging. I then chose some printed textured paper in a dark maroon leaf design. I then stamped the background skeleton leaves onto the paper in Versamark ink and heat embossed with green and mustard Adirondack embossing powder. This was trimmed to cover the bases.

I then die-cut some more leaves (Tim Holtz/Sizzix) from white card and applied these as shown, adding some Posca colours in selected areas.

The word was stamped in Versafine black on white card, trimmed and edged with yellow Posca pen before adding to the cards.

Final touch was to add a yellow edging to each card ......

Sid xx

Pin It

Friday, November 25, 2022

Pear .....


Made this clean and simple 'partridge in a pear tree' card on a 6 x 6 inch white cardbase for a Challenge over on UK Stampers Forum ....... designed to not contain Traditional Christmas colours of Red & Green ....

I cut a smaller matt from brown Kraft card and applied to the card front.

I then die-cut the tree from white card and the bow in pearlescent pink card. The pink bow was applied over the white die-cut and the whole die-cut applied to the Kraft base on foam pads.

The sentiment (IndigoBlu) was stamped in black Versafine on white card, trimmed and edged with black. The words were then applied on foam pads as shown to finish the card ......

Sid xx

Pin It

Thursday, November 24, 2022

Lavender .....


Made this little fragrant lavender bag with lavender from Provence France .....

The bag is ATC size - 2.5 x 3.5 inches. I used a TH die to cut the bag from old bookpaper. This was coloured with milled lavender and old paper Distress inks applied with blending brushes before gluing together leaving the top flap open.

I then stamped the fern leaves (PaperArtsy) onto the bag in Dusty Concord Distress Ink. I die-cut some mini labels and stamped them with milled lavender Distress Ink (MamaMakes) and threaded through with jute string. I also tied a bow from some purple ribbon.

I then assembled the elements and applied with hot glue. Two heads of lavender, the ribbon, the labels (on foam pads) & a material covered button. The word Joy was stamped on some milled lavender coloured white card in Versafine black. Trimmed and applied as shown.

The bag was then filled with dried lavender flowers and the top sealed down to enclose. I have also edged the bag with Brilliance lavender ink to finish.

Nice shabby look and fragrant too ........

Sid xx

I then

Pin It

Wednesday, November 23, 2022

Joy ......


A snowflake Christmas Card ....

The base is a 3 x 3 inch white card blank. I matted some red tartan card over some black card and added this to the card front.

I then die-cut a large snowflake die in silver a red glitter cards.

These were layered centrally and embellished with an adhesive pearl. Three little die-cut stars were added.

The sentiment (IndigoBlu) was stamped in Versafine black ink, trimmed and matted on black card before adding to the card .....

Sid xx

Pin It

Tuesday, November 22, 2022

Holly ......

A Christmas card .....

The base is a white 5 x 5 inch cardblank .....

I cut two matts, one red and the other holly and layered these on the cardblank.  I then cut another smaller matt from white card, edged in red.

I then die-cut the trees from red glitter card and the reindeer in brown Kraft. I added antlers in champagne glitter card and a red nose with Nuvo drops. I also cut the ground from white card.

The elements were assembled as shown, some on foam pads to finish the card .....

Sid xx

Pin It

Monday, November 21, 2022

Blue ......


Made a little papercrafted Christmas House .... it measures 5 x 2 x 3 inches.......

I printed 2 pieces of 300gsm of white card with a blue weathered wood design. These would become the outside walls of the little house.

I die-cut the walls and windows from the card and assembled the house base applying vellum to the inside to cover the window and door apertures (for lighting inside with a battery candle).


The roof was tiled with a die in blue card and some blue Stickles glitter glue was added to highlight.

I then used some Scandi dies (Sizzix) in two shades of blue and brown Kraft card along with some blue glitter card.


All elements were attached to the house front and sides (some on foam pads) and two sentiments were stamped on white card in Versafine black ink and applied as shown on foam pads.

No Christmas colours on this decorative Christmas House ......

Sid xx

Pin It

Sunday, November 20, 2022

Mistletoe .....


A Christmas card  .....

The base is a 6 x 6 inch white card. I then cut a smaller matt from brown Kraft card and embossed with a snow embossing folder. This was attached to the card base.

The mistletoe leaves were die-cut from green card, the bow from red/white striped paper and the berries from silver glitter card (Sizzix). They were assembled and added as shown to the Kraft matt using foam pads.

I then die-cut a round tag and stamped this with the sentiment in sepia Archival ink. It was added on some jute string and on foam pads.

Sid xx


Pin It

Saturday, November 19, 2022

LIM Challenge #478 .....

 It's time for another Challenge from 'Less Is More' this week the theme is ....


We do hope you will play along with us by making a Clean and Simple card in the theme whilst following the rules, of course !

This is my Design Team card for your inspiration:

The card was made on a 6 x 6 inch white cardbase. I cut a white base to 4 x 4 inches and stamped this with a stamp from AAll & Create in Versafine black ink which was then heat embossed with clear embossing powder. Another image of the Wellingtons Boots was made and coloured with Copic markers before trimming out the boots.

I then stamped the words again on white card and edged with green Copic. The white matt was edged with black ink.

I then assembled the card by attaching the stamped layer to the centre of the card base. The boots and words were then attached over the originals on foam pads to finish the card ....

Nothing better than a session outdoors in the garden & do click HERE to visit 'Less Is More' blog where my fellow Design Team members have made cards for your inspiration .....

Sid xx

Pin It

Friday, November 18, 2022

Poinsettia .......


Made another folded Christmas card ......

The base was cut from white card and scored and folded into shape. The front panels were then covered in a bright printed paper. Here are some instructions to make it your own : 

The card is made from a piece of card 8.5 x 5 inches. The scores are at 1.25 inches & 2.5 inches from each end leaving the central piece 3.5 inches. The tab with sentiment is 5.5 x 1 inch. When adding the tab make sure the card is folded flat before sticking it in place. The card fits a 6 x 6 envelope for posting.

An oblong of white card was die-cut with a stitched edge die as a background.

I then die-cut the poinsettia and holly leaves and berries using a set of Tim Holtz/Sizzix dies. They were layered on the white panel and this was added to the middle section of the card.

The sentiment was stamped in red Archival ink on a banner which was matted on green card. Two die-cut holly leaves and berries were added as shown before adding the banner to the bottom of the card.

The card folds flat, has a whte panel on the back for the handwritten greeting and fits a 6 x 6 inch envelope for posting .......

Sid xx

Pin It

Thursday, November 17, 2022

Snow .....


A Clean & Simple Christmas Card .....

The base is a white slimline card. I cut a smaller matt from more white card and die-cut the word 'SNOW' in this. I chose some red plaid snowflake paper and applied this behind the die-cut letters.

I then die-cut a couple of snowflakes from red glitter card.

The die-cut matt was applied to the card on foam pads. The snowflakes were added as shown and these were centred with green adhesive pearls to finish .......

Sid xx

Pin It

Wednesday, November 16, 2022

Hanger......


A decorated holly hanging box .....

The box components were die-cut from white card and assembled to form the box. The front was decorated with paper and the inside with dark green card.

The Poinsettia (Tim Holtz), holly, berries and fir sprigs were die-cut from coloured card and assembled as shown inside and around the outside of the box. I added Glossy Accents to the berries & some black stamens to the poinsettiawith  touch of white Posca pen.

The sentiment was stamped in Versafine black ink on white card, trimmed and matted on red card applying to the top right of the frame.

The decoration was finished with some dark green satin ribbon tied to form a loop with a bow. Would make a fab Christmas tree decoration ....

Sid xx

Pin It

Tuesday, November 15, 2022

Stag .......


Made this Christmas card ....

The base is a 6 x 6 inch white card blank. I then chose some red/black squared paper and matted on black card. I then cut a smaller matt from red velvet card and matted this onto the card front.

The stag was stamped on white card in Archival sepia ink and coloured with distress ink washes and a waterbrush. The holly was stamped and coloured similarly. Both stag and holly were trimmed out. The stag was mounted on foam pads onto the red velvet along with the holly.

The sentiment was stamped in Versafine black ink, matted on the squared paper and applied on foam pads to finish the card ......

Sid xx

Pin It

Monday, November 14, 2022

Deer ......


A Christmas card made recently .....

I wanted to keep the card Clean and Simple so made a 5 x 5 inch white card base which I embossed with a Stampin' Up falling snow folder.

The trees and deer (Poppystamps) were die-cut from green and brown Kraft cards whilst the antlers were die-cut from champagne glitter card. The elements were added to the card front as shown with some on foam pads. I added some red clear Nuvo crystal drops to the deer noses.

The sentiment was stamped in black Versafine ink and added at the bottom on foam pads .....

Sid xx

Pin It

Sunday, November 13, 2022

Snowflakes ......


Another folded card made on pink pearlescent card scored and folded & covered with panels of a printed snowflake paper. There is a white panel on the back for your written greeting !

The central stitched edge oblong was die-cut and decorated with a stamped and coloured Christmas tree on foam pads and a silver die-cut snowflake. The tree was embellished with some green Stickles glitter glue.

The front panel was stamped on white card in black Versafine ink. Matted on paper and pink card and applied as shown so the card can be folded flat for posting in an envelope. I added 4 pale pink adhesive gems to finish.

Liking the different Christmas colourway ......

Sid xx

Pin It

Saturday, November 12, 2022

Red ......


A Christmas card made with stamps and die-cuts .....

The base was a white 5 x 5 inch card blank. I then cut a smaller white card and stamped the bare trees  with Archival sepia ink . Some red dots were added to the trees.

I applied a torn strip of gold and white striped Washi tape as a ground. I then die-cut the reindeer from brown Kraft card and the antlers from champagne glitter card. The reindeed (Poppystamps) was added as shown with the head on foam pads. I added a red adhesive gem on its nose. The small tree was die-cut from red card and the large tree from red glitter card. These were added as shown with the small tree on foam pads.

The sentiment was stamped in black Versafine ink on white card and mounted on foam pads.

The background was then matted on star and Kraft cards before adding to the card base .....

Sid xx

Pin It

Friday, November 11, 2022

Triangles ......


A set of Twinchies (2 x 2 inch decorated squares) made for a swap over on UK Stampers Forum .....

The bases were trimmed to 2 x 2 inches from re-cycled food packaging. Some blue printed paper was then cut as the base layer and applied to the bases.

I chose some more printed paper with snowflakes and stamped over this with stars using Versamark ink. This was then heat embossed with patina gold embossing powder. I trimmed out 2 x 2 inch squares and cut them into triangles which were edged in mauve chalk ink arranging them as shown over the bases.

I then added a chevron of metallic gold Washi tape and edged each Twinchie with black Brilliance ink to finish ......

Sid xx

Pin It

Thursday, November 10, 2022

Tree ......


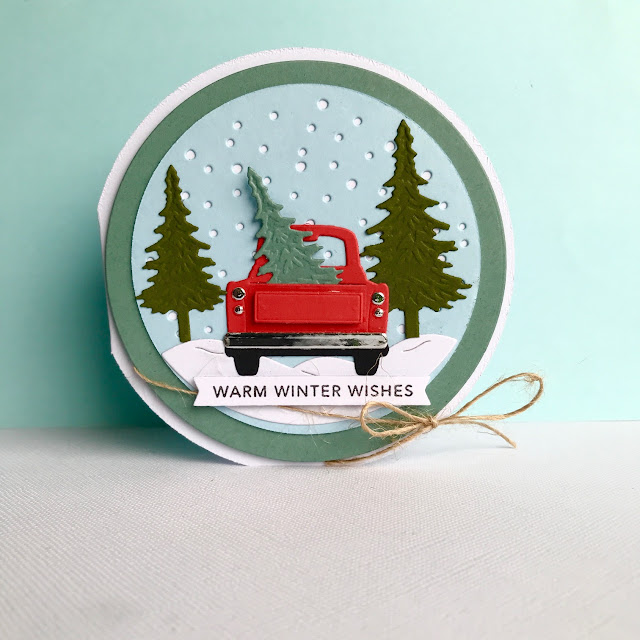
Made this Christmas card ..... the card is 4 inches in diameter ....

I used a set of dies by Spellbinders (Through the Woods) to cut the background, base, trees and truck from coloured and silver mirri cards.

The base card was cut from a white card with a circle die leaving an edge intact as the hinge.

All elements were assembled as shown and applied to the card base on foam pads, tying through with a length of jute string.

The sentiment was stamped on white card and applied at the base on foam pads to finish .....

Sid xx

Pin It
Wednesday, November 09, 2022

Stars .....


Made a set of three Artist Trading Coins for a monthly swap over on UK Stampers Forum .....

The bases were die-cut to 2.5 inches in diameter from re-cycled food packaging. I then die-cut some printed paper and stamped this with Versamark ink with a dotty star, heat embossing with white embossing powder. The embossed backgrounds were added to the bases.

I then stamped another striped star with green Memento ink, trimmed out and applied centrally over the other star. These were centred with green adhesive glossy dots.

The Coins were finished by edging with dark green Acrylograph chalk pen ......

Sid xx

Pin It

Tuesday, November 08, 2022

Holidays ......


A folded card made on green card scored and folded & covered with panels of a printed paper. There is a white panel on the back for your written greeting !

The central circle was die-cut and decorated with fussy-cut trees on foam pads embellished with Puffy snow.

The front panel was stamped on white card in green dye ink. Matted on green card and applied as shown so the card can be folded flat for posting in an envelope. I added 4 red adhesive pearls to finish.

Sid xx

Pin It

Saturday, November 05, 2022

LIM Challenge #477

Yet another 'Less Is More' Challenge today ...... this time you need to make a card .....


Hope you will join us and use two or more colours from the Colour Wheel and follow the Challenge Rules in making a Clean & Simple card ....


This is my Design Team card for the Challenge......

Made a tall thin white card blank measuring 3 x 8 inches ....

I then cut a smaller white card matt and scored lines around the outside to frame it. I then chose three stylized flower stamps and stamped them (overlapping) in Yellow, Orange and Red onto the matt.

The words were stamped in Versafine black ink and heat embossed with clear embossing powder. The words were edged in black and applied at the bottom on foam pads as shown.

The matt was then applied to the card base to finish .....

Hoping that you will make something for the Challenge and if you need further inspiration click HERE to see my fellow Design Team makes ......

Sid xx


Pin It

Acorn .....


A set of Inchies ( 1 x 1 inch squares) made for a swap over in UK Stampers Forum .....

The bases were punched from re-cycled food packaging. I then punched some backgrounds from a spray background and stamped these with a square sewn stamp in Versafine black ink.

The acorns were die-cut, coloured and applied centrally.

The Inchies were finished with a border of gold Molotow pen to finish ......

Sid xx

Pin It

Friday, November 04, 2022

Joy.....


Here is a simple  4 x 4 inch Christmas card ....

I made a background using a text stamp and stamping in Archival sepia ink on a 3 x 3 inch piece of white card, it was edged in sepia ink too.

The joy was die-cut once in red and once in green card, overlaying the green over the snowflake and treating with green Stickles glitter glue.

The background was matted on red and green cards to form borders and the 'Joy' applied on the background on foam pads. The design was then added to the card front and was finished with 3 green sequins added on Glossy Accents ....

Sid xx

Pin It

Thursday, November 03, 2022

Peace ......


Made this 6 x 6 inch Christmas card .....

All stamps used are from IndigoBlu. I made a background with white card and Distress Oxides. The central stamp was then stamped on the background in Versafine black and heat embossed with clear embossing powder. This was stamped again and the circle trimmed out. The image was coloured with Inktense pencils and a waterbrush. The circle was coloured with Copic marker and glazed with Glossy Accents.

The two holly sprigs were stamped on white card with green memento ink and coloured with Copic markers, trimmed out and the berries glazed with Glossy Accents.

I then stamped the twirly border top and bottom in Archival sepia ink and added some green Stickles glitter glue to the leaves.

The words were stamped in black Versafine ink, heat embossed with clear embossing powder trimmed out and matted on red card. The background was also matted on red card to form a border.

The card was finished by adding the holly sprigs as shown, the red circle on foam pads over the original and the words added on foam pads before adding to a card base .....

Sid xx

Pin It

Wednesday, November 02, 2022

Colorful .....


Made a Clean & Simple Christmas card .....

The base is a 5 x 5 inch white card blank. I then die-cut a smaller stitched edge matt from white card.

I then stamped the trees in black Versafine ink and die-cut them out. They were then coloured with watercolour brush pens. I also die-cut some silver stars for the top of the trees from glitter card.

I arranged the trees and stars as shown on the background with some on foam pads. The words have been stamped on white card with Versafine black ink which was heat embossed with clear embossing powder before trimming out and edging in black. They were added to the matt.

The background was then added to the card blank on more foam pads to finish .....

Sid xx

Pin It

Tuesday, November 01, 2022

Imagine ......


Made this collaged 5 x 5 inch card ....

The background was cut from a Gelli print and stamped with some crosses with a stamp and maroon Archival ink.

I took some chipboard and die-cut it, coloured with green Distress Oxide, stamped with flowers and matted this on some chevron paper. I took a piece of die-cut chipboard and coloured with green Distress ink and drew in some veins with Acrylograph pen.

The imagine tag was die-cut from maroon card and the word applied in the aperture. The tag was tied through with some fine ribbon.

I then applied the background onto a matt od violet card. added the floral piece. Applied the leaves on foam pads over this and the aperture tag on top of this on foam pads. The background was then added to the white card blank and three violet clear dots added to finish .....

Sid xx

Pin It
Related Posts Plugin for WordPress, Blogger...