>

Thursday, March 27, 2008

Aged Circle


I was just experimenting with finishes and made this distressed circle. I used a Fiskars 'Heart' circle punch and punched out a 3 inch circle of ordinary copier paper. I then used Distress ink re-inkers in Spiced Marmalade and Mustard Seed applied to a teflon sheet and spritzed with water before swiping the circle across the colours and swirling it a bit. The circle was dried and then heat embossed with copper EP over a swirl stamp and versamark. The whole piece was then smeared with a generous layer of crackle glaze and allowed to dry. Once dry and cracked a darker colour of ink was applied to highlight the cracks and the excess wiped off with a paper towel. Think I will use it as a collage element on a new canvas I am working on.

Pin It

Sunday, March 23, 2008

Forever Tag


This tag was created from a plain manilla packing tag. The background was coloured with beige chalk ink which was stamped twice with a clock stamp, once with pink and once with turquoise pigment ink. The blue image was heat embossed with clear fine detail EP. A swirl border was stamped with versamark and heat embossed with fine detail gold EP. The eyes and word were stamped over the others with black stazon. The tag was finished with dark green ribbon.

Pin It

Saturday, March 22, 2008

Thinking of You Card


Firstly a very Happy Easter to everyone out there !!!!
I made the background square for this card using the lace glitter method and two colours of ultra-fine glitter.


This was achieved by using double-sided clear adhesive sheet. A square was cut and one side of the protective cover removed. A piece of cotton lace was then adhered to the sheet and the first colour (midnight blue) of the glitter poured over the lace and rubbed well in with the finger. The excess glitter was tapped off and then the lace removed leavinf a pattern. The second colour of glitter was then applied (leaf green) and similarly rubbed well in with the finger before tapping off the excess. I then used a soft brush to remove loose glitter.


The base card was lightly chalked with emerald decorating chalk and a leaf stencil used to highlight the pattern and I used a cotton wool bud to apply the chalk through the stencil. The chalk was set with a coat of cheap hairspray. The backing sheet off the glitter square was then carefully removed and the film adhered to the card. The embellishments are three die-cut mirri board hearts in matching colours, suitably layered and finished with a large faceted green flat-backed jewel. These were applied with glossy accents. Finally the sentiment was stamped with ultramarine Stazon.

Pin It

Wednesday, March 19, 2008

DreamGirls !


This vintage card started life as a vintage photo which was printed onto glossy photopaper and subsequently cut out carefully. The base card was made from textured moss green cardstock which was covered with diagonal stripes of 3mm double sided tape and covered with black and gold ultra fine glitter. The photo was adhered with foam pads and the metal 'Dream' brad was used to attach a piece of German scrap. The two squares were made from mountboard which was stamped with Adirondack Ink through some sequin mesh before heat setting and heat embossing with clear embossing powder. The raw edges were coloured with black stazon and these were adhered to the card with double sided tape. I especially liked the muted colours of this card.

Pin It

Tuesday, March 18, 2008

With Love Card


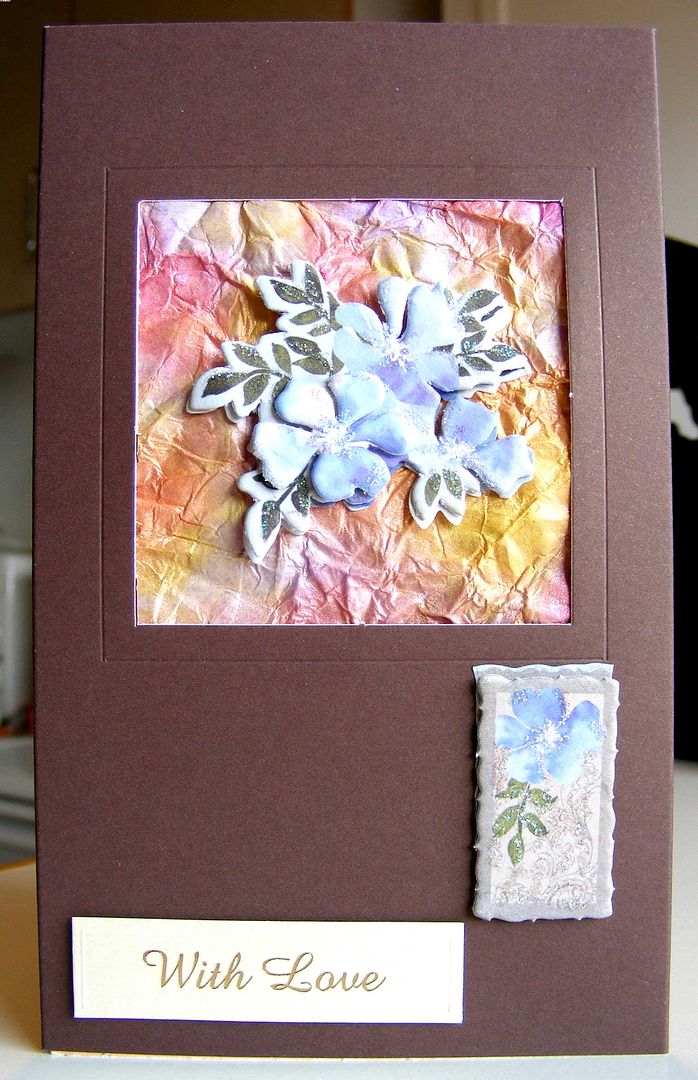
This card was made using a brown square aperture card with an insert of paper made using the Starburst Stains wet scrunch background. This background produces a wonderful shimmery effect. A piece was cut to size and adhered with double sided tape to the inside of the aperture. a blue flower diecut embellishment was added to it with foam pads, along with another oblong embellishment and an embossed plate with the words 'With Love' in gold on cream pearlescent card.

Pin It

Monday, March 17, 2008

'Enchanted' ATC


Finished this ATC last night. The background was attached to a rounded corner card blank and was prepared by applying and scraping various interference colours over a tan piece of cardstock. Colours are blue, purple and gold. A random effect was obtained by applying blobs of the paint and drawing a piece of rigid plastic across the surface. A border stamp with black stazon was stamped onto the same tan card and coloured with gold interference paint. This was cut out and applied on the right hand edge. The background was finished by stamping twice with a Rubber Stampede Arch Block (3633C) in versamark and applying pearl green and clear embossing powder before heat embossing. The central plate was made by spattering a piece of card with various inks and allowing to dry. This was stamped and embossed with stars and blocks of gold, cut out and stamped with the word 'enchanted'. This was applied with 4 blue coloured staples in the centre of the ATC. Et voila.......there you have it!

Pin It

Sunday, March 16, 2008

Celtic Knot Card


Well here we are half way through March and not a single post from me for so long. I did this card using a piece of mountboard as a mount and Lumiere paints as a background, overstamping with black stazon and highlighting with gold. The centre embellishment is a large black faceted jewel. The mountboard was matted on green, gold and glossy black before attaching to the card with double sided adhesive. The base card is pearlescent cream randomly stamped with a calligraphy stamp and black stazon.

Pin It

Thursday, February 07, 2008

Chinese New Year

Phew !! Not had much time to post lately, but just to break the trend here are 3 ATC's I did to celebrate Chinese New Year. The 'Year of the Rat' on 7th - 9th February 2008. I was lucky enough to be in Hong Kong at the time and it was truly amazing.


Pin It

Tuesday, January 01, 2008

Happy New Year 2008


Another year over and another just begun!! What a whirlwind year it's been too and doesn't time fly.

Here's wishing everyone a Happy, Healthy and Prosperous NEW YEAR.

Pin It

Sunday, December 23, 2007

Christmas Greetings


Well, we are nearly there again. Can't believe that Christmas is upon us once more. Gifts bought, cards made and sent, arrangements finalised, so all that's left now is to celebrate. Eat, drink and be merry are the orders of the day.


I would just like to wish all of my friends, family & fellow crafters a simply superb Christmas filled with joy and love.


Enjoy !!!!!

Pin It
Related Posts Plugin for WordPress, Blogger...