>
Showing posts with label Stazon Ink. Show all posts

Friday, June 01, 2018

Green Love .......


Made a decorated tag for a Swap over on UK Stampers Forum !

I have used unusual colours for a 'Love' theme.  There are stamped elements over a background made with Distress inks.  The heart has been stamped and foiled in gold and green metallic film and mounted on foam pads to raise it.  I have stamped the buttons with Stazon ink and applied at the base.

Finishing touch was to add some green eyelash fibres.

If you fancy joining in the swap (one of many) click HERE to join the Forum and join in !

Sid xx

Pin It

Saturday, April 22, 2017

Angelic Arch .....


Not seen many of these lately so I thought I might revive the idea by making a decorated Gothic Arch.

I started with a piece of white card trimmed to the shape of a Gothic Arch.  This was coloured using Starburst Stains spray in Delphinium Turquoise.  I added a few coats especially around the edges and as usual the Mica shimmer does not show very well on the photos.  Once dry I inked a heart stamp (Chocolate Baroque) with starlight silver Brilliance Ink and stamped stamped several times along the bottom of the card.


Next I took some sequin waste and applied moonlight white Brilliance Ink through it on the left and bottom edges.  This was dried thoroughly with the heat gun.  I then inked an angel stamp (Art Journey) with Versafine onyx black ink and stamped this centrally at an angle. The angel wings and hair were highlighted in places with a white Posca pen.


Next I took a piece or real lichen covered twig and attached this at the bottom of the angel image with hot glue.  To this I applied a little metal heart charm on a foam pad threaded through with silver ribbon round the twig as shown.


The whole arch was then matted onto silver mirri card which I stamped with a text stamp in black Stazon Ink.  This was then trimmed to leave a border around the coloured plate.  A small strip of card was trimmed with decorative scissors and coloured with blue ink and stuck in place at the bottom. Finally some pearl beads were used to embellish and were stuck in place with Glossy Accents as shown.

Let's have a revival of the Gothic Arch !!

I am also entering this piece into the April 'Take It Make It Challenge' over on the Craft Stamper Blog whose theme is 'Anything Goes'

Sid xx

Pin It

Friday, February 10, 2017

Follow My Heart ....


I have a lot of materials but have not really made many multimedia pieces in the past. This multimedia piece is on a piece of compressed wood measuring 6 x 6 inches.

I started by spreading a fairly thick coat of Viva Decor Croco Crackling Colour (try saying that fast !!).  I used Bronze, Platinum, Gold & Turquoise.  I applied it in blocks which blended a little where they touched.  I must say they really did 'crackle' when they had dried (around 12 hours drying time). I quite like the way the raw wood shows through the cracks in places and I did originally think about gessoing the wood base first but decided against it.
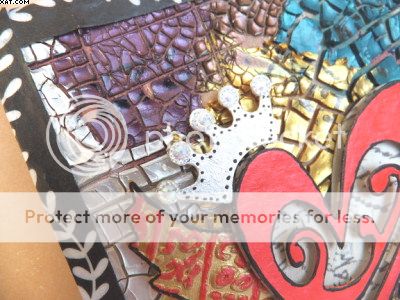


I then took an old Tim Holtz design die from Sizzix called 'Heart Wings' and diecut the design out of kraft card.  I embossed the wings through an embossing folder and then painted them in gold acrylic paint.  Once dry I highlighted the embossing with some pink pearlescent acrylic paint.  The solid back of the heart I covered in Tim Holtz Tissue Tape whilst the swirly front of the heart I gave a couple of coats of the same pink pearlescent acrylic paint and when dry edging with a black Posca pen.  The crown was painted in silver acrylic paint and 5 self adhesive crystals were added after edging with dots in black Posca pen.


Before I attached the wings and heart I inked a rubber alphabet stamp in black Stazon and stamped randomly on the crackle finish.  I didn't use a block but applied directly with my fingers as the surface was so uneven.


The wings were applied with hot glue and I raised them on foam pads, followed by the heart back then the heart front again raised on foam pads.  The crown was also applied on foam pads.


I then stamped the sentiment on white card in black Versafine and applied as shown with more hot glue.  I edged the whole thing with Washi Tape.  I also added a hanger made from florists wire stuck in place at the back with hot glue to finish the piece. I have also entered my creation into The Artistic Stamper February Challenge whose theme is 'Hearts'.

I really enjoyed making it and it has got me thinking about more multimedia in future.  Hope you like it.

Sid xx

Pin It
Related Posts Plugin for WordPress, Blogger...

