>
Showing posts with label Self Adhesive Gems. Show all posts

Wednesday, May 24, 2017

Hello, Hello ......


Just to say 'Hello' !!

I made this card from a 5 x 7 inch white card blank base.  I cut a slightly smaller matt in more white card.

I then cut 6 matts using two sizes of stitched edge dies.  I stamped the smaller matts with Versamark ink and a stamp (Inkadinkado) and then heat embossed with detail clear embossing powder.  Once embossed I coloured them using three shades of Distress ink applied with a blender pad and wiped off the ink to reveal the embossed image below.  I added stems with a Micron pen. These were then mounted on the larger square matts and applied as shown on foam pads.

The sentiment was diecut in cream card and stuck in place as shown with three self adhesive gems added to finish.  I think the squares look a bit like they could be leather .... what do you think ?

Sid xx

Pin It

Thursday, May 11, 2017

Bunting Birthday .....


Here is a card made for a Colour Challenge this month over on the UK Stampers Forum Facebook Group.

I started with a 4 x 4 inch white card blank and diecut a black matt and a slightly smaller blue matt with a square stitched edge die through the Sizzix Big Shot.

I then diecut some bunting with another die in white card.  I coloured the flags with Copic Markers, backed the star cutouts with black card (as a contrast with the matt) and drew in a thin black line. The bunting was applied as shown and the stars were decorated with coloured self adhesive gems.

The sentiment (Woodware) was stamped on white card in Versafine onyx black ink and this was trimmed and matted on more black card.  The sentiment was then applied as shown on foam pads to finish.

Sid xx

Pin It

Friday, February 10, 2017

Follow My Heart ....


I have a lot of materials but have not really made many multimedia pieces in the past. This multimedia piece is on a piece of compressed wood measuring 6 x 6 inches.

I started by spreading a fairly thick coat of Viva Decor Croco Crackling Colour (try saying that fast !!).  I used Bronze, Platinum, Gold & Turquoise.  I applied it in blocks which blended a little where they touched.  I must say they really did 'crackle' when they had dried (around 12 hours drying time). I quite like the way the raw wood shows through the cracks in places and I did originally think about gessoing the wood base first but decided against it.
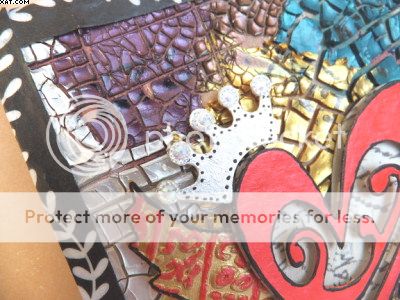


I then took an old Tim Holtz design die from Sizzix called 'Heart Wings' and diecut the design out of kraft card.  I embossed the wings through an embossing folder and then painted them in gold acrylic paint.  Once dry I highlighted the embossing with some pink pearlescent acrylic paint.  The solid back of the heart I covered in Tim Holtz Tissue Tape whilst the swirly front of the heart I gave a couple of coats of the same pink pearlescent acrylic paint and when dry edging with a black Posca pen.  The crown was painted in silver acrylic paint and 5 self adhesive crystals were added after edging with dots in black Posca pen.


Before I attached the wings and heart I inked a rubber alphabet stamp in black Stazon and stamped randomly on the crackle finish.  I didn't use a block but applied directly with my fingers as the surface was so uneven.


The wings were applied with hot glue and I raised them on foam pads, followed by the heart back then the heart front again raised on foam pads.  The crown was also applied on foam pads.


I then stamped the sentiment on white card in black Versafine and applied as shown with more hot glue.  I edged the whole thing with Washi Tape.  I also added a hanger made from florists wire stuck in place at the back with hot glue to finish the piece. I have also entered my creation into The Artistic Stamper February Challenge whose theme is 'Hearts'.

I really enjoyed making it and it has got me thinking about more multimedia in future.  Hope you like it.

Sid xx

Pin It

Tuesday, January 17, 2017

My Heart ........


Happy Tuesday everyone !!  This is a card recently made in the CAS style (plenty of white space).  I started with a 5.5 x 5.5 inch plain white card and cut a slightly smaller matt in more white card to work on.

I cut some more white card into 1 inch strips and applied Tim Holtz tissue tape in a double row onto these strips.  They were cut into various lengths and then cut into as shown to act as bunting.

The matt was then stamped with Distress Inks in Crushed Olive and Fired Brick with an inksplat stamp from Tim Holtz.


I next took some red card and diecut a stitched heart.  The pennant pieces were applied on redline tape at the top and raised with foam pads.  I then cut a few nicks out of the matt and wound the fibres rouns as shown starting and finishing with some adhesive tape behind the matt to hold it in place.


The heart was then placed as shown and mounted on foam pads.  I then stamped the sentiment (Woodware) in Versafine black ink and addedd a bit of hand drawn decoration with a Micron Pen.

Final touch was to add three self adhesive sparkly gems.

Sid xx

Pin It
Related Posts Plugin for WordPress, Blogger...

