>
Showing posts with label Twig. Show all posts

Tuesday, October 10, 2017

Stags House .....


Here is a little house made as a standing Christmas decoration ....

I used a die and diecut the house parts from heavy card.  The roof was made from a strip of corrugated board.  The walls were covered in decorative papers before assembly.


The deer was stamped in black archival ink onto Kraft card and diecut.  This was mounted on the front of the house on a foam pad.  The star at the top was diecut and heat embossed in kaleidascope embossing powder.  The decoration was made from twigs, greenery and white cones tied together with natural twine.  A little bow of red gingham ribbon was then added with hot glue and the whole thing attached with hot glue.


The roof was daubed with white acrylic paint before distressing to remove some of the top layer of corrugated.  Finally very coarse glass glitter was adhered on hot glue on the roof and at the base to finish the house .....

Sid xx

Pin It

Saturday, April 22, 2017

Angelic Arch .....


Not seen many of these lately so I thought I might revive the idea by making a decorated Gothic Arch.

I started with a piece of white card trimmed to the shape of a Gothic Arch.  This was coloured using Starburst Stains spray in Delphinium Turquoise.  I added a few coats especially around the edges and as usual the Mica shimmer does not show very well on the photos.  Once dry I inked a heart stamp (Chocolate Baroque) with starlight silver Brilliance Ink and stamped stamped several times along the bottom of the card.


Next I took some sequin waste and applied moonlight white Brilliance Ink through it on the left and bottom edges.  This was dried thoroughly with the heat gun.  I then inked an angel stamp (Art Journey) with Versafine onyx black ink and stamped this centrally at an angle. The angel wings and hair were highlighted in places with a white Posca pen.


Next I took a piece or real lichen covered twig and attached this at the bottom of the angel image with hot glue.  To this I applied a little metal heart charm on a foam pad threaded through with silver ribbon round the twig as shown.


The whole arch was then matted onto silver mirri card which I stamped with a text stamp in black Stazon Ink.  This was then trimmed to leave a border around the coloured plate.  A small strip of card was trimmed with decorative scissors and coloured with blue ink and stuck in place at the bottom. Finally some pearl beads were used to embellish and were stuck in place with Glossy Accents as shown.

Let's have a revival of the Gothic Arch !!

I am also entering this piece into the April 'Take It Make It Challenge' over on the Craft Stamper Blog whose theme is 'Anything Goes'

Sid xx

Pin It

Monday, July 27, 2009

'Nature' Box

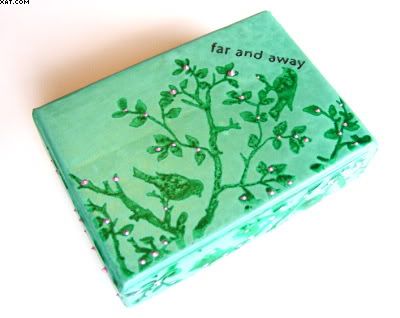
Here is a little box I have decorated for an altered swap over on UK Stampers Forum. The brief was to use something which had grown from the earth or in the sea and to turn it into a piece of art for swapping.

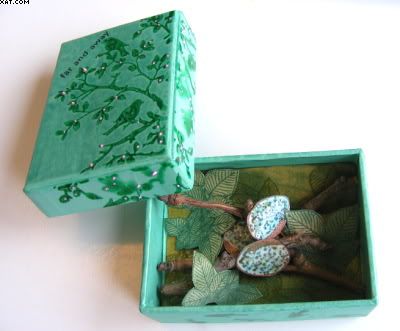
I had collected a piece of very lichen covered deadwood from under some trees ages ago and this has sat in my hall waiting to be used ! I had a plain box which is 8cm long x 6cm wide x 3cm deep. I painted it in a pale green semi-gloss acrylic all over and allowed to dry. I then used a couple of rubber stamps from Crafty Individuals (one a single bird and the other a branch with birds) in eden green Stazon on the top, 3 sides and all sides of the base of the box. Once dry I sprayed desert moon gecko green Glitz Spritz generously on all surfaces and allowed this to dry naturally. Once dry I added tiny blobs of pink Pearly Doodles dimensional paint to represent blossom on the leaves and branches on the top only. The words 'far and away' were stamped on the top of the lid in black Stazon. The mica shine does not show very well on the shots unfortunately, but they are quite shiny !


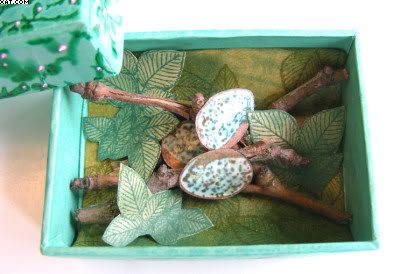
I then stamped 3 birds eggs (PaperArtsy) in vintage sepia and used a waterbrush and Marvey le Plume II pens to colour the eggs in green, blue and brown. Once dry I applied Versamark from the pen and heat embossed them with clear detail EP. I then trimmed them out carefully.


I wanted to make a leafy background and on a piece of beige paper stamped a leaf stamp (Crafty Individuals) onto a background made with Distress inks in pine needles, shabby shutters and peeled paint. Three of the leaves were trimmed out for decoration. The background was stuck in place with double sided tape.


I broke my twig into useable sized pieces and stuck these in place with clear silicone glue, arranging them to suit. The eggs and leaves were then shaped and also applied the same way to provide a 3D effect..........loosely resembling a birds nest ! I am quite pleased with the effect overall and its great to use natural pieces in your artwork too.

Hope you like it :-)

Pin It

Monday, June 22, 2009

'P' is for Party Tag


Another tag in the Alphabet series. This time it's 'P' for Party and rather than go for the usual party hats, clowns, baloons etc. I thought more Political and went for the Green Party - eco friendly so I though that green plants and flowers fitted the bill.

The tag was cut from oatmeal mottled card and was coloured with the wonderfully vibrant Nick Bantock inks from Ranger in chartreuse leaf and sapmoss green, applied with cut'n'dry foam and a swirling motion to achieve the shaded areas.

The stamps used on the body of the tag are a selection from PaperArtsy and Crafty Individuals. I wanted to achieve a relatively densely layered effect so I just overstamped many times using NB sapmoss green, Brilliance pearlescent ivy & starlight black inks. Some flower were stamped also and coloured with a waterbrush and Adirondack stream and cranberry inks as shown.

The main letter P was made from chipboard which was rubbed over with Versamark and triple heat embossed with dark green embossing powder. At the last layer the leaf stamp was inked with Brilliance sunflower yellow ink and whilst the EP was still molten the inked stamp was stamped into the EP on the letter and left for a few moments until the EP had set. Full instructions on triple heat embossing are available as a class on my blog by clicking HERE.

All the letters are K&Co and I trimmed them and edged with green chalk ink. These were stuck in place along with the main chipboard letter as shown. To finish a green eyelet was applied with the cropadile and a small piece of dry natural twig applied as a hanger. The tag was finished with an edging of green chalk ink.

This shot shows more detail of the letter P embellishment. :-)

Pin It
Related Posts Plugin for WordPress, Blogger...